
There may be times you find a particular aspect of your Canon Rebel's design illogical or maybe a tad inconvenient. If so, here are some customization options that help you fix pesky little problems.
Change the function of the Set Button.
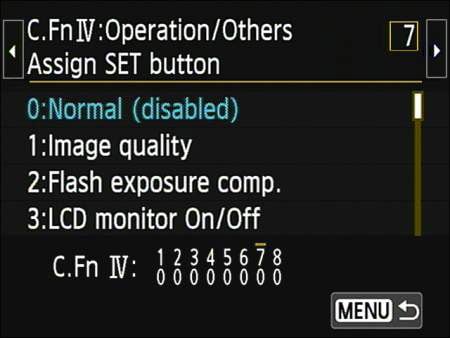
When you shoot in the P, Tv, Av, or M exposure modes, you can set the button to perform the following tasks when no menus are displayed:
Image Quality
Flash Exposure Compensation
LCD Monitor On/Off
Menu display
ISO Speed
You establish the button’s purpose via Custom Function 7. To activate the options, just tap one or press the Set button. To scroll to the fourth and fifth options, press the up/down cross keys or tap the arrows on the right side of the screen. Tap the Set icon or press the Set button to lock in your choice.
To go back to the default setting, return to the Custom Function menu and select option 0 (Normal).
Customize the AE Lock and Shutter Button.
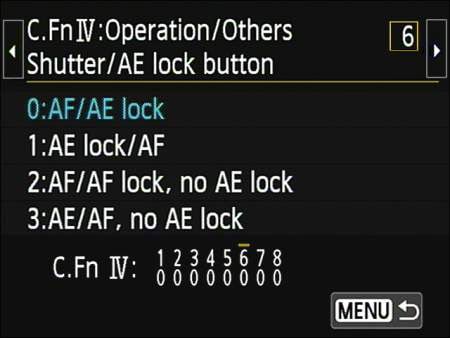
To configure the buttons, set the Mode dial to P, Tv, Av, or M. Then head for Custom Function 6. You can choose from the following configuration options. The part of the option name before the slash indicates the result of pressing the shutter button halfway; the name after the slash indicates the result of pressing the AE Lock button.
AF/AE Lock: Pressing the shutter button halfway initiates autofocus; pressing the AE Lock button locks autoexposure.
AE Lock/AF: Pressing the shutter button halfway locks autoexposure. To initiate autofocusing, you instead press the AE Lock button.
AF/AF Lock, no AE Lock: Pressing the shutter button halfway initiates autofocusing and exposure metering, and pressing the AE Lock button locks focus. Autoexposure lock isn’t possible.
AE/AF, no AE Lock: Press the shutter button halfway to initiate autoexposure and press the AE Lock button to autofocus.
Disable the AF-assist beam.
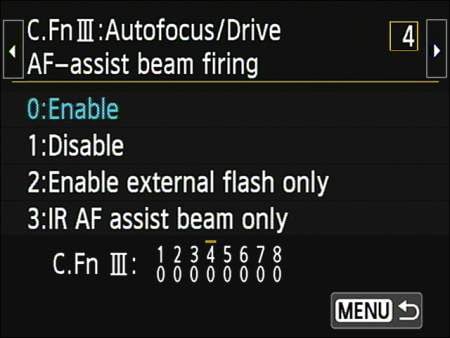
In dim lighting, your camera may emit an AF-assist beam from the built-in flash when you press the shutter button halfway — assuming that the flash unit is open, of course. This pulse of light helps the camera “see” its target better, improving the performance of the autofocusing system.
If you’re shooting in a situation where the AF-assist beam may be distracting, you can disable it in the P, TV, Av, or M exposure modes. Make the change via Custom Function 4.
Silence the camera.
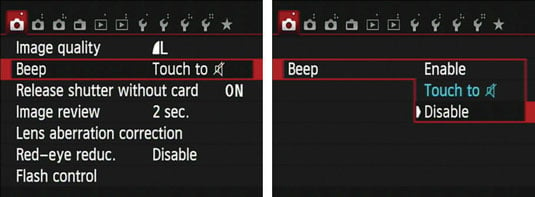
If you need the camera to hush up, set the Beep option on Shooting Menu 1 to Disable.
Note that if the option is set to Enable, you also hear a tone when you tap touchscreen-controlled options. If you don’t want to hear that tone but still want the non-touchscreen beeps, set the option to Touch to Silence.
Prevent shutter release without a memory card.
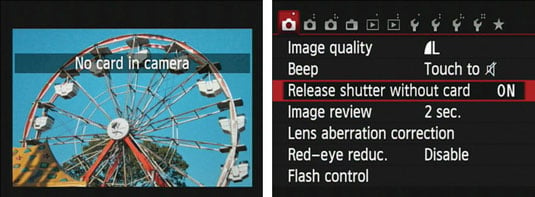
By default, you can take a picture without any memory card in the camera. That means when you press the shutter button, the camera will release the shutter to take a temporary photo that it stores in its internal memory. The picture appears on the monitor for a few seconds but then disappears and can’t be retrieved.
If you’re wondering about the point of this option, it’s designed for use in camera stores, enabling salespeople to demonstrate cameras without having to keep a memory card in every model.
Reduce the number of exposure stops.
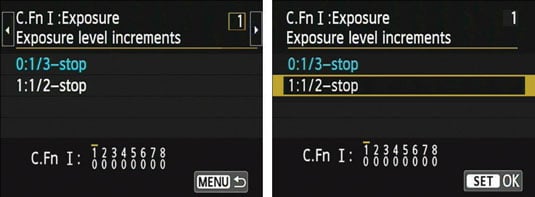
To increase exposure by one stop means to adjust the aperture or shutter speed to allow twice as much light into the camera as the current settings permit. To reduce exposure a stop, you use settings that allow half as much light. Doubling or halving the ISO value also adjusts exposure by one stop.
If you prefer, you can tell the camera to present exposure adjustments in half-stop increments so that you don’t have to cycle through as many settings each time you want to make a change. Make your preferences known via Custom Function 1.
Create custom folders.
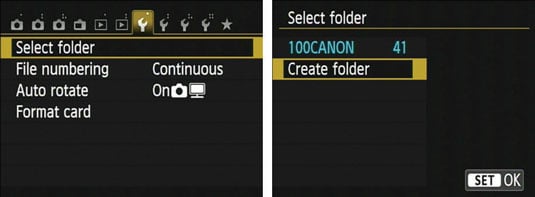
Normally, your camera automatically creates folders to store your images. If you want to create a new folder before the existing one is full, choose Select Folder from Setup Menu 1 and then choose Create Folder.
The camera asks for permission to create the folder; tap OK or highlight it and press Set. The folder is automatically assigned the next available folder number and is selected as the active folder — the one that will hold any new photos you shoot. Tap Set or press the Set button to return to Setup Menu 1.
To make a different folder as the active folder, choose Select Folder again, choose the folder you want to use, and tap Set or press the Set button.
Turn off the Shooting Settings screen.
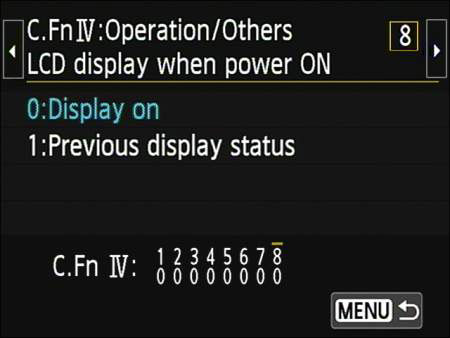
The monitor is one of the biggest drains on the camera battery, so limiting it to displaying information only when you need it can extend the time between battery charges.
To take advantage of this feature, set Custom Function 8 to Previous Display Status, exit the menus, and then press the shutter button halfway and release it. You get a temporary display of the Shooting Settings screen. Press the Info button to turn off the monitor and then turn off the camera.
Change the color space from sRGB to Adobe RGB.

By default, your camera captures images using the sRGB color mode, which simply refers to an industry-standard spectrum of colors. The sRGB color mode was created to help ensure color consistency as an image moves from camera to monitor and printer.
However, the sRGB color spectrum leaves out some colors that can be reproduced in print and onscreen, at least by some devices. So, as an alternative, your camera also enables you to shoot in the Adobe RGB color mode — which includes a larger spectrum of colors.
If you want to capture images in Adobe RGB instead of sRGB, you can make the adjustment via the Color Space option on Shooting Menu 2.