Realize that going into this hobby requires a real commitment on your part. You need to show concern at every step and on every level. Your fishes’ lives depend on your attention to detail.
If you’re a parent, and your children have an aquarium, it’s your responsibility to help them maintain the aquarium. You probably experienced the empty promises made by children who want a new pet. Make a game out of it and try to keep it fun. As soon as it starts to feel like work, you’re on your own.
Basic tasks need tended to on a regular basis. They’re listed as follows, and I cover them in detail in the following sections:- Vacuum the gravel.
- Clean and maintain the filters.
- Test your water quality.
- Conduct partial water changes.
How to vacuum your saltwater aquarium
Vacuuming is one of the most important parts of maintaining your tank. You must reduce the accumulation of detritus in the gravel so that your biological filters aren’t overwhelmed.Detritus is the combination of fish wastes and uneaten food that sinks to and decays on the bottom of the aquarium. If not removed, this organic waste breaks down into ammonia and overwhelms the nitrogen cycle. This will, in turn, disturb your water chemistry, snowballing into a series of problems that will ultimately harm your fish and invertebrates.
Detritus can be particularly damaging to an undergravel filter. Too much clogs the undergravel filter, preventing water flow through the gravel and reducing the filter’s ability to do its job.Although an aquarium vacuum is a nice piece of equipment, the old-fashioned garden hose also works to siphon wastes (see the section “Siphoning water” later in this chapter). If you choose to purchase an aquarium vacuum, sometimes called a substrate cleaner, more than likely you can find them at your aquarium dealer.
The most efficient way to vacuum your aquarium is while conducting a water change, because water is removed in the process anyway. This accomplishes two goals at once:
- Vacuuming detritus
- Removing water from the tank for replacement
When you vacuum, make sure you gently rake the gravel. If you have an undergravel filter, don’t mix it up too aggressively or you will disrupt the filter bed.
How to clean saltwater aquarium filters
Many filters have their own maintenance schedule. The level to which you clean your filter depends on the kind of filtration that it provides. A filter that’s strictly mechanical can be cleaned thoroughly to remove debris, whereas a biological filter shouldn’t be touched except to remove large detritus. Somewhere in the middle is the chemical filter, which should be recharged every month.Filters remove wastes from the aquarium and either retain them (mechanical and chemical filtration) or convert them to less harmful compounds (biological filtration). With the exception of the natural biological filtration of live rock, wastes accumulate in most filters until you remove them by cleaning.
In the following sections, I touch briefly on each filter, giving you a maintenance routine.Inside box filter
Although you may not be using inside box filters except in a quarantine tank (see Chapter 5), you can easily maintain them. Simply replace the activated carbon and the filter floss every month, retaining about half of the latter for the bacteria that they harbor.Sponge filter
Because the sponge in this type of filter provides the filter medium for mechanical and biological filtration, there are no other media to change. Sponge filters are easy to maintain by rinsing them in water every two weeks to a month, but be careful not to wash them out too thoroughly (keep those bacteria!).Undergravel filter
After a healthy undergravel filtration system is established, this filter can be used indefinitely without being disassembled and cleaned. There is no filter floss or carbon to change, and the only medium is the gravel itself. Nonetheless, debris does accumulate in the gravel, so the gravel needs to be vacuumed to keep the filter from clogging. Vacuum during routine partial water changes every two weeks.Every month, make sure that you check the airstones that power your undergravel filter and replace them if they’re clogged or crumbling. If you have powerheads, make sure the intakes are clear and the impeller inside is clean. I like to take them apart every month and clean the moving non-electrical parts under running tap water. If they have excessive buildup of coralline algae, soak them and other fixtures in white vinegar for a couple of hours; doing so will dissolve the calcium.
Power filters
Power filters are easy to maintain. Most have cartridges that can be replaced every two to four weeks, depending on bioload and waste accumulation. However, make every effort to retain 50 percent of the used filter media or use a sponge type medium so helpful bacteria aren’t lost. If your filter has two cartridges, alternate their replacement so bacteria are always present. Activated carbon should be replaced every month, as well.If your filter is equipped with a biowheel, you can retain bacteria even though you have to replace the internal filter media. Biowheels don’t need to be cleaned.
Filter impellers should be cleaned every month under running tap water so that they continue to run efficiently.
Canister filters
The canister filter contains compartments with various kinds of filter media, like activated carbon, filter sponges, filter floss, and ceramic bodies. The use of multiple filter media allows valuable bacteria to be retained when the filter is cleaned every month, depending on waste accumulation and bioload.When the canister filter is cleaned, the activated carbon is replaced, the ceramic bodies and filter sponges are rinsed and retained, and 50 percent of the filter floss is replaced.
The number of filter components depends on the brand of canister filter — many are available. Read the manufacturer’s instructions and follow its recommended maintenance schedule.
Don’t forget to check those impellers and clean them, as well.
Trickle filters and sumps
Trickle filters offer great advantages over other filter systems relative to filtration efficiency and effectiveness. In addition, they require little maintenance. Like the canister filters, you can find many brands, and the level to which you clean them depends on their components. Every month, replace the carbon and rinse the sponges and filter pads that are providing mechanical filtration. Bioballs and ceramic bodies can be rinsed every six months to a year.Live rock
The natural biological filtration of live rock needs little to no maintenance. As long as the aquarium remains healthy and circulation is maintained, live rock is self-cleaning and self-perpetuating. That’s why this natural choice of filtration is becoming so popular.Protein skimmers
Daily checks are required for the protein skimmer to make sure that it’s working properly and to empty the collection cup if needed. Airflow components, like airstones, air ports, and tubing, should be checked regularly and then cleaned and replaced as needed. Every month, clean the powerhead or water pump impellers, as well.Follow your manufacturer’s maintenance schedule so that your protein skimmer is kept running efficiently.
Testing, testing, testing (your water)
When you first set up your aquarium, testing the water every day is critical to monitoring the water-maturation process. As you begin to add fish, water chemistry will change radically, and water-quality monitoring remains essential for the survival of your fish. After this sensitive period, which can last several weeks, it’s still important to test your water. I recommend that you do so at least once every week. Doing so gives you a good understanding of the mechanics of the nitrogen cycle and tells you when the nitrates, carbonate hardness, pH, and other parameters are to the point at which a water change is needed. As for temperature and specific gravity/salinity, you should keep an eye on those parameters every day.Look out for sudden behavioral changes in your fish, fish disease, fish mortality, excessive algal growth, smelly water, and cloudy water. All these warrant an immediate water-quality test and possible water change.
Keep track of the results of your water testing in a journal so you can compare them to previous test results. If you notice a dramatic change since the last test in any water parameter, you may need to conduct a water change or make adjustments.How to change the water
Water changes are one of the most important aspects of cleaning and maintaining your aquarium. Waste products build slowly in your aquarium and the resilience of your water is slowly depleted. The only way to solve both of these problems is to physically change your water, removing the wastes and replenishing valuable trace elements.How much water and how often do you change it?
The typical preventative water change usually involves 10 to 20 percent of the tank’s volume being replaced with properly balanced premixed seawater. The added water, which should be the correct specific gravity and temperature, will also replace exhausted trace elements and nutrients. The amount you change varies with the quality of your water, the aquarium’s bioload (number of critters), and the frequency of water changes.Most experts recommend a 10 percent water change every week or a 20 percent change every two weeks. If your aquarium is crowded, your son Wilson has a tendency to overfeed the fishes, or you’re unable to change your water frequently, you may need to change a greater volume. However, if your aquarium isn’t heavily stocked, you’re careful when you feed, and you’re religious about water changes, you can get away with less.
I recommend that you start with a water change of 20 percent every two weeks and modify it either up or down depending on the type of filtration and water quality. For example, a 55-gallon saltwater aquarium with live rock or a trickle filter (wet/dry filter) and a protein skimmer can probably go longer between water changes.Keep an eye on nitrate levels because they tell you if you need to increase or decrease the frequency and volume of water changes.
How to siphon water
The best way to conduct a water change is to use an aquarium vacuum and a large plastic bucket. The vacuum has a large diameter tube attached to a siphon. The siphon is used to draw water from the aquarium, while the vacuum is thrust into the substrate, stirring the gravel and allowing detritus to flow out with the water into the bucket.The surface gravel should be stirred during every partial water change for two reasons.
- If you have an undergravel filter, stirring breaks up impacted areas in the filter bed where water flow has become restricted.
- Stirring puts detritus into suspension where it can be siphoned out with the old water.
When you change the water, make every effort to efficiently cover as much of the substrate as possible, but don’t rush over spots. If you can’t cover it all, make a mental note where you left off and start at that spot with the next water change.
If your substrate is sand, only move the vacuum over the top of the sand and be careful not to suck it right out of the tank.
These steps explain how to siphon:- Fill the tube completely with water, making sure no air is trapped in the tube. Ensure the siphon and your hands are clean. You can fill the hose by submerging it in the aquarium, but do this only if your aquarium is large enough to accommodate the hose without spooking the fish. Otherwise, place one end of the tube in the tank, put your mouth on the other, and draw the aquarium water that way to start the flow.
- Make sure the bucket end is lower than the aquarium, or siphoning won’t work. If you filled your siphon in the aquarium, plug one end of the hose tightly with your thumb, lift it from the aquarium, and bring it lower than the tank to the bucket.
- Release your thumb, and the water will begin to flow rapidly from the aquarium into the bucket. You can control the water flow by pinching the hose.
- Discard the water in the bucket.
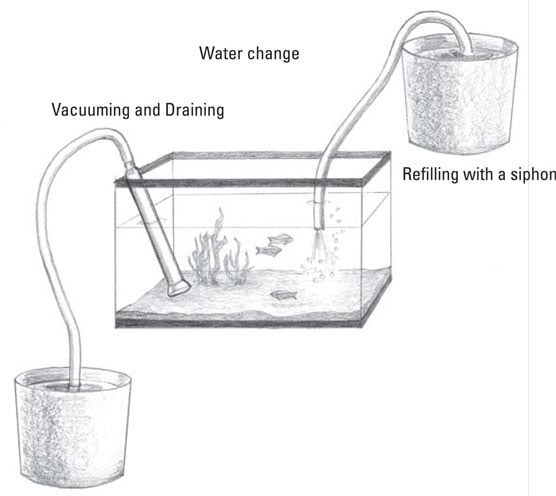 Use a siphon and vacuum to clean your gravel and change your water.
How to add water
When you need to add water, make sure you use premixed and conditioned saltwater that you store in a cool, dark place. Heat your replacement water to the same temperature as your aquarium and aerate it for about 15 minutes before conducting the water change.To add water, pour the premixed saltwater slowly into your tank, making sure not to disrupt the aquarium or its inhabitants.
Verify the water you add is the same temperature and specific gravity as the water in your aquarium.
Water out of your tap may be loaded with chlorine, chloramine, heavy metals, phosphates, and other ions. Many of these compounds are harmful to fish, so they need to be removed. This process is called water conditioning. It doesn’t hurt to read the water-mixing sections in Chapter 9 to review how to premix and condition salt water.
Your local water company routinely checks the water supply for these compounds. Check with them to find out what’s in your tap water.
How to top off your aquarium
Don’t confuse water changes with adding water that has evaporated from the aquarium. Depending on the amount of aeration and circulation that you have, you may have more or less water evaporation. When water evaporates, dissolved salts are left behind, and the specific gravity of the water increases.Pay attention to this process, because changes in specific gravity cause severe problems for your tank’s inhabitants.
Water evaporation is readily solved by adding freshwater, not premixed conditioned saltwater, to your aquarium. The water you add should be conditioned tap water. If you don’t have a lot of evaporation, the use of store-bought distilled water relieves you of the need to condition the water.Distilled water is pure water, that is, pure H2O without additives and toxic compounds.
Many aquarium shops sell filtered water specifically for saltwater aquariums.