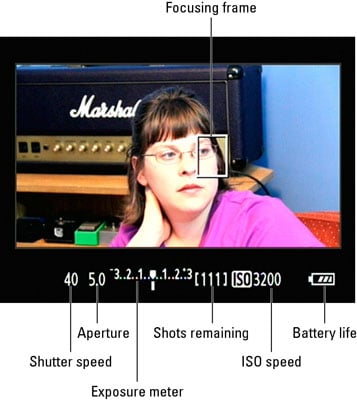
After you set the Mode dial to Movie mode on your Canon 60D, the viewfinder turns off, and you see your scene on the monitor. The same focusing frame you get in Live View mode appears, and the bottom of the screen shows the exposure meter, battery status icon, and shots-remaining value. If you press the shutter button halfway to engage the autoexposure meter, you also see the camera’s selected aperture (f-stop) and shutter speed.
As with Live View mode, you can press the Info button to change the display mode. This time, though, you have only four options: Display nothing but the focusing frame, show the exposure settings and battery level, see options, and add the electronic level.
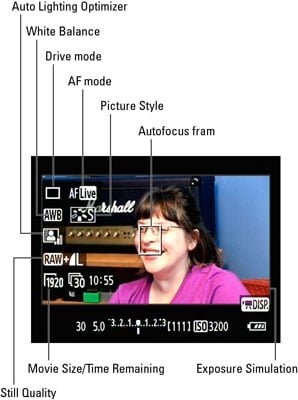
A couple of items in these two figures warrant a little further explanation:
The shutter speed, ISO, and shots-remaining values relate only to any still shots you may capture during a recording session. For movie recording, the camera controls the aperture, shutter speed, and ISO settings for you to determine the exposure (unless you’re manually controlling that aspect of the movie by enabling the Manual Exposure setting on Movie Menu 1).
The Picture Style and White Balance options work as they do for normal photography. Picture Style affects color, contrast, and sharpness; White Balance enables you to deal with lighting conditions that may create an unwanted tint or color cast.
The exposure meter works as it does when you take still pictures in the Creative modes, which is to say that it indicates the amount of exposure compensation that’s applied. This feature enables you to request that the camera adjust the brightness of your next recording. It also affects any still shots you take. If the little white bar under the meter is at the center position, as shown in the figures, no compensation has been applied.
The Movie Size/Time Remaining value shows you the recording size you selected along with the length of the movie that will fit on your memory card if you stick with that size.
The Still Quality setting indicates the Quality option that will be used if you take a still photo.
The Exposure Simulation icon works the same way as in Live View mode although the little symbol is different. If it appears white, as in the figure, you can expect your movie to be about as bright as the live scene you see in the monitor. In very dim or very bright light, the monitor may not be able to provide an accurate representation of the movie brightness and lets you know by dimming the Exposure Simulation symbol. The movie still records at the best exposure settings the camera can select, however.