
Homemade tapers candles are an easy, elegant gift idea for Christmas. Whether you make the taper candles short or tall, the candle-dipping process is straightforward: You dip both ends of a wick into melted wax, let cool, and repeat about 20 to 30 times. You don’t do anything special to create the tapered look; it just naturally happens.
![[Credit: ©iStockphoto.com/Kristian Septimius Krogh 2012]](https://www.dummies.com/wp-content/uploads/346126.image0.jpg)
Melted wax is extremely flammable, so use all cautionary measures when doing this project.
Follow these steps to create your own taper candles:
Figure out how tall you want each taper, add a couple of extra inches so that your wick protrudes, double that amount, and then add 4 inches for space.
When you make tapers, you usually dip in pairs, but you use only one wick. If you want to create a 6-inch taper, for example, then you take 6 inches plus 2 inches to get 8 inches. You multiply that number by 2 to get 16 inches (enough wick for two candles) and then add 4 inches to the total so that you have space in between the candle. (You don’t want the ends of your wick to touch each other when you dip.) So to make two 6-inch tapers, you need to cut your wick to 20 inches.
Tie a weight to each end of the wick so that it stays submerged and straight while you dip.
Rocks work just fine as weights. You remove these weights later when the wick is strong enough to stay straight.
Fill the bottom part of a double boiler with water and bring it to a rolling boil. In the top part of a double boiler, melt your wax to the package’s specified temperature.
When you dip candles, you usually use paraffin wax or a mixture of beeswax and paraffin. Either way, you probably need to add the usual 10 percent stearin. Melt twice the wax you think you need. You need to have plenty left over so that you have enough wax to dip in.
Dipping works best when your wax is approximately 160 F to 170 F.
Fill your dipping can with wax.
Make sure your dipping can is tall enough to accommodate the size of the candle you want to make. Also fill the dipping can fairly full so that you can dip almost all the way up the wick. You have to keep adding wax to the dipping can throughout the process to keep it full.
Dip your wick into your melted wax .
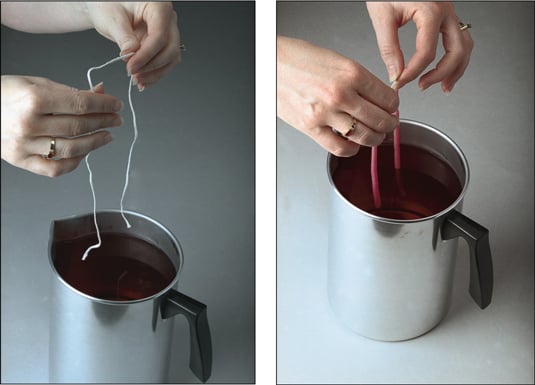 Dip the trimmed wick into the melted wax, let it cool, and then redip repeatedly until you reach your desired diameter.
Dip your wick deep enough so that you have only a couple of inches of undipped wick remaining. Don’t linger too long on this dip, though. You want your wick in the wax only for a second. Plunge it in and then remove it smoothly so that the wax doesn’t blob.
If your taper looks bumpy, your wax isn’t warm enough. If your wax isn’t building up on your wick, your wax is too hot. If the wax isn’t firming up enough between dips, you need to let it cool longer in between dips.
Place your wicks over a rack or dowel rod until they cool.
The cooling process takes approximately 3 minutes. Basically, the wax should feel cool to your touch.
Repeat Steps 5 and 6 until your candle is the diameter you want.
You may have to dip your candles 20 or 30 times or even more. Every time you dip, more wax builds up on your wick. Eventually, your wick becomes two tapers.
Let your tapers cool a few hours before handling them and trimming your wick to 1/4 inch.
In general, taper candles are 7/8 inch in diameter at the bottom so that they can fit into most candleholders. If you’re not using a mold, you probably need to cut the base of the candle down to that size.