
In any SLR camera (including the Canon EOS 60D), whether digital or film, light travels through the lens and is sent to the viewfinder by way of a mirror. When you press the shutter button all the way, the mirror flips up so that the light goes directly onto the image sensor, rather than being diverted to the viewfinder.
The problem with this system is that when the mirror flips, it causes a small amount of vibration. This vibration may introduce slight blurring in the photo, depending on the shutter speed you select. In general, slower shutter speeds (1/60 second and slower) are most susceptible to mirror-induced blurring, but many landscape and studio still-life photographers use their mirror lock-up feature religiously, no matter what their shutter speeds are, to capture the clearest, sharpest photo.
To reduce the effect of mirror slap-induced vibration, the 60D camera offers mirror lockup. When you enable this feature, the mirror movement is completed well before the shot is recorded, preventing camera shake.
To enable mirror lockup, take these steps:
Set the Mode dial to a mode in the Creative Zone.
Mirror lockup isn’t available in the fully automatic exposure modes.
Press Menu and navigate to the Custom Functions menu.
Scroll down to C.Fn III: Autofocus/Drive and press Set.
Press left or right on the multicontroller until you see C.Fn III-5, Mirror Lockup; then press Set.
Press up or down to highlight the Enable option.
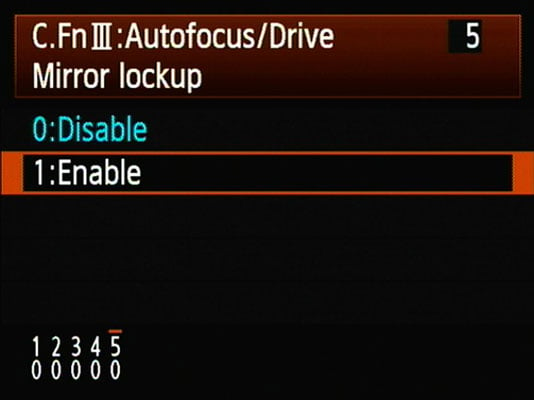
Press the Set button.
After you enable mirror lockup, you take a slightly different approach to picture taking. Use this technique:
Frame your shot.
If you’re using autofocus, press and hold the shutter button halfway to focus.
Or, if you prefer manual focusing, twist the focusing ring as needed to focus the image.
Press the shutter button all the way down to lock up the mirror. Then release the button.
At this point, you can no longer see anything through the viewfinder. Don’t panic; that’s normal. The mirror’s function is to enable you to see in the viewfinder the scene that the lens will capture, and mirror lockup prevents it from serving that purpose.
Press the shutter button all the way again.
The camera takes the picture.
Remember to disable the feature when you’re finished unless you plan on using it the next time you pick up your camera.
Using a tripod or another type of support is critical to getting shake-free shots when using slow shutter speeds, whether you are using mirror lockup or not. (Fireworks, night photography, and even shots in dimly lit interiors all require slow shutter speeds if you don't boost ISO through the roof.). For even more protection, set your camera to the 2-second self-timer mode, and take your hands completely off the camera after you press the shutter button in Step 3. The picture is taken two seconds after the mirror lockup occurs. If you purchased the remote control unit for your camera, you instead can trigger the shutter button using it.