How to draw heads
Start with a basic oval when drawing a head for your fashion drawings. Take a look at your head in a mirror. Ignore your facial features and hair, and see that your head is longer than it is wide — the definition of an oval. You can also think of the head as a large egg shape.Next, draw a face grid on your oval. Face grids have nothing to do with sports. A face grid is is a fancy term for a simple drawing tool that helps you establish the placement of the features of the face — you just draw horizontal and vertical guide lines that cross at the center of your oval.
The vertical line is a line of symmetry that marks the center of the face (down the nose), and the horizontal line is the figure’s eye level. Mapping out a face grid gives you a starting point when you’re looking at an empty oval that needs to be turned into a face. You don’t use measuring tools to place the facial features; just eyeball everything.
Some people prefer to curve the guide lines slightly, following the oval’s natural curve. A slight curve to your face grid adds dimension so that the facial features don’t appear to be rigid or flat. A slight curve gives facial features a more active feeling.
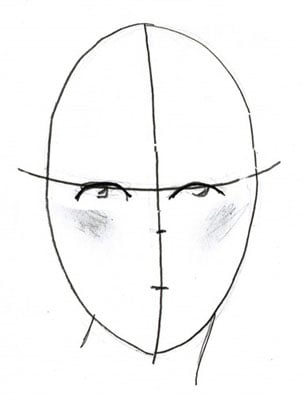
The eyeline is halfway down the head, so keep the horizontal face grid line in the center of the oval, or you’ll end up with eyeballs on the forehead!
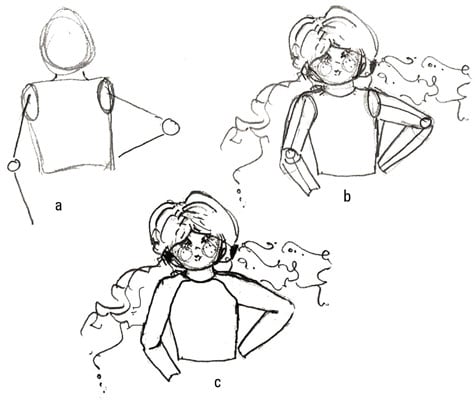
Drawing the neck and shoulders
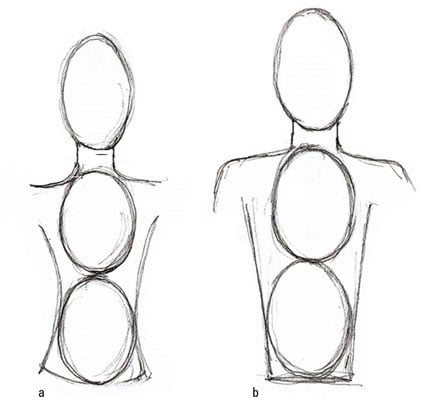
A fashion head is basically an oval to which you attach a beautiful upper body. Start with the neck and add in shoulders to see your fashion figure start to come alive. Breaking figure drawings down into basic geometric shapes and using lines of proportion solves half of your problems in creating figure drawings. You use your lines of proportion to guide you.Keep in mind that not all drawings include the entire body; you can end your figure at the waist, especially if you’re focusing on upper body clothing.
Get the trunk of the body started by drawing the neck and shoulders:
-
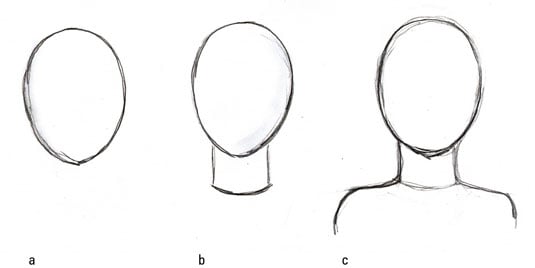
Draw an oval head shape.
-
Draw the neck by starting on both sides of the chin area and creating a short cylinder-like shape about one-third head high.
-
The shoulders, which are bigger for men than women, ease out of the neckline. They extend slightly beyond the head or about the length of two heads turned sideways, and they form the top of the arms.
Having a real-life model helps tremendously when you’re doing figure drawings. Go to a figure drawing class and work from a model if you can. If you can’t get to a class, grab a friend who’s willing to sit still. The advantage of drawing from real life is being able to see all the real body parts and proportions. If you can’t rope anyone into posing, buy a wooden mannequin at an art supply store to help you with form and shape.
Working on the arms
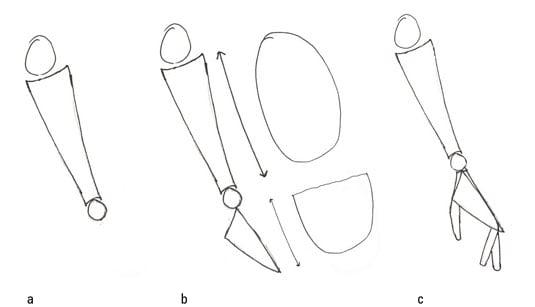
When making fashion sketches, you have to draw the arms in proportion to the rest of the body, or your drawing will look very off-balance. A common beginner’s mistake is to make the arms too short, so use the correct head count. Arms should be two and a half heads long, not including the wrists and hands.The elbows should line up with the waistline, about three heads from the top. Use your stick figure proportions as a guide to find the correct arm lengths.
Draw a figure's arm like this:- At the end of each shoulder line, lightly pencil in two cylinders for the upper and lower arms. A circle between the two represents the elbow, as shown in Figure a. The length of the upper arm is about one and a half heads, and the forearm is about one head long. End the first cylinder at the elbow, which is across from the waistline, as shown in Figure b. The waistline is three heads down. The second cylinder ends arounds the top of the thigh (or four heads down) and tapers down to where the wrist and hand begin.
- Turn the sides of the cylinders into gentle curves to represent the muscles, as shown in Figure c.

Drawing children's arms
Kids’ arms are short and rounded, and they’re always purely functional looking in fashion drawings. No kid frets about how his arms look the way teens and adults do. Kids’ arms are meant for climbing, playing, and carrying, not for posing or preening.No cartooning when drawing kids’ arms: You’re drawing fashion kids who look hip like their fashion-forward parents.
Here’s how to create arms for kids:-
Draw a child’s torso with a head and armholes.
-
Add short, straight arm lines with circles as elbows.
Keep the arms relaxed and not necessarily on the hips; kids tend to just let arms fall in a relaxed fashion. Bent elbows fall a little above the waist.
-
Add cylinders over the arm lines, keeping the circles to represent the elbows.
Children’s arms are shorter in length and rounder in width than adult arms, so keep them chubby and stubby!
-
Outline the child fashion figure and erase your initial lines.
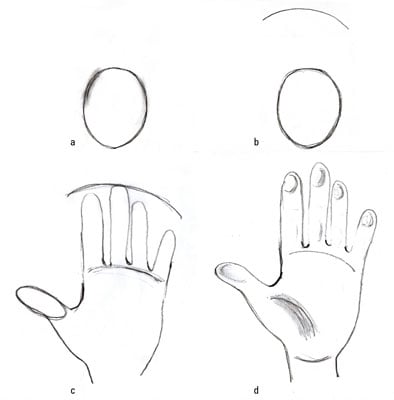
Adding the hands
Many new fashion artists hide the hands by sticking them behind the figure’s back or by drawing shapes that looks like paws. But hands don’t have to be so hard if you use basic shapes and curves.Follow these steps to create a flat hand with the fingers extended:
-
Draw an oval for the palm.
This oval should be a little less than half the length of your figure’s head.
-
Draw a parallel curve above the oval to show where the fingers end.
The distance between the curve and the top of the oval is approximately the same as the palm length. The total length of the hand is about three-quarters of the length of the head.
-
Lightly sketch in the fingers, using the top of the oval as the place where the fingers join the palm and the top curve for the fingertips.
The middle finger is the longest finger, with the pointer finger as the next longest. The ring finger is slightly shorter than the pointer finger (or the same length as the pointer), and the pinky finger, of course, is the shortest.
-
Add a cylinder-like shape for the thumb and shade for dimension.
Here’s how to draw the hand from the side:
-
Start with a circle for the elbow. For the forearm, draw a tapered cylinder that ends with a smaller circle at the end for the wrist.
-
At the end of the wrist, draw a triangle shape with one point of the triangle touching the circle of the wrist.
This triangle represents the hand, minus the fingers. The forearm is 1 head long, and the hand is about half a head long.
-
From the wide point of the triangle, add in a tube-type shape for the thumb. On the sharp point of the triangle, add two tube shapes bending from the end for the fingers.
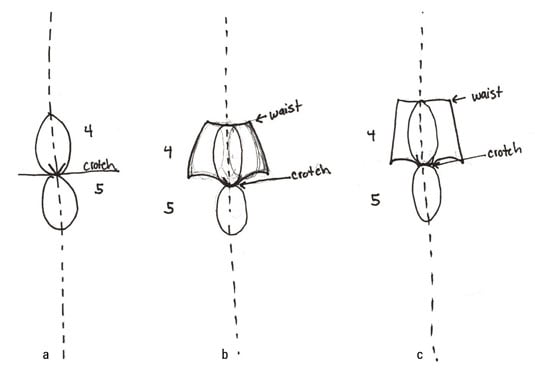
How to draw the waist and hips
Waistlines come in all shapes and sizes, even in fashion drawing, but the basics remain: a woman’s waist is curvy, and a guy’s is relatively straight. Hips are wider and curvier on women and straighter and thinner for men. Hips are the widest part of your lower half.To draw a waistline, check the lines of proportion and use the head count to properly place the waist.
To create the waistline:
-
Draw a figure and count down three heads.
-
Draw a horizontal line for the waist.
-
To shape the man’s waist, draw a line that starts in the armpit and angles down and in at the waist. For the woman, start the line at the armpit and create a line that curves in around the middle of the third head and then flares out, creating an hourglass shape.
Curve the line at the waist for a woman and keep the line straight but tapered in for a man.
To mark out the hips and pelvic region on a woman, follow these guidelines:
-
Starting at the bottom of the fourth head, draw a horizontal line for the crotch; place the V of the crotch on that line.
-
At the top of the fourth head, draw a curved line for the waist. Starting from the sides of the waistline, draw the sides of the lower torso: Use a line down each side, ending at the horizontal line for the crotch. Draw a couple of downward arcs to represent the tops of the legs.
In women, the hips are often just a little wider than shoulder width.
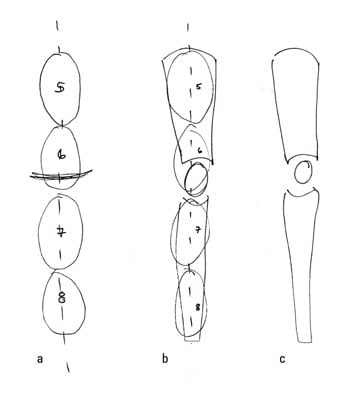
Working on the legs
Counting head lengths when drawing fashion figures works when dividing up the length of the legs. The entire length of legs in a figure drawing runs about four heads. The knee joints start within the sixth head.Men’s legs are thicker than women’s. Keep a woman’s leg long and curvy while making a man’s wide and straight with muscular calves.
Start drawing your figure's legs this way:-
Mark off four heads (ovals) to show the length of the leg.
The knee falls in approximately the bottom one-fifth of the second oval from the top.
-
Draw in two cylinder-like shapes over the four-head length, making the top cylinder slightly shorter than the bottom cylinder. Connect the two cylinders with a circle for the knee.
The knee circle should be about half a head tall. End the bottom part of the leg at the bottom of the eighth head.
-
Erase the head markings from Step 1, leaving the cyclinders and circle to create the leg shape.
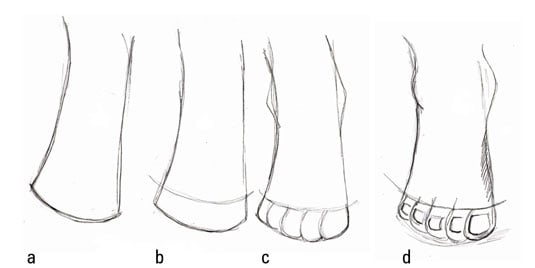
Feet are the foundation
Feet hold the body up, so don’t draw them too small on your fashion figure drawings — the length of your foot is about the length of your forearm, from the crease of your elbow to the start of your wrist. You can draw feet from many angles, but concentrate on the front and side views for now.Start your feet by drawing a hoof (as in animal) shape — don’t laugh, it works!
-
Lightly draw the outline of a hoof shape.
-
Inside the hoof shape, lightly draw a curve that follows the line of the front of the foot.
This line marks where the toes join the foot and determines how long the toes are.
-
Divide the space between the two lines into five toes, starting with the big toe, and sketch in the anklebones.
The anklebones are just slight triangle pieces coming out from each side — the anklebone on the inside of the leg is a little higher than the one on the outside. These bones work the same way on the both the right and left foot.
-
Draw in the toenails using curved lines and add shading by the arch of the foot and below the toes.
-
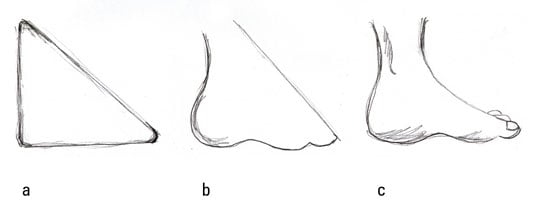
Draw a right triangle (about the length of a head) and round out the points.
-
Curve the right angle of the triangle to form a heel. Continue along the bottom of the triangle with a curved line for the bottom of the foot.
Curve the line up at about the midpoint of the triangle to form the arch of the foot. Then make a smaller indentation toward the front of the triangle to show where the big toe begins.
-
To complete the top of the foot, draw a curved line along the front of the triangle from the ankle to the toe.
-
Finish the foot by penciling in a toenail, the anklebone, and a little shading.