
One way to change Custom Functions of the Canon EOS 60D is to change what direction you move the control dials to increase or decrease shutter speed and aperture values. To do so, start by accessing your EOS 60D Custom Functions, navigating to the function of your choice, and amending the settings to change the control dial direction to your liking:
Set the Mode dial to one of the exposure modes in the Creative Zone (P, Tv, Av, M, B, or C).
You can’t adjust the performance of the Set button in the Basic Zone (Full Auto, Flash Off, Creative Auto, and Image Zone). Typically, you use the Set button to lock in menu selections.
Custom Functions won’t work in Movie mode either, and a few don’t work when you’re using Live View.
Press Menu to bring up the menu system, and then navigate to the Custom Function group (turn the Main dial or press the multicontroller left or right).
Although you can use either controller to move from menu group to menu group, rotating the Main dial is easy and intuitive.
Using the Quick Control dial (rotate) or the multicontroller (press up or down), highlight the custom function you want to explore.
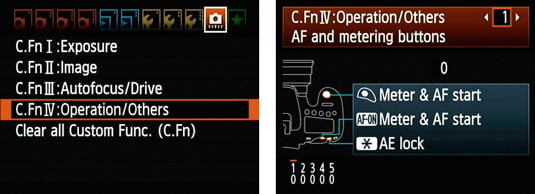
In this case, go for C.Fn. IV: Operation/Others.
Press Set.
You might not see your Custom Function yet. Don’t worry; you’ll take care of that in the next step.
Custom Functions are grouped into four categories. The category number and name appear in the upper-left corner of the screen; the number of the selected function appears in the upper-right corner and is marked with a bar at the bottom of the screen. The blue text indicates the current setting of the selected Custom Function. You also can see the number of the option that’s selected at the bottom of the screen, underneath the Custom Function number. A zero represents the default setting.
If necessary, turn the Quick Control dial or press the multicontroller left or right to scroll through the group’s custom functions until you reach the function you want.
In this case, you’re looking for Custom Function 3, Dial Direction During Tv/Av.
Press the Set button.
This activates the options and changes the focus from the function number at the top of the screen to the options. A highlight box appears around the selected option or option number. If that option appears in blue (as this one), it is also the active setting.

It’s easy to forget this step and wonder why you can’t change any of the settings. If you don’t press Set, you can’t change anything. It’s Canon’s way of protecting you from yourself.
Rotate the Quick Control dial or press the multicontroller left or right to highlight the option you want.
In this case, there are only two options: 0: Normal and 1: Reverse Direction.
Press the Set button to lock in changes.
Now whenever you’re in a Creative Zone mode, the dial directions that increase or decrease shutter speed or aperture are reversed. Normally, turning the dials clockwise or to the right increases their values (faster shutter speeds and larger apertures).
To revert to default settings for all Custom Functions, select the Clear All Custom Functions menu choice in Step 3.