But for figure drawing artists, shading is essential, because shading molds the body with lights and darks to create dimension. In the following sections, we show you how to use some basic shading techniques.
Shading in all the right places
Shading takes your drawing from a flat, paper-doll look to one with a three-dimensional feeling.To give a drawing form, shading can’t be random or haphazard. Some students are a bit too eager to add depth to their fashion illustrations and shade everywhere. Casting a shadow across an object requires a light source, whether you’re drawing realistic figures or fashion illustrations.
Here’s an exercise for you: Take a piece of fruit and put it on a counter on a sunny day. Notice where the sunlight is falling on it and observe the shadow cast over the rest of the fruit. Notice the shadow on the counter where the piece of fruit is resting as well. Now hold the fruit up to a light source.Again, you see the part farthest away from the light source fall into shadow.
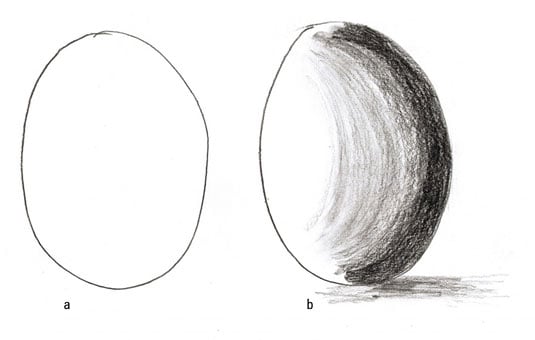
After you observe how shadows fall around an object, you can try to capture the shading on paper. Try giving volume to an egg shape:
-
Draw an oval to represent the basic egg shape.
For reference, put a real egg on your counter, shine a light on the side of it, and observe the highlights and shadows.
-
Use the side of your pencil to add shading to make the oval appear 3-D. Follow the curve of the shape you’re shading, and don’t forget to draw the shadow it casts on the counter!
The light source comes from the left side of the egg, so the right side falls into shadow.
Use a soft lead pencil to create shadows and then blend in your pencil marks with your finger. Blending with your finger is a wonderful technique to make your shadows smoother looking. Your fingers are valuable tools when comes to smudging and blending your shadow. Don’t be afraid of dirty hands!
Creating shine-on shades
In shine-on shading, you have a white area in the middle of dark or shaded areas. This technique is for more than shiny hair; you can use it to put the sheen in patent leather shoes and bags as well as on jewelry. Even eyes shine when you’re drawing close-ups of the face!You can create shine-on shading in two ways:
-
Erase dark areas. The eraser on the tip of your pencil (or any other eraser you have handy) works perfectly when you want to create the impression of shine. Map out a dark area with the side of your pencil. After you’ve blended in that dark area, simply drag your eraser through it to get a super highlight.
If you’re using your eraser to get that glow, don’t go too dark when drawing the shaded area. The darker the shaded area is, the harder it is to erase.
-
Leave an area white. The other way to achieve that special gleam on a darker shade that you’ve created with your pencil is to simply leave a white area within the darkened space. Pencil in a dark area, stop where you want a shine, and then continue with your dark blending after you’ve left a white space. You can work with vertical blends or blend along a curve.
This technique works with markers, too!
-
Darken an area using the side of your pencil and blend in that area.
-
Drag an eraser through the shaded area to create shine.
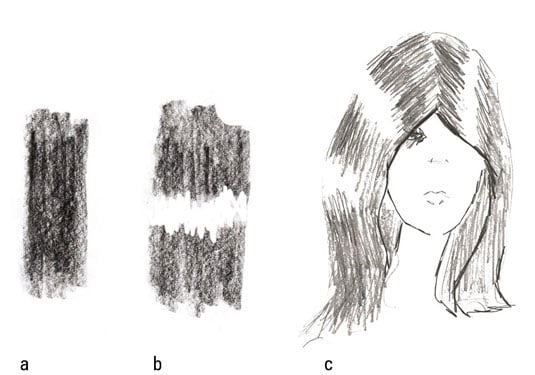
The best way to figure out which areas should be white is to think about where the light is coming from. If it’s from above, find the highest surface of your object. Notice the areas of white in her hair. The curve near the crown of her head creates a relatively flat, high surface for light reflection.
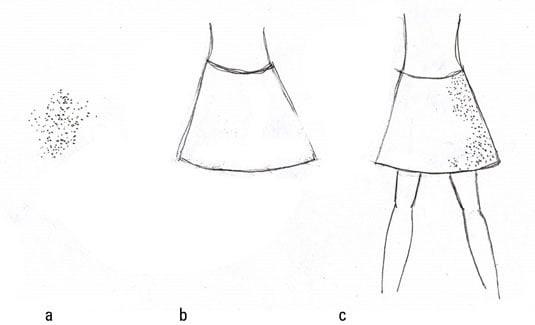
Stippling starters
Stippling involves tiny little dots — lots of them! Stippling is a wonderful way of shading without using pencil strokes or blending with your fingers. And stippling is easy, too. All you have to do is take your pencil and make a cluster of tiny dots using your pencil tip only, keeping them close together to get a dense look.Use stippling to add texture on clothes as they fall into shadow, not to shade in faces.
Try these step-by-step stippling instructions:-
Practice drawing a series of little dots in clusters.
Work slowly, because if you dot too quickly, your dots may end up looking like tiny little lines or small check marks. You want dots and dots only.
-
Draw a skirt shape.
-
Use your stippling technique to create shadow on the side of a skirt.
Think about where your light source is coming from when you’re deciding where to put the dots. In this example, the light is coming from the left.