
You have many reasons for working strictly in the TI-Nspire Graphs application or the Geometry application. Sometimes, however, it’s to your advantage to work in an environment that contains the best of both worlds.
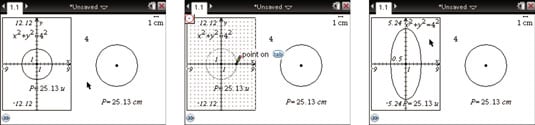
Objects behave differently in the analytic window. Here, you see two circles that have the same radius, but look quite different. The circle on the left was drawn in the analytic window, whereas the circle on the right was drawn in the Geometry work area.
Following are the steps to draw a circle with radius 4 outside the analytic window (in the Geometry work area):
Use the Text tool and press [4] to represent the length of the radius of the circle.
Press [MENU]→Shapes→Circle, press x to choose the location of the center, click the 4, and then click again to anchor the circle.
Caution! You will get an error message, Numeric entry not available in mixed views, if you try to type a number for the radius using the Circle tool. The following steps show another way to draw a circle with radius 4:
Press [MENU]→View→Show Grid to reveal a grid in the analytic window.
The grid corresponds to the tick marks located on each axis. A grid enables you to draw circles with a radius of exactly 4 units.
Press [MENU]→Shapes→Circle, press [CLICK] to choose the location of the center (the origin for this example), and then click the tick mark that corresponds to 4 units.
See the second screen. If you resize the circle, it will jump to other grid locations.
Press [MENU]→Actions→Coordinates and Equations to find the equation of the analytic circle on the left (you can right-click the circle and choose Coordinates and Equations). You can use this tool to find the equations of circles, lines, and tangents as long as they are drawn in the analytic window. If these same objects are drawn in the Geometry work area, the Coordinates and Equations option is not available.
Likewise, the Measurement (length) tool is used to find the circumference of both circles. Notice that the circumference measurement for the circle on the left is “unitless” (as indicated by the letter u), whereas the units for the circle on the right are given in centimeters.
Keep in mind that all measurements found in an analytic window are unitless; the scale displayed in the upper-right corner of the screen applies only to plane geometry objects.
Finally, in the third screen, the scale for the y-axis in the analytic window is changed, and the analytic objects changed accordingly. Keep in mind that two-dimensional objects will become distorted if you adjust the scale on only one axis. Did you notice that the circle on the right was unaffected by the change of scale in the analytic window? The aspect ratio is always 1:1 for plane geometry objects.
If you move a plane geometry object to the analytic window, it continues to behave as a plane geometry object instead of changing automatically to an analytic object.