When making bias strips for your quilt, you can either create one long strip or cut individual strips and then sew them together to get the length you need. You can use either of these methods to produce different types of bias binding.
To end up with a continuous binding strip, follow these steps:
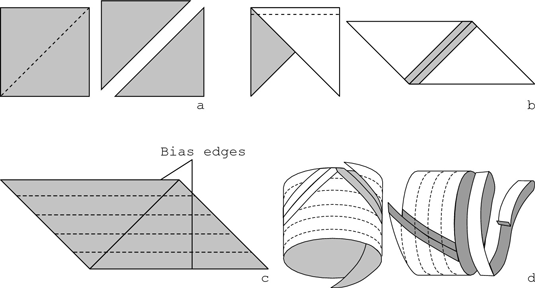
Cut a 44" x 44" square of fabric (with selvages removed) in half diagonally to make two large triangles (see a in the following figure).
The square is cut on-grain at this point.
 Making a continuous bias strip.
Stitch the triangles together along the short edges to make the shape shown in b in the preceding figure. Press the seam allowance open.
You now have a trapezoid shape with two bias edges (upper and lower).
Decide how wide you need the binding to be, and mark lines on the wrong side of the fabric using a ruler (refer to c in the preceding figure).
Stitch the short ends of the fabric together (right sides facing), off-setting the lines by one strip line to form a funny-looking tube (refer to d in the preceding figure).
Carefully press the seam allowance open.
With scissors, cut the binding in one continuous strip, starting at the offset overhang and cutting along the marked lines.