Many mistakes can be avoided altogether if you slow down. Going too fast is the most common pitfall that woodworkers fall into. You get in a hurry and get excited to finish a project. Don't do it. Not only will you be much more likely to mess up your project, but you could end up damaging something even more important — yourself. Hurrying is the number one cause of workshop injuries.
If you find yourself eager to hurry things along, take a break and remind yourself that hurrying could end up costing you more time in the long run if you have to fix a mistake — or take a trip to the emergency room.
Uneven or blotchy finish
Sometimes you get blotchy finishes from using an oil finish, such as Danish oil, or a stain. The finish turns out blotchy because the pores in some woods, such as cherry, take in differing amounts of the oil and have an uneven appearance.You can't correct this after the damage has been done, so you need to make sure that you plan for it before you start finishing. You can avoid this problem two ways:
-
Use a sanding sealer or other pore-filling product to fill the pores of the wood before you apply the final finish.
-
Use a finish that sits on top of the wood rather than absorbing into it. Varnish and shellac are two examples.
Drawers or doors that don't fit
Nothing is more heart-breaking than finishing your work on a cabinet and then trying to slide the drawer in, only to find out that the drawer is too big to fit the opening. Don't get stuck standing there baffled as to why this happened. After all, you followed the plans, right?The problem is that you followed the plans. Here's the situation: When you build the carcass of a cabinet, your measurements may be off by 1/32 inch here and there, for example. When you try to put the carcass together, very small discrepancies can add up to enough of a difference in overall size to make your drawer not fit right.
The solution is simple: Wait to make the drawers or doors until after your carcass in completely done. Then disregard the dimensions on the plan and work from the carcass itself. This ensures that your drawer or door dimensions match those of the carcass.
A table that rocks
More often than not, when you're done making a table, you'll find that it wobbles. (Thought they may not admit it, most woodworkers have had the same experience.)To avoid this problem, make sure that you cut all the legs to the exact same length. Put them on a panel-cutting jig and run them all through the table saw at the same time. You also need to make sure that you get the table perfectly square when you glue it up. Assemble the table leg/rail system in two stages: First, glue the short rails to the legs and then, after they've had a chance to dry completely, glue these two assemblies to the long rails. Check for square in both directions — across the top of the assembly and from leg bottom to opposite leg top.
Try as you might to get everything perfectly square from the start, some problems may occur. To fix a wobbly table after glue-up, adjust the length of the legs until you get them even. To do this, put the table on a flat bench and rock it to see which leg is the longest. Next, move the table until this long leg is off the bench. Push the leg tight against the edge of the bench and level the table. If this is the long leg, it will extend slightly down from the tabletop. Using a utility knife, score the point where the top of the bench crosses the table leg. Use a sander or plane to shorten the leg to this mark.
 © Shutterstock/Roman Samborskyi
Stain that doesn't take
The most common reasons that a stain doesn't take are that you used a non-staining wood filler or you have some glue that you didn't completely wipe off after assembling the piece.Both problems are easy to prevent but not as easy to correct. So make sure you use a wood filler that can take stain, and be sure to wipe off all the glue that oozes out of a joint when you assemble it.
If you do end up with an unstained spot on your project, apply some colored glaze (semi-transparent solution similar to thinned-out paints or stains) to the unstained area, adjusting the color and coverage until you get a match to the stained wood. Let it dry and then topcoat it.
Sanding that makes the wood fuzzy
Some woods, such as birch, get fuzzy when you sand them too much. The fibers of the wood tear and create hairlike fuzz on the surface of the wood. You don't want to stain or topcoat wood in that condition.If your wood does get fuzzy, go down a grit or two with the sandpaper (120-grit is a good place to start) and sand out the little furs. The way to avoid fuzzy wood is to make sure you don't sand with a paper finer than 150 grit. And don't use a scraper either.
Joints that don't fit together
You've taken great care to get joints that are tight, but when you put the glue on and try to pull the joint together, it doesn't go. Either you have joints that are too tight, or you pulled the joint together only partway and are experiencing "lock-up."To avoid overly tight joints, always dry fit first. If you have to, pound (or even moderately tap) the joint together with a mallet, you need to loosen the joint before you add glue to it. If your joint is a mortise-and-tenon, shave down the tenon slightly until you're able to pull the joint together by hand or with minimal tapping.
If the joint locks up on you when you're assembling it, you need to do some serious mallet tapping and clamping to get it to move again. Depending on how long the joint's been locked, you may not be able to get it to budge. Just avoid a locked joint in the first place, which is as simple as pulling the joint fully together when you first try to assemble it. Resist the temptation to partially attach the joint. Always attach a joint completely before moving to another one.
Tabletops that aren't flat
After all your effort in choosing, milling, and assembling board for a tabletop, you remove the clamps — only to find out that the tabletop isn't flat. Assuming your wood wasn't warped, cupped, or twisted, you have two possible reasons for your problem. Either the edges of the board weren't perfectly straight and square, or you applied too much clamp pressure when gluing the boards together.To avoid these problems, make sure that you use a jointer that is adjusted properly to make perfectly square edges on a board. Don't apply so much pressure to the clamps that the board starts to deflect up from the clamps. A clamp or two positioned on top of the boards can help this too.
To flatten an uneven tabletop, you need to plane and sand it flat. You will lose thickness in the board, so you may not want to go this route. Your best option is to cut the top apart at the joints and start over again. Take a deep breath — it's not as bad as it sounds, and it is far easier than trying to flatten with a plane and sander.
After the boards are separated again, joint them until they have square edges, dry clamp the edge joints and check for flat, then re-glue them using just enough pressure to bring the boards together.
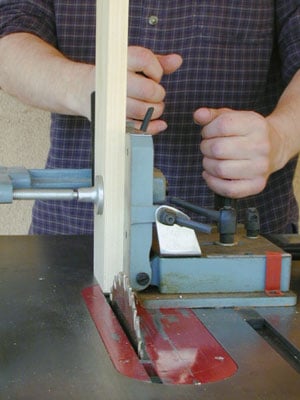
Wood that splits when being cut
Running a piece of wood through a saw sometimes causes tear-out, which is the result of the spinning blade grabbing the unsupported edge of the wood as the board leaves the saw. Tear-out occurs on the back edge of boards when you cut across the grain.The way to avoid tear-out is to put a backing board against the back edge of the wood when you cut. The backing board acts as a sacrificial board for tear-out. Also, if you have a board that needs both rip cuts and crosscuts, do the crosscuts first and the rip cut second. Because the blade is unlikely to cause tear-out on a rip cut, you don't have to worry about using a backing board.
Joints that are too loose
Sometimes a joint fits too loosely. If you're working with mortise-and-tenon joints, loose fit is a particular problem, because their strength depends on a tight fit between mortise and tenon.So what do you do if the tenon is too loose in the mortise? Well, aside from cutting a new tenon, using a glue that fills gaps works a lot of the time. Regular carpenter's wood glue won't work. You need an epoxy resin glue — a two-part glue that often expands as it cures to fill gaps in the wood.
Your other option is to glue a thin piece of wood to the tenon to make it bigger and then trim the newly sized tenon to fit the mortise.