
Self-Timer mode enables you to take up to nine pictures with one press of the shutter button, timing the frames at intervals of a half second to 3 seconds. If you want to record more frames or enjoy more flexibility over the interval between images, bail out of Self-Timer mode and instead enable Interval Timer Shooting.
With Interval Timer Shooting, you can record a whole memory card full of images and space the shots minutes or even hours apart. This feature enables you to capture a subject as it changes over time — a technique commonly known as time-lapse photography. Here’s how to do it:
Set the Release mode to any setting but Self-Timer or Mirror Up.
Those modes aren’t compatible with interval-timing shooting. You also can’t use the optional ML-L3 wireless remote control for this task.
Choose Interval Timer Shooting from the Shooting menu and press OK.
The screen on the right appears.
To begin setting up your capture session, highlight Now or Start Time.
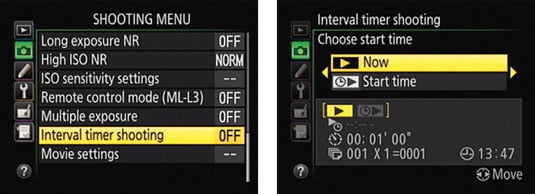
If you want to start the captures right away, highlight Now.
To set a later start time for the captures, highlight Start Time.
Press the Multi Selector right to display the capture-setup screen.
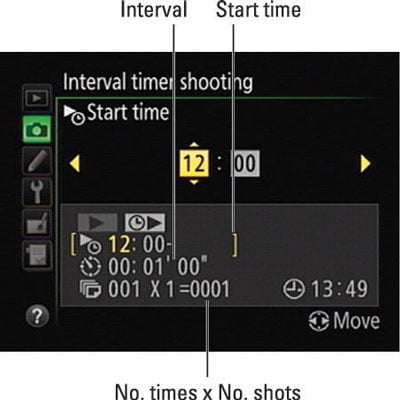
If you selected Start Time in Step 3, the screen looks like the one shown. If you selected Now, the Start Time option is dimmed, and the Interval option is highlighted instead.
Set up your recording session.
You get three options: Start Time, Interval (time between shots), and Number of Times x Number of Shots (determines total number of shots recorded). The current settings for each option appear in the bottom half of the screen.
At the top of the screen, value boxes appear. The highlighted box is active and relates to the setting that’s highlighted at the bottom of the screen. For example, in the figure, the hour box for the Start Time setting is active. Press the Multi Selector right or left to cycle through the value boxes; to change the value in a box, press up or down.
The Interval and Start Time options are based on a 24-hour clock. (The current time appears in the bottom-right corner of the screen and is based upon the date/time information you entered when setting up the camera.)
For the Interval option, the left column box is for the hour setting; the middle, minutes; and the right, seconds. Make sure that the value you enter is longer than the shutter speed you plan to use.
For the Start Time option, you can set the hour and minute values only. Again, the Start Time option is available only if you selected Start Time in Step 3.
The Number of Times value multiplied by the Number of Shots per interval determines how many pictures will be recorded.
Press the Multi Selector right until you see the screen shown.
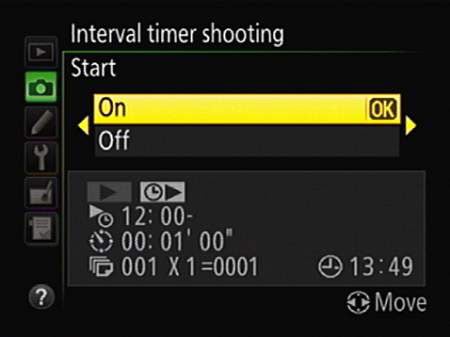
Highlight On and press OK.
If you selected Now as your interval-capture starting option, the first shot is recorded about 3 seconds later. If you set a delayed start time, the camera displays a “Timer Active” message for a few seconds, and then the monitor turns off.
Monitoring the shot progress: The letters INTVL blink in the Control panel while an interval sequence is in progress. Before each shot is captured, the display changes to show the number of intervals remaining and the number of shots remaining in the current interval.
The first value appears in the space usually occupied by the shutter speed; the second takes the place of the f-stop setting. You also can view the values at any time by pressing the shutter button halfway.
Interrupting interval shooting: Between shots, bring up the Interval Timing menu item, press OK, highlight Pause, and press OK. You can also interrupt the interval sequence by turning off the camera — which gives you the chance to install an empty memory card if the current ones are full.
When you turn on the camera again, reselect the Interval Timer Shooting menu option, press the Multi Selector right, choose Restart, and press OK to continue shooting. To cancel the sequence entirely, choose Off instead of Restart.
Autofocusing: If you’re using autofocusing, the camera initiates focusing before each shot.
Between shots: You can view pictures in Playback mode or adjust menu settings between shots. The monitor goes dark about 4 seconds before the next shot is taken.