
Raising goats for milk is part of a green lifestyle. If you don't think your hands are strong enough to hand-milk your goats, you have a problem such as carpal tunnel, or milking your goats by hand just takes too long, consider getting a milking machine. Small-scale dairy goat farms use a bucket milk machine rather than one with a direct line into a bulk milk tank.
A milking machine is a combination of several components that work together to create a vacuum that draws milk from the teats, alternating with air, which causes the milk to flow into a container in a rhythmic fashion, similar to a kid nursing.
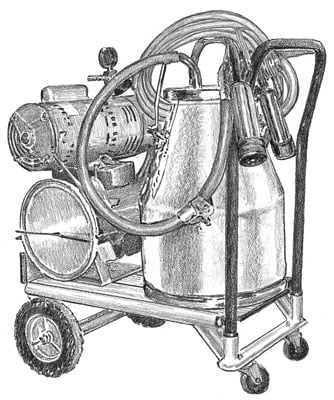
New ones are pretty expensive, but you can sometimes find a used one online for a reasonable price.
Like any skill, machine-milking takes practice. Try to find other goat owners who machine-milk so you can get an idea of what to expect from a milk machine and what using one entails.
Here are the steps for milking a goat with a milking machine:
Sanitize the milking machine with a sanitizer such as Clorox.
Turn the milking machine on and check that a vacuum is being created in each attachment before attaching the inflations to the doe.
Improper vacuum attachment can lead to mastitis. To check whether it is working effectively, listen to the machine for a hissing noise with the cluster vacuum shut off. If it is working properly, the hissing noise will decrease.
Secure the goat in the milk stand and give her some grain to eat.
Wash your hands.
Hand-milk one or two squirts from each teat into a cup.
This allows you to check for abnormalities and removes any milk close to the surface of the teat that is more likely to be contaminated with bacteria. If the milk is abnormal, dispose of it after milking.
Clean the udder and teats with warm water and soap, or sanitize with a wipe such as Milk Check Teat Wipes.
Thoroughly dry the udder and teats with a clean paper towel.
Never milk a wet udder; doing so can irritate the teats and lead to mastitis.
Place the teat cups of the machine on the goat's udder and then turn the vacuum on.
When the vacuum reaches the proper setting, the teat cups stay on the goat. You see milk begin to flow through the tubing to the container.
Remove the machine when you can no longer see a large volume of milk going through the tubing.
Make sure you keep an eye on the quantity. Over-milking can cause mastitis in machine-milked goats. The udder should shrink as you milk it, except during the first few days after kidding, when it may be swollen from the hormones released for kidding.
Hand-milk the last bit of milk to prevent disease and decreased milk production.
Milking the last bit of milk is called stripping.
Dip or spray the teats with a sanitizer such as Derma Sept Teat Dip.
If you use dip cups, use a clean one for each goat to avoid cross-contamination. If you spray the teats, make sure to thoroughly coat each teat end with spray.
Return the goat to the herd.
Make sure you have some fresh hay or alfalfa and fresh water available for the goat right after milking. She will eat and drink instead of lying down and exposing an open teat orifice to bacteria. The orifice gradually seals, protecting the goat from mastitis.
Clean the milking machine according to manufacturer's instructions.