 ©By Jeffrey M. Banke/Shutterstock.com
As long as you have a sunny location in an area where you get at least eight to ten weeks of relatively sunny weather and temperatures between 60 and 90 degrees Fahrenheit, you can grow cannabis outdoors. If your growing season is short, you can get a jump on things by starting your plants indoors and then transplanting your seedlings (after a brief hardening period). If you live in a warmer climate, you can simply plant your seeds outside after the threat of frost passes.
How to choose a cannabis grow site
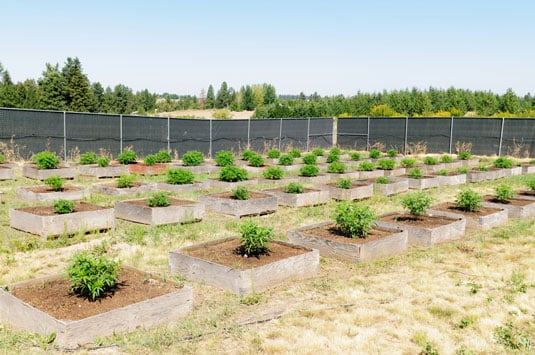
If you decide to grow outdoors, choose your grow site carefully. Consider the following factors:- Compliance: Your grow site must comply with all local rules and regulations. It must be private property owned by you. In most locations, your garden must be secure with a privacy fence and plants no taller than the fence. Any gates must be locked to prevent kids from getting to the plants and to discourage theft.
- Space: The amount of space you need depends on the number and types of plants you want to and are legally permitted to grow. Your plants will need to be spaced at least three to five feet apart, so they all get plenty of sun and breeze.
Think ahead. Will each plant have enough space when fully grown? Will plants shade other plants from the sun?
- Soil: Cannabis can grow in a wide variety of soil types, as long as the soil has sufficient drainage. If it doesn’t, you can amend the soil or plant in containers.
- Sunlight and darkness: Cannabis plants need at least five hours of direct sunlight plus at least five hours of indirect sun daily. They’ll reward you for more sun with a bountiful harvest. Also, don’t plant a photoperiod strain under or near a bright street lamp; otherwise, it may not flower properly.
Consider surrounding objects such as buildings and trees and how the angle of the sun changes over the course of the growing season. As a result, an area that gets full sun all day long during one part of the growing season may be shaded part or all of the day during another part of the growing season. Ideally, your grow site will get sun all day long throughout the growing season.
- Convenient access: You’ll be tending to your plants regularly and be eager to watch them grow, so pick a location with easy access. A backyard garden may be ideal.
- Access to water: Unless it rains every few days, you’ll need to water your plants regularly, so pick a site that has easy access to water.
Cannabis must be grown on private property, so you must own the land. Growing on public land, such as a national park or forest, is illegal.
Evaluate the soil
Prior to planting in an outdoor grow site, check the soil. Quality soil has the following characteristics:- Loamy: Loam soil is a combination of approximately equal parts of sand and silt along with relatively little clay. It retains moisture, but it also drains well, so plants aren’t sitting in saturated soil in which they’re susceptible to root rot and other diseases. Loam soil crumbles easily in your hands. If the soil is rock hard when dry, it contains too much clay. If it doesn’t hold together at all when you squeeze it into a ball, it may be too sandy.
- Fertile: Healthy soil also contains organic matter, such as decomposing wood and other plant matter. You can mix mulch and other amendments into the soil to increase its fertility, if necessary.
- Slightly acidic: You can use a pH meter to test the soil’s pH, which should be in a range of 5.5 to 6.5. Anything lower is too acidic, and anything higher is too alkaline.
- Alive: Good soil is home to many critters, including earthworms and beneficial bacteria and other microorganisms. If you don’t see anything crawling around in your soil, it’s probably lacking in organic matter.
Take a soup can of soil from several areas around your grow site to your local nursery or university extension office to have your soil tested. Test results show pH levels; levels of key nutrients, including potassium, phosphorous, and nitrogen; concentrations of organic matter; and so on. You may also receive specific recommendations on amendments needed to improve soil quality.
For a more thorough guide to evaluating outdoor soil, check out the free Willamette Valley Soil Quality Card Guide published by Oregon State University.
Decide whether to grow in-ground or in containers
When growing outside, you have the option of growing your plants in containers or in the ground. Sometimes, the choice is easy; for example, if the only place with enough sun is a concrete or wood deck, you have no choice but to grow in containers. If you do have a choice, consider the pros and cons of each option:- Planting in-ground is generally easier and more forgiving. With quality soil, you don’t have to worry so much about plants becoming root bound or developing root rot, and you may not have to water as frequently.
- Containers add height which may make your plants taller than allowed by law or taller than the privacy fence you built.
- If containers are too small, plants can get root bound, preventing them from absorbing the water and nutrients they need. In containers, plants may also be more susceptible to root rot if the plants don’t drain properly.
- You can move containers around if the sunny locations in your space change over the course of the growing season.
- If you have poor quality soil, you need to amend the soil prior to planting, which adds to the cost and work involved.
- In a container, you can easily customize your soil mix to create the perfect grow medium for your plants.
Harden off your marijuana plants
If you start your plants inside (in a grow room or on a windowsill), harden them off before transplanting them to an outdoor location. Hardening off is a process in which plants gradually become acclimated to the outside environment over a period of seven to ten days.Take your plants outside for 30 minutes or so on the first day and place them in a sheltered area where they receive indirect sunlight and perhaps a gentle breeze. Continue to increase this time by 30 minutes or so each day, gradually increasing their exposure to more direct sun. Watch your plants carefully for signs of heavy stress such as burning or wilting. Light stress is good, and it will accelerate the hardening off process, but heavy stress can kill a plant or severely impact its ability to flourish.
You should also harden off your plants against the cold. If frost is possible, keep the plants inside at night. Otherwise, gradually expose them to the cold nights. You may want to place them in a cold frame or under a box or bucket at first to provide some shelter from the cold without having to bring them inside, just be sure to uncover them the next day or they may overheat. Over the course of seven to ten days, they should be able to make it through a cool and frost-free night.
Support and protect your plants
When growing plants outside, you may need to provide them with support and protection from the elements, especially cold and frost as the summer growing season ends.First, focus on providing your plant with structural support throughout its growth cycle especially in the flower stage. The idea is to provide your plant’s branches the support they need to grow big fat buds without becoming too heavy and breaking off from the main stalk. Bamboo stakes, along with twine or Velcro plant straps, are great and provide a variety of ways to stake your plants, such as the following:
- Place a stake alongside the stalk, and tie the stalk to the stake.
- Place three or four stakes around the periphery of the plant, and tie branches that need support to the stakes. You can also wrap twine around the stakes to create your own “cage.”
- Place a row of stakes in front of or behind several plants, and then tie stakes horizontally to the vertical stakes (or weave them together) to create a trellis. You can then tie branches to the trellis.
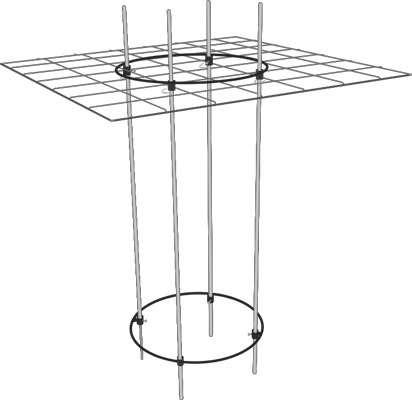 A ScroG kit.