When you manage a project in Smartsheet, you want to use a project sheet to manage the project’s schedule and tasks. In most projects, some tasks can’t be done until others are finished. Those are called dependencies, and the tasks that need to be finished before others can be started are called predecessors. Using dependencies and predecessors make managing the overall timelime for your project easier, because Smartsheet can automatically calculate start and end dates of dependent tasks based on the dates and durations of their predecessors.
To use dependencies and predecessors, you first have to enable dependences for the sheet. Here’s how:
Log in to Smartsheet and view the project sheet you want to modify. If you’re starting a new one, you can create a new project sheet from template.
Click the drop-down arrow under the Predecessors column and choose Edit Dependency Settings.
In the Edit Gantt Settings dialogue box (see Figure 1), under Dependencies, check the Dependencies Enabled dialogue box.
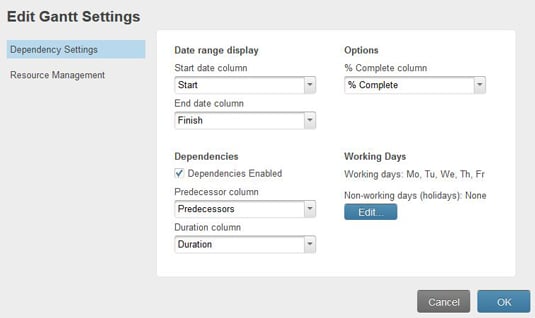 Figure 1: Enable dependences in your project sheet.
Source: smartsheet.com
The Predecessors and Duration columns should default to the correct columns. If not, make sure you choose the matching Predecessors and Duration columns.
Most of the other defaults for Date Range Display, Options, and Working Days should be fine, so leave as is.
If you have some nonworking days (such as holidays or vacations) you need to add, click the Edit button under Working Days. Type in or use the calendar to add the additional nonworking days and click OK.
Click OK.
Now, when you assign a task as the predecessor to another one, the start and finish dates for the dependent task automatically calculate based on the duration you set for the predecessor. Here’s how to do this yourself (see Figure 2 for reference):
In your project sheet, type in two separate tasks.
For the first task, click on the Start date cell and choose a start date from the calendar.
Click the Finish date cell and choose an end date for the task. The duration automatically fills in.
For the second task, click in the Predecessors cell and type in the row number of the first task. In Figure 2, the row number is 1. You see the start and finish dates automatically fill in, beginning after the finish date of the first task.
Change the duration of the second task, if it will take longer than one day. The finish date for the second task automatically updates based on the new duration.
And that’s it! You can continue to add tasks and specify predecessors and durations as you need to.
Make sure a predecessor is really predecessor; that is, the task really needs to be completed before the next one. If it doesn’t, then don’t assign a predecessor, because you won’t be able to modify the start and finish dates of the task if you do.

Source: smartsheet.com