Google Groups gives you the ability to classify the posts in your group into categories to make them easier for your users to find. Categories are a more formal way to add structure to your group; the categories you define display on the first page of your group. Your members must navigate into the category structure to find the subject area they want to post in.
To access the Categories settings for your group, follow these steps:
Log in to Google Groups and open the group you want to manage.
Click the gear icon at the top right and choose Group Settings.
In the left navigation, expand the Settings section.
Click Categories under Settings.
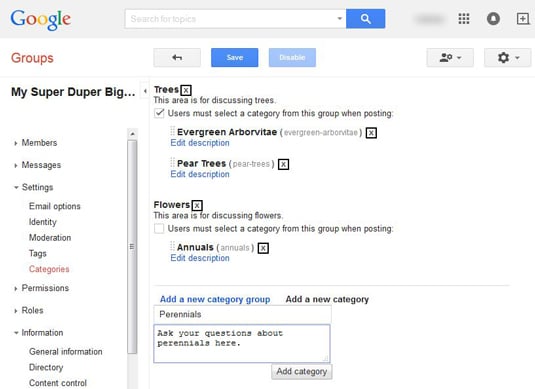
Categories are disabled by default, so the first thing you need to do in Categories settings is click Enable Categories. Then you see options for adding a new category group and adding a new category. The way this structure works is like so (with examples in parentheses):
First category group (Trees)
First category (Evergreen Arborvitae)
Second category (Pear Trees)
Second category group (Flowers)
First category (Annuals)
Second category (Perennials)
And so on. So, you create your category groups first as overarching subject areas, and then create your more specific categories under them. Note that a category group won’t display unless you have categories beneath it. You must click Save for your category structure to take effect. See Figure 1 to view this example.
Source: google.com
Here are a few tips for making the most of your category structure:
You can add helpful descriptions to your category groups and categories to help your members understand what they should discuss in them. You can either add the description when you’re setting up the groups or categories or you can add it later by clicking the Edit Description link below a group or category.
You can use the dots next to each category name to move the categories around. You can move categories to different groups or reorder the categories how you want. For example, you can place your most popular categories at the top for easier access. Just click and hold your mouse over the dots and drag the category where you want it.
You can require members to choose a category when posting by checking the appropriate box. This enforces your category structure.
You can delete a category group or category by clicking the X next to it. Unless you are doing a major overhaul to your structure, you may want to steer clear of this. Note that Google Groups does not warn you or ask if you’re sure you want to delete groups or categories, so use this with caution.
You can’t use both tags and categories at the same time; you have to choose one or the other. Enabling one will disable the other; if you decide to switch to tags later on, the work you’ve done setting up categories will be saved.