
The whole idea of using a tool like Buffer is to schedule your social media posts in advance, which you’d most likely do for business reasons, such as promoting a product launch or a company event that’s coming up. With Buffer, you can write and schedule a whole slew of posts at one time; Buffer will then release those posts to the specified social media channels at the times you want.
The various Buffer plans have limits on how many posts you can store. For the Individual plan, you can store only up to 10 posts per type of social media service (that is, 10 Twitter, 10 Facebook, and so on). For the Awesome plan, you can store up to 100 posts per social media channel, which might be good for a smaller business. But if you’re managing a lot of channels and scheduling tons of posts, then the Business plan is probably for you, which allows unlimited scheduled posts.
Just follow these steps to schedule a post for delivery:
Log in to Buffer and view your dashboard.
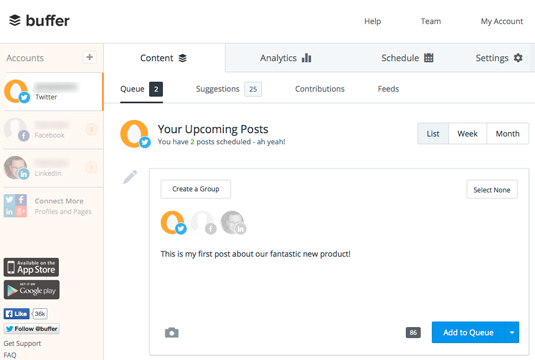
On the left, click the social media account you want to post from, such as Twitter or Facebook. Your browser displays your upcoming posts, with an area for what you want to share.
Type in the message you want to share. If you’re using Twitter, Buffer keeps track of how many of the 140 allowed characters per post you have left.
If you want to post the message to multiple accounts, choose additional accounts under the Create a Group button (refer to Figure 1). This means that your post will be released to all the channels you choose, which eliminates the need to copy the same posts into the other channels.
When finished, click the Add to Queue button. Your post is scheduled to be delivered at the next scheduled release time, as specified in your Settings.
If you want to fine-tune your scheduling at the time you’re adding the post to your queue, click the arrow next to the Add to Queue button. You see these options:
Share Next: This option schedules the current post to the next scheduled release time in your Settings.
Share Now: This option bypasses scheduling and posts your content immediately.
Schedule Post: This option also bypasses the regular scheduling settings and enables you to specify an exact date and time for the post. If you’re lining up a large number of posts for future delivery, you’ll probably be using this option mostly.
Your scheduled posts appear stacked in the list. You can reorder the posts by hovering over the conversation balloon, which changes to an arrow icon, and drag a post before or after another post.
When you’re creating and scheduling a large number of posts, it might be best to write all those posts in a word-processing program or spreadsheet first, so that you can just copy and paste the final posts into Buffer.
Source: buffer.com