You can transfer files between any of the TI-84 Plus C, TI-84 Plus, and TI-83 families of calculators. After connecting two calculators, you can transfer files from one calculator (the sending calculator) to another (the receiving calculator).
TI-84 Plus C calculator files are usually, but not always, compatible with the TI-84 Plus and TI-83 families of calculators. Apps, pics, and images are not compatible files. Most calculator programs will transfer, but functionality differences may cause problems in the execution of the program. If you try to transfer an incompatible calculator file, you will get the ERROR: VERSION error message as shown in the first screen.

To select and send files, follow these steps:
On the receiving calculator, press

You see a screen that says Waiting, and in its upper-right corner, a moving dashed line indicates that the receiving calculator is waiting to receive files. See the second screen.
Always put the receiving calculator in Receiving mode before you transfer files from the sending calculator! If you forget, you will get the ERROR: Error in Xmit error message as shown in the third screen. Notice the helpful messages at the bottom of the error message screen.
To access the Link SEND menu on the sending calculator, press

See the first screen.
Use the up- and down-arrow keys to select the type of file you want to send, and then press [ENTER].
The first screen shows the types of files you can send. The down arrow visible after number 9 in this list of menu items indicates that there are more menu items than can be displayed on-screen. Press

to view these other menu items.
If you want to send all files on the calculator to another calculator, select All+ and proceed to Step 4. If you select All–, you have the opportunity to select the files you want to send from an exhaustive list of every file that could possibly be sent!
Use the up- and down-arrow keys to move the cursor to a file you want to send, and press [ENTER] to select that file. Repeat this process until you have selected all the files in this list that you want to send to another calculator.
The calculator places a small square next to the files you select, as in the second screen. In this screen, lists L1, L3, and L4 are selected in the List SELECT menu:
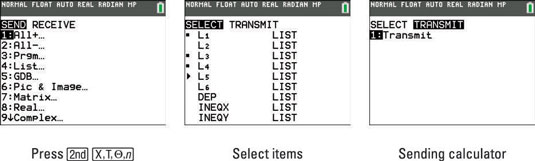
On the sending calculator, press the right-arrow key to access the Link TRANSMIT menu.
See the third screen.
On the sending calculator, press [ENTER] to send the files to the receiving calculator.
As files are transferred, you may receive the DuplicateName menu, as illustrated in the first screen. This indicates that the receiving calculator already contains a file with the same name. Because the default names for stat lists are stored in the calculator, you always get this message when transferring L1–L6, even if the list on the receiving calculator is empty.
When you get the DuplicateName menu, select the appropriate course of action:
If you select Overwrite, any data in the existing file is overwritten by the data in the file being transferred.
If you select Rename, a new file is created and stored under the name you specify, as in the second screen.
The A after Name = indicates that the calculator is in Alpha mode: When you press a key, the green letter above the key is displayed. To enter a number, press [ALPHA] to take the calculator out of Alpha mode and then enter the number. To enter a letter after entering a number, you must first press [ALPHA]. Press [ENTER] when you are finished entering the name.
When renaming a file that is being transferred to the receiving calculator, the calculator has a strange and confusing way of warning you if you already have a file on the receiving calculator with that name. When you press [ENTER] after entering the name, the calculator erases the name and makes you start over entering a name.
No warning message tells you that a file having the same name already exists on the calculator. If this happens to you, simply enter a different name.
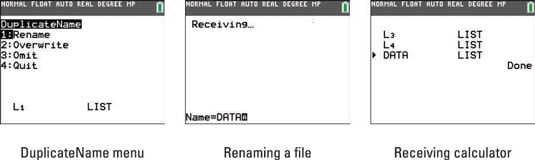
The third screen illustrates a completed transfer of files between two calculators. During the transfer of the files, L1 was renamed DATA.
If you want to terminate the transfer of files in progress, press [ON] on either calculator. Then press [ENTER] when you’re confronted with the Error in Xmit error message. If you put one calculator in Receiving mode and then decide not to transfer any files to that calculator, press o to take it out of Receiving mode or simply wait for the transfer to time out.