Creating a geometric construction can provide a rich mathematical experience, especially when used with the dynamic click-and-drag feature of TI-Nspire. To access the Construction menu, press [MENU]→Construction.
How to construct perpendicular lines on the TI-Nspire
To construct a perpendicular line, you must already have a segment, line, or ray. Then follow these steps:
Press [MENU]→Construction→Perpendicular to open the Perpendicular tool (you may want to hover over the icon in the upper-left corner of the screen).
Click the segment, line, or ray through which you want your perpendicular line to pass.
Move the cursor to an existing point or to any point on the screen through which you want the perpendicular line to pass.
As you move the cursor, notice that a ghosted image of the perpendicular line is displayed on the screen.
Press [CLICK] to set the perpendicular line in place.
Press [ESC] to exit the Perpendicular tool.
Steps 2 and 3 can be reversed.
The steps for constructing a parallel line are identical to those steps used to construct a perpendicular line. Just take out the word perpendicular and insert the word parallel.
How to use the Perpendicular Bisector tool
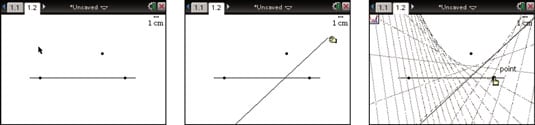
To use the TI-Nspire Perpendicular Bisector tool, you must have a segment or an implied segment (two points). Here, you are going to use the Perpendicular Bisector tool to construct a parabola. Insert a new Geometry page and follow these steps to construct the sketch:
Draw a horizontal line that will represent the directrix of the parabola. Press [MENU]→Points & Lines→Line. [CLICK], press [SHIFT], maneuver the line, and press [CLICK] to place the line.
Place a point above the line that represents the focus of the parabola. Press [MENU]→Points & Lines→Point. [CLICK] to place the point. Repeat this step to place a point on the directrix line.
Activate the Perpendicular Bisector tool: Press [MENU]→Construction→Perpendicular Bisector.
[CLICK] the two points that you just created, which are endpoints of the implied segment through which you want your perpendicular bisector to pass.
Your parabola will look better if you grab the ends of the perpendicular bisector and extend the line.
Use the Locus tool to create your parabola. Press [MENU]→Construction→Locus. [CLICK] the perpendicular bisector and then [CLICK] the point that is on the directrix.
Press [ESC] to exit the Locus tool.
How to use the TI-Nspire Angle Bisector tool
To use the Angle Bisector tool, follow these steps:
Press [MENU]→Construction→Angle Bisector to open the Angle Bisector tool (don’t forget about the icon located in the upper-left corner of the screen).
Click the three points that form your angle, making sure that the second point you select is the vertex of the angle to be bisected.
Press [ESC] to exit the Angle Bisector tool.
How to use midpoints on the TI-Nspire
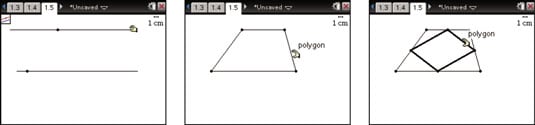
To use the Midpoint tool, you must have a segment or an implied segment (two points). Here is a math question for you: What shape do you get when you connect all four midpoints in a quadrilateral? To find out the answer, try construction on a trapezoid. Here are the steps to construct the shape:
Press [MENU]→Construction→Midpoint to open the Midpoint tool (notice the icon located in the upper-left corner of the screen).
Click the segment to construct the midpoint, or click the endpoints of the implied segment. Mark the midpoint for all four sides of the trapezoid.
Use the Polygon tool to connect the midpoints. Press [MENU]→Shapes→Polygon. [CLICK] each of the four midpoints, and then [CLICK] the first midpoint again to close the polygon.
Press [ESC] to exit the Polygon tool.