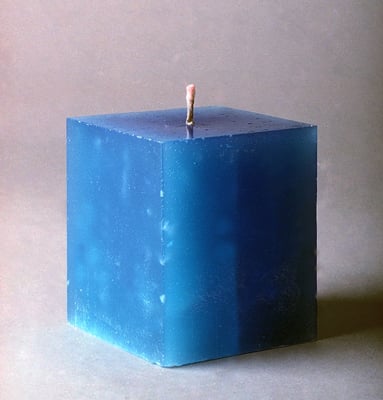
Homemade gifts are always appreciated. This basic molded candle is an inexpensive gift idea and even better, you can customize the candle colors and scents with your recipients in mind. Why not start a new Christmas tradition and give homemade gifts to family and friends?
After you choose your mold, figure out how much wax you need to melt by pouring water into your mold and then measuring the amount of water you used. For every 3.5 fluid ounces of water, you need 3 ounces of unmelted wax.
Some manufacturers label the mold with its wax capacity so that no measuring is necessary.
Metal-cored (lead-free) and paper-cored wicks are appropriate for this project. Use this list to determine the proper thickness for your wick:
If your mold is 0–1 inch diameter, you need extra small, 20 ply
If your mold is 1–2 inches diameter, use 24 ply
If your mold is 2–3 inches diameter, use medium, 30 ply
If your mold is 3–4inches diameter, use large, 36 ply
If your mold is 4 inches or more diameter, use extra large, 40-plus ply
To make basic molded candles, follow these steps:
Melted wax is extremely flammable, so use all cautionary measures when doing this project.
Fill the bottom part of a double boiler with water and bring it to a rolling boil. In the top part of a double boiler, melt your wax to the package’s specified temperature.
If you’re recycling wax or you’re unsure of the temperature, aim for 190 degrees F and maintain that temperature for half an hour.
Spray your mold with a mold release, such as silicone or vegetable spray.
Using a releasing agent helps you remove the candle from the mold.
If you make candles regularly, you may want to use commercial grade release spray instead of vegetable oil because over time, the vegetable oil can leave a film on your mold. However, if you make candles only on occasion, the vegetable oil spray works just fine.
Cut your primed wick so that it’s 2 inches longer than your finished candle’s height and then insert it into your mold.
A primed wick is one that you (or the wick manufacturer) have thoroughly soaked with wax. You can do Steps 2 and 3 prior to melting your wax, if you’re worried about time or you prefer not to multitask.
When your wax reaches the required temperature, add any additives.
Unless you’re using a flexible mold, add stearin in proportion to 10 percent of your wax. (If you’re using a flexible mold, use vybar.) Stearin and vybar help release the mold and bind the scent to the wax.
When you add these ingredients, your wax’s temperature will probably drop, so continue heating your wax a little longer until it reaches the proper temperature again.
Add color, or scent.
You can purchase candle scents at a craft store. Essential oils don’t work as well and can clog up the wick.
Craft stores also sell dyes. Although you can use pure wax crayons, the color won’t be as true and the crayons can clog the wick.
Remove your wax from the heat and slowly and smoothly pour it into your mold.
Be careful not to get any water into your wax.
Wait a few minutes and then gently tap the side of your mold to remove any air bubbles. As your wax cools, poke holes in the wax around the wick to release tension.
If you don’t, the wax pulls the wick off center and may create a concave section on the outside of the candle.
After your wax has cooled quite a while, reheat the extra wax you saved and pour it into any holes that have occurred as the wax cools.
This step is called a repour.
Let your wax cool almost completely and then do a second repour.
Don’t rush this step, though. If you repour the wax while the candle is still hot and liquid, you’re just adding more hot wax that has to shrink.
When you remove your candle from the mold, remember that the bottom of the mold now becomes the top of the candle.
After you’ve removed your candle from its mold, you’re ready to make your candle look beautiful. Using a craft knife or other sharp object, level off the bottom of the candle. Then, trim your candle’s wick. Use a paper towel or cloth to wipe around your candle and remove any extra wax. Congratulations! Your candle is ready to burn.