
Crochet thread is available in a variety of colors and fibers, so you can make a cuff for any occasion. Use a metallic thread to add bling for a night on the town or try a natural-colored cotton for a summer outing. Quick to stitch, you'll want to make one of these cuffs for you and all your girlfriends.
Materials and vital statistics
- Yarn: Coats & Clark Aunt Lydia's "Fashion Crochet Thread" size 3 crochet thread (100% mercerized cotton), Article #182 (1.3 oz. [37 g], 150 yds [137 m] each ball): 1 ball of #65 Warm Teal
- Hook: Steel crochet hook size 1 U.S. (2.75 mm) or size needed to obtain gauge
- Bowl or plastic baggie
- Fabric stiffener
- Paper towels
- 1-in. plastic shaft button
- Yarn needle
- Measurements: 7 in. long x 2 in. wide
- Gauge: Motif = 1-1/2 in. square
- Stitches used: Chain stitch (ch), slip stitch (sl st), single crochet (sc), double crochet (dc)
Directions
In a nutshell, here's how you make the Granny Square Cuff: Crochet one granny square motif completely; then make a second motif and join it to the first motif on the last round. Make and join two more motifs in the same manner to form a row of motifs. Easy as pie!The stitch diagram shows you where to join your motifs.
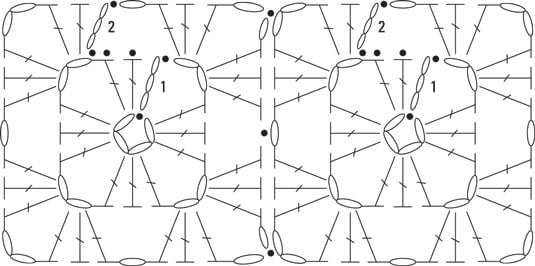
First granny square motif
Make 2 rounds of a basic granny square. Fasten off.Remaining granny square motifs
Rnd 1: Work the first round like you did for the first granny square motif.Rnd 2: Sl st across to first ch-2 sp, ch 3 (counts as first dc), work (2 dc, ch 2, 3 dc) all in same ch-2 sp, ch 1, work (3 dc, ch 2, 3 dc) in next ch-2 sp, ch 1, work 3 dc in next ch-2 sp, ch 1, holding both pieces with WS together sl st in corresponding corner of completed square, work 3 dc in same ch-2 sp of the current square, sl st in next ch-1 sp of completed square, work 3 dc in next ch-2 sp of current square, sl st in next corresponding corner of completed square, ch 1, work 3 dc in same ch-2 sp of current square, ch 1, sl st in top of turning chain to join. Fasten off.
Repeat these steps for a third and fourth motif forming a single row of motifs.