
The grown-up iPads (including the iPad mini) have a vibrant multitouch display. You'd be hard-pressed to find a more appealing portable screen for watching movies or playing games — and, yes, for appreciating photos.
Though the screen on the latest iPad mini is smaller, it boasts the same sterling Retina display of its larger siblings. And even the first generation iPad mini that Apple continues to sell is a first rate photo viewer, even with a somewhat lower resolution display. Images are crisp and vivid, at least those that you shot properly.
What's more, you can shoot some of those pictures directly with your prized tablet. The reasons, of course, are the front and rear cameras built into the device.
There are a few ways to start shooting pictures on the iPad. So we're going to cut to the chase immediately:
Fire up the camera itself. Choose one of the following:
On the Home screen, tap the Camera app icon.
From the Lock screen, drag the Camera icon from the bottom-right corner in an upward motion.
Drag Control Center up from the bottom of the screen and tap the Camera app icon.
Ask Siri to open the Camera app for you.
However you get here, your iPad has turned into the tablet equivalent of a Kodak Instamatic, minus the film, of course, and in a form factor that is obviously much bigger. The nearly 8-inch screen on the iPad mini provides a pretty sweet viewfinder.
If you're using a version of iOS prior to iOS 7 with your iPad mini, make sure the switch at the bottom-right corner of the screen is set to camera mode rather than video mode.
Keep your eyes peeled on the iPad mini display and use the viewfinder to frame your image.
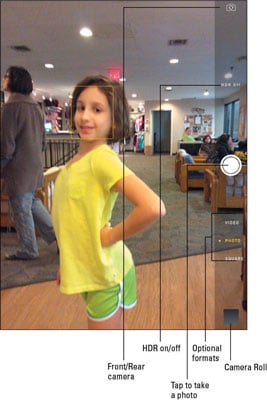
Select a shooting format.
Photo: Think snapshot.
Square: A picture formatted to make nice with the popular Instagram photo-sharing app.
Video.
You move from one format to another by swiping up or down along the right edge of the screen so that the format you've chosen is highlighted in yellow, with a yellow dot next to it.
Snap your image:
Tap the white round camera button. The button is at the middle-right edge of the screen whether you are holding the iPad in portrait mode or landscape mode. You'll be able to change the point of focus if necessary.
Press the physical volume up or volume down button. These buttons are on the side of the tablet (portrait mode) or at the top or bottom of the device (landscape mode). Just be careful not to cover the lens with your fingers.
The image you shoot lands in the Camera Roll in the lower-right corner of the screen.
Here are some tips for working with the camera app:
Adjust the focal point. Tap the portion of the screen in which you see the face or object you want as the image's focal point.
A small rectangle surrounds your selection, and the iPad automatically adjusts the exposure and focus of that part of the image.
Zoom in or out. Tap the screen with two fingers and spread (unpinch) to zoom in or pinch to zoom out.
The iPad has a 5X digital zoom, which basically crops and resizes an image. Such zooms are nowhere near as effective quality-wise as optical zooms on many digital cameras. Be aware that zooming works only with the rear camera still in Camera mode; it doesn't work with the front camera or when you shoot video.
See grid lines to help you compose your picture. Tap Settings→Photos & Camera→Camera and tap the Grid switch to turn it on (green instead of gray will be showing).
Grid lines can help you frame a shot using the photographic principle known as the Rule of Thirds (which means putting the photo's subject at one of the intersecting points drawn by dividing the frame into thirds).
Toggle between the front and rear cameras. Tap the Front/Rear Camera button on the upper-right corner of the screen.
We should point out that the front camera is of lower quality than its rear cousin, but it's perfectly adequate for the kinds of demands you put on it, including FaceTime and Photo Booth.
Shoot in HDR. To exploit a feature known as HDR, or high dynamic range, photography, tap the HDR button.
The HDR feature takes three separate exposures (long, normal, short) and blends the best parts of the three shots into a single image. In Settings (under Photos & Camera), you can choose to keep the “normal” photo along with your HDR result or just hang on to the latter.
Geotag your photos. The iPad is pretty smart when it comes to geography. Turn on Location Services and the specific location settings for the camera in Settings Pictures you take with the iPad cameras are geotagged, or identified by where they were shot.
Think long and hard before permitting images to be geotagged if you plan on sharing those images with people from whom you want to keep your address and other locations private — especially photos you're planning on sharing online.