
Through Apple’s Push Notification service, app developers can send you alerts related to programs you’ve installed on your iPad. Such alerts are typically in text form but may include sounds as well. The idea is that you’ll receive notifications even when the app they apply to isn’t running. Notifications may also appear as numbered “badges” on their corresponding Home screen icon.
The downside to keeping Push notifications turned on is that they can curtail battery life. And you may find notifications distracting at times.
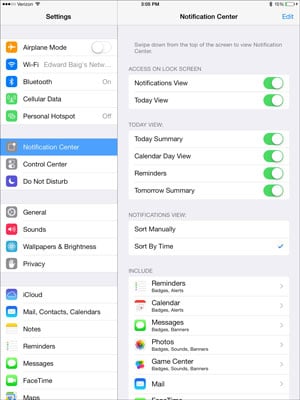
You no longer find a global On/Off switch for Notifications; beginning with iOS 5, you have to manage them on an app-by-app basis. To do so, tap Notification Center on the left side of the Settings screen and then tap the app you want to manage.
All installed apps that take advantage of Notification Center appear on the right side of the panel with the enabled apps displayed in the upper section (Include) and disabled apps in the lower section (Do Not Include).
Tap any app to adjust its settings.
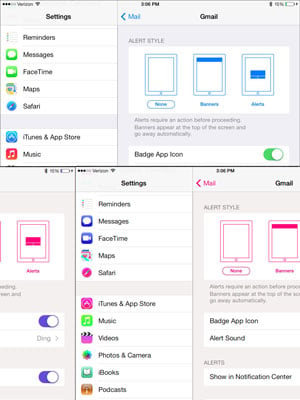
The figure shows the Notification settings for the Mail app (more specifically, Gmail). Some apps offer other options, including sound alerts, and other apps may offer fewer options. To help you get started, here’s a rundown of the options shown, starting at the top:
Alert Style: Tap to select the style of alert you want to see:
None: Choose None, and notifications won’t appear spontaneously. They’ll still be available in Notification Center (swipe down from the top of the screen) but won’t interrupt your work (or play).
Banners: Choose Banners to display alerts as banners at the top of the screen and have them go away automatically, as opposed to . . . .
Alerts: Choose Alerts to display alerts that require action before proceeding.
Badge App Icon: Enable this to display the number of pending alerts on the app’s icon on your Home screen.
Alert Sound: Tap this setting to choose the sound that accompanies notifications of new mail messages. (The Ding sound is selected.) But you can pick from a lengthy list of sound and ringtone alternatives and tap each possible choice to hear what the sound snippet sounds like. Or select None if you’re in the mood for total quiet.
Show in Notification Center: Tap the switch to enable or disable notifications for this app in Notification Center. Straightforward enough.
Show on Lock Screen: Enable this option if you want to see notifications for this app when your iPad screen is locked.
Show Preview: Enable this to see the first part of the mail or iMessage as part of the notification in Notification Center.
Apps that don’t take advantage of the iOS Notification Center can still offer notifications, but you’ll have to scroll down to the Apps section on the left side of Settings and tap the app you want to alter. Note that the app you hope to fiddle with doesn’t always appear in the Apps section of Settings. For that matter, many of the apps that do appear in the list don’t offer notifications anyway.
The broader point we’re trying to make is that we urge you to check out the settings for all the apps you see in this list. You’ll never know about many useful options if you don’t.
If you find you went overboard with notifications at first to the point where they become annoying or distracting, don’t fret. You can always go back and redo some or all of the notifications that you’ve set up.
You have a lot to say about Notification Center itself. You can determine whether to view it on the Lock screen, display the Today view, and (if you’re displaying that view) what to show in there (Today’s Summary, Calendar Day View, Reminders, Tomorrow Summary).
Apple understands that sometimes you don’t want to be bothered by notifications or other distractions, no matter how unobtrusive they might be. The result is a feature aptly named Do Not Disturb. Flip the switch so the setting is turned to On, and a moon icon appears in the status bar.
Then you can rest assured that your alerts are silenced until you turn the setting back to the Off position. Of course, it’s even easier to turn this setting on or off in Control Center.