
-
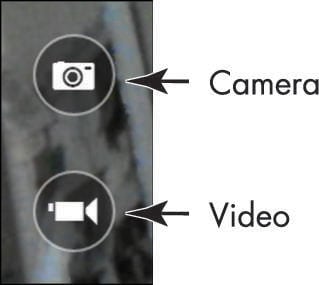
Click the Camera app tile on the Start screen.
-
Aim your laptop towards your subject matter and click the Camera button. The photo is captured.
-
Click the Video button to record a video.
-
Click the Video button again to stop recording.
When you take a photo, you can right-click on the picture. Buttons then appear that you can use to open the picture in an app such as windows Photo Viewer or delete it. If you take multiple pictures, use the arrows that appear when you move your mouse to the sides of the screen to scroll through the photos.
To adjust photo resolution or make settings for audio recordings when you're recording a video, right-click and then click the Exposure button to use a slider to adjust exposure brightness.
View a digital image in the Photos app
-
To peruse your photos and open them in the Photos app, click the Photos tile on the Start screen.
-
In the Photos app, double-click a photo library to display files within it. Double-click a photo to view it.
-
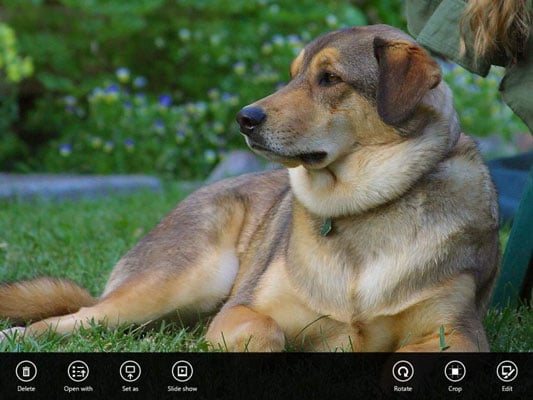
You can then right-click the photo and use the tools to do any of the following:
-
The Delete button deletes the selected image.
-
Click the Open With button to use another program, such as Paint, to edit the photo.
-
Click the Set As button to set the image as your lock screen image, the image background for the Photos app tile, or as an app background.
-
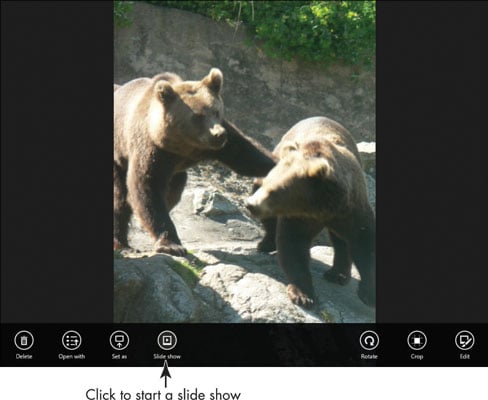
Click the Slide Show button to run a slide show.
-
Use the Rotate button to rotate the image 90 degrees at a time.
-
Use the Crop button to display handles you can drag to crop to a portion of the Image.
-
Click the Edit button to make changes to the photo.
-
Share a photo
-
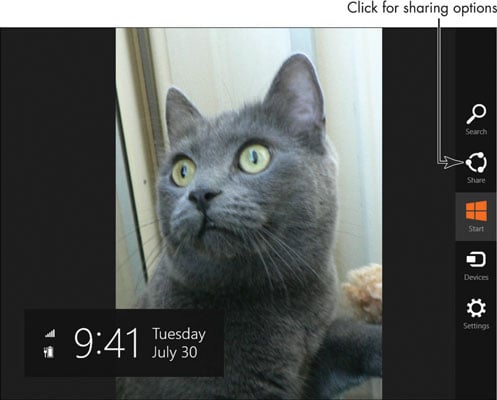
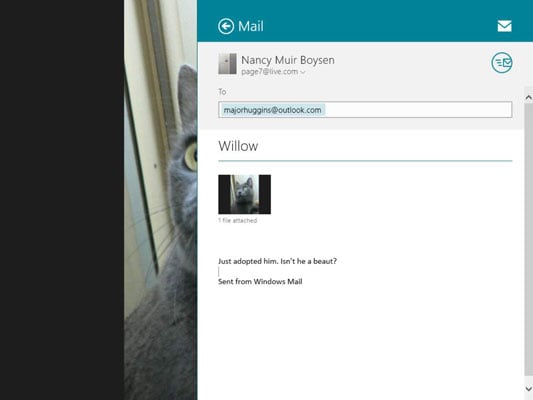
Click the Photos app tile on the Start screen. Locate a photo you want to share and then press Win+C.
-
Click the Share charm for more sharing options in Photos. Click Mail.
-
In the e-mail form that appears, enter an e-mail address or addresses, subject, and a message.
-
Click the Send button. An e-mail is sent from your default e-mail with your photo attached.
If your photo is large, consider clicking the SkyDrive link, if available, rather than Mail to upload it to your SkyDrive account and share it with the recipient.
Run a slide show in Photos
-
You can use Photos to play a slide show, which continues until you stop it. Click the Photos tile on the Start screen and click a photo album or library to open it.
-
Right-click and click the Slide Show button.
-
Click anywhere on the screen to stop the slide show.