
Make sure your Wi-Fi network is locked up tight
The first step in securing Alexa is securing the network that Alexa uses to access the Internet: your home Wi-Fi network. A secure Wi-Fi network is necessary because of a practice called wardriving, where a black-hat hacker drives through various neighborhoods with a portable computer or another device set up to look for available wireless networks. If the miscreant finds an unsecured network, he uses it for free Internet access (such a person is called a piggybacker) or to cause mischief with shared network resources.The problem is that wireless networks are inherently unsecure because the wireless connection that enables you to access Alexa from the kitchen or the living room can also enable an intruder from outside your home to access the network. Fortunately, you can secure your wireless network against these threats with a few tweaks and techniques:
Most of what follows here requires access to your Wi-Fi router’s administration or setup pages. See your router’s documentation to learn how to perform these tasks.
- Change the router’s administrator password. By far the most important configuration chore for any new Wi-Fi router is to change the default password (and username, if your router requires one). The administrative password is the password you use to log on to the router’s setup pages. This password has nothing to do with the password you use to log on to your Internet service provider (ISP) or to your wireless network. Changing the default administrative password is crucial because it’s fairly easy for a nearby malicious hacker to access your router’s login page and all new routers use common (and, therefore, well-known) default passwords (such as “password”) and usernames (such as “admin”).
- Change the Wi-Fi network password. Make sure your Wi-Fi network is protected by a robust, hard-to-guess password to avoid unauthorized access.
- Beef up your Wi-Fi router’s encryption. To ensure that no nearby mischief-maker can intercept your network data (using a tool called a packet sniffer), you need to encrypt your wireless network. Some older routers either have no encryption turned on or use an outdated (read: unsecure) encryption called Wired Equivalent Privacy (WEP). The current gold standard for encryption is Wi-Fi Protected Access II (WPA2), so make sure your router uses this security type.
- Check your network name for identifying info. Make sure the name of your Wi-Fi network — known as its service set identifier (SSID) — doesn’t include any text that identifies you (for example, “Joe Flaherty’s Network”) or your location (“123 Primrose Lane Wi-Fi”).
- Update your router’s firmware. The internal program that runs the Wi-Fi router is called its Reputable router manufacturers release regular firmware updates not only to fix problems and provide new features, but also to plug security holes. Therefore, it’s crucial to always keep your router’s firmware up to date.
- Create a separate Wi-Fi network for smart-home stuff. If your router supports multiple networks, set up one network for your regular web access and a second network for your smart-home devices. Home-automation gadgets tend not to be very secure, so by shunting them (and Alexa) off to a separate network, you keep your regular network safe.
If you create a second Wi-Fi network for your Alexa and smart-home devices, the Alexa app and any device manufacturer apps will be able to work only with their respective devices if the smartphone (or tablet) running the apps is also connected to that network.
Change Alexa’s Wake Word
In 2018, an Echo device surreptitiously recorded a conversation between a wife and her husband, and then sent that conversation to one of the husband’s work colleagues. Did Alexa have a grudge against the couple, or was it all just a series of unfortunate events? Happily, it seems to have been the latter (Alexa, so far as we know, can hold no grudges). Amazon’s explanation for the bizarre occurrence was that the following equally bizarre series occurred:- Alexa heard a word in the conversation that sounded like “Alexa,” the default wake word, so it began recording the conversation.
- Alexa subsequently heard a phrase in the conversation that sounded like “send message.” Alexa then asked, “To whom?”
- As the conversation continued, Alexa heard what sounded like the name of a person in the couple’s Contacts list. Alexa repeated the contact’s name and asked, “Right?”
- Alexa heard a word — such as “Yes” or “Right” — that it interpreted as confirmation, so it stopped recording and sent the conversation as a message to the contact.
Assuming that Alexa is not a sociopath, what can be done to prevent such an alarming privacy breach? Amazon says it’s working on ways to ensure that this series of events doesn’t happen again, but in the meantime, you can see that it all started with the Alexa device “hearing” the default wake word: “Alexa.” So, a good first step is to change the wake word to another word that you’re less likely to say.
There are three other possible wake words — Amazon, Echo, and Computer — and you choose one of them by following these steps:
- In the Alexa app, tap the Devices icon.
- Tap Echo & Alexa (or All Devices).
- Tap your Alexa device.
- Tap Wake Word. The Alexa app displays the Wake Word screen, as shown.
- Tap the wake word you prefer to use. The Alexa app warns you that it will take a few minutes to update your device to the new wake word.
- Tap OK. Alexa updates the wake word. Note that until the update is complete, you won’t be able to use your Alexa device or the voice component of the Alexa app.
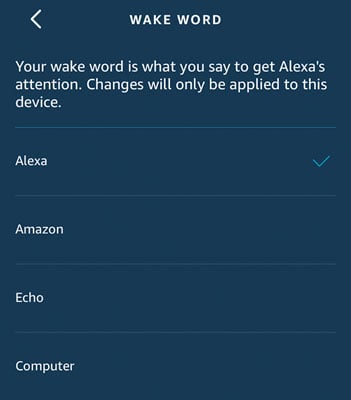 Use the Wake Word screen to tap the word you want to use to summon Alexa.
Stop Alexa from listening (and watching)
It’s unfortunate that Alexa doesn’t offer a way to specify a custom wake word. The problem is that the default wake word choices — Alexa, Amazon, Echo, and Computer — aren’t that unique, so it’s easy to invoke Alexa by accident. Letting you specify an unmistakable wake word — such as, say, “Beelzebub” or “rutabaga” — would go a long way to prevent accidental Alexa wakeups.Also, you should be aware that your Alexa device really is listening to everything you say. The device maintains a constant audio buffer — a one-second-long recording — that it monitors for the wake word.
Therefore, to prevent inadvertent wakeups or to prevent that creepy feeling of knowing the device is listening to you right now, if you know you won’t be using Alexa for a while, you should turn off the device microphone. You do that by pressing the Microphone Off button.
Another good reason to mute your Alexa device when you’re not using it is the so-called dolphin attack that researchers demonstrated recently. Broadcasting audio at a frequency too high for humans to hear (but within the range of dolphin ears, hence the name of the attack), the researchers were able to surreptitiously make Alexa devices dial phone numbers and take photographs.
If you have an Alexa device with a screen, it means you also have an Alexa device with a camera. However, device cameras are notoriously hackable, meaning some creep could gain access to the camera to watch you or take photos. When you mute your device, you also turn off the camera. But when you have the microphone on, it’s not a bad idea to be paranoid and turn off the camera if you don’t need it:- Swipe down the from the top of the screen.
- Tap Settings.
- Tap Device Options.
- Tap the Camera switch to Off.
Trash sensitive Alexa recordings
When you say Alexa’s wake word, your Alexa device begins recording everything it hears until your interaction is complete. You may think Amazon just deletes those recordings after Alexa is done with them, but that’s not the case. In fact, Amazon keeps your Alexa recordings indefinitely.Why would Amazon do such a thing? For the simple and innocent reason that Amazon uses your old voice recordings to improve your Alexa experience. Alexa “learns” your voice and your preferences, and that makes your Alexa interactions better every time you use it.
That Amazon has recordings of you asking for the time, the latest Death Cab for Cutie song, or breaking-wind sound effects may seem like no big deal. But as you get more used to having Alexa around, you may expose more private or sensitive information in your conversations, such as medical problems, legal issues, and financial preferences. If having those types of recordings stored indefinitely in the cloud somewhere gives you the heebie-jeebies (and it should), then you should delete your Alexa recordings.
You don't have to delete everything. That’s probably not a good idea anyway because it would almost certainly mean that your Alexa experience would get much worse for a while as Alexa relearns your voice and preferences. Fortunately, you can be selective about the recordings you delete. Here’s what to do:
- In the Alexa app, choose Menu →Settings.
- Choose Alexa Account→ Alexa Privacy.
- Tap Review Voice History. The Alexa app displays the Review Voice History screen, which by default shows your recordings made today.
- Use the Date Range list to select the recordings you want to review. Your choices are Today, Yesterday, This Week, This Month, All History, or Custom. If you go with Custom, use the controls that show up to select the day, month, and year for the Start Date and End Date you want to review; then tap Show. Each recording shows when the interaction occurred and on which device. Importantly, in most cases you also see the text of your Alexa voice command. If you want to hear the recording itself, tap the interaction’s Show icon (the downward-pointing arrow) and then tap the Play button. The figure shows a typical list of recordings.
- Choose how you want to delete the voice recordings:
- To delete individual recordings, select the check box to the left of each recording and then tap Delete Selected Recordings.
- To delete all the recordings in the current date range, tap Delete All Recordings for [range], where range is the current Date Range value from Step 4.
- When the Alexa app asks you to confirm the deletion, tap Yes. The Alexa app deletes your voice recordings.
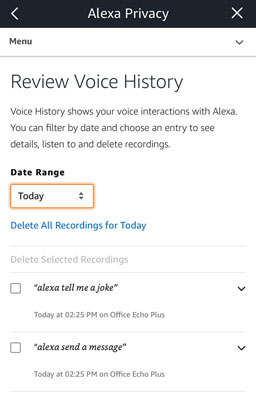 The Review Voice History screen shows your Alexa voice recordings from the selected date range.
Configure Alexa not to use your personal data
By default, Amazon Voice Services (AVS) uses some of your Alexa-generated data to improve and enhance Alexa. There are two types of data that Amazon uses to make Alexa better:- Voice recordings: When Amazon is developing a new feature for Alexa, it uses some of its customers’ voice recordings to “train” Alexa on that new feature. The more diverse that collection of recordings is, the more likely it is that the feature will work well for a broad range of users.
- Text messages: When you use a voice command to send a text message through your Alexa device, AVS transcribes that recording into text to ship to your recipient. AVS also uses your messages to analyze the accuracy of its transcriptions.
- In the Alexa app, choose Menu → Settings.
- Choose Alexa Account → Alexa Privacy.
- Tap Manage How Your Data Improves Alexa. The Alexa app displays the Manage How Your Data Improves Alexa screen, shown in the following figure.
- If you don’t want Amazon to use your voice recordings, tap the Help Develop New Features switch to Off. The Alexa app asks you to confirm.
- Tap Turn Off.
- If you don’t want Amazon to use your text messages, tap the switch that appears beside your name in the Use Messages to Improve Transcriptions section to Off.
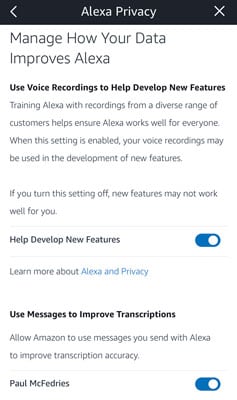 Use the switches on this screen to control what data Amazon uses to improve Alexa.
Shut down Alexa’s communications
Alexa’s communication features enable you to send messages, make voice or video calls, and drop in (with permission) on other Alexa users, or have them drop in on you. It’s undoubtedly convenient to be able to perform these tasks hands-free, but they do open up some security and privacy concerns:- Messages are received as an audio file. That’s sounds benign, but it may be possible for an attacker to fool Alexa into “playing” an audio file that contains malicious code.
- Enabling Drop In on your Alexa device means someone in your Contacts list could initiate a voice or even a video conversation with you without warning.
- Alexa requires access to your contacts, but if an attacker could somehow manage to access your Alexa device, then your contacts’ information would also be compromised.
Turn communications off
If you don’t use (or rarely use) your Alexa device to send or receive messages or drop-ins, you can make your device both more secure and more private by disabling all its communications features. Here’s how it’s done:- In the Alexa app, tap the Devices icon.
- Tap Echo & Alexa (or All Devices).
- Tap your Alexa device.
- Tap Communications.
- Tap the Communications switch to Off, as shown.
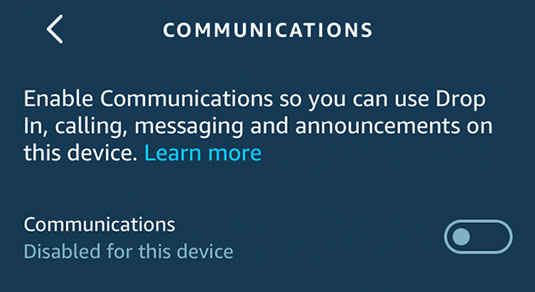 To make your Alexa device more secure and private, tap the Communications switch to Off.
If you only want to disable the intrusive Drop In feature, leave the Communications switch in the On position and instead tap the Off option in the Drop In section.
Revoke access to your contacts
If you’ve shut down Alexa’s communications features permanently, then you should also revoke Alexa’s access to your contacts because you no longer need them. Revoking access to contacts causes two things to happen:- Alexa no longer imports new and changed contacts from your mobile device’s Contacts app.
- The previously imported contacts are deleted from Amazon’s servers.
- In the Alexa app, choose Menu → Contacts.
- Tap Manage Contacts, which is the three-dots icon in the upper-right corner.
- Tap Import Contacts.
- Tap the Import Contacts switch to Off, as shown. The Alexa app asks you to confirm.
- Tap Disable. The Alexa app stops importing your mobile-device contacts, and your previously imported contacts are deleted from Amazon.
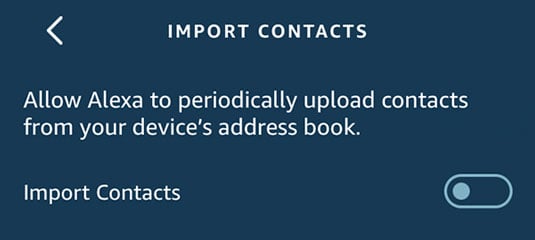 To remove your contacts from both Alexa and Amazon, tap the Import Contacts switch to Off.
Secure your Amazon account
Because everything Alexa does is tied to your Amazon account, your Alexa experience is only as secure as your Amazon account. Therefore, it’s vital to ensure that you’ve got your Amazon account locked down. Fortunately, that requires just two things: giving your account a strong password and turning on Amazon’s Two-Step Verification feature.Give your Amazon account a bulletproof password
Your Amazon account’s first line of defense is a strong password. First, get a bulletproof password figured out, and then follow these steps to change your existing Amazon password:- Surf to your country’s Amazon domain and sign in to your account.
- Click Accounts & Lists → Your Account. On other Amazon domains, you usually click Your Account →Manage Your Content and Devices.
- Click Login & Security.
- Click the Edit button beside the Password setting. Amazon displays the Change Password page, shown here.
- Type your current password.
- Type your new, strong password in the two text boxes.
- Click Save Changes. Amazon applies the new password to your account.
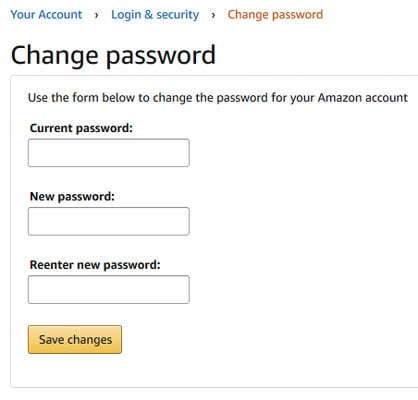 Use the Change Password page to change your Amazon account password.
Turn on Amazon’s Two-Step Verification
A password made of steel is a necessary security feature, but, sadly, it’s not a sufficient security feature. A malicious user may still worm his way into your account with guile or brute force, so you need a second line of defense. That line is a feature that Amazon calls Two-Step Verification (which is a more comprehensible name than what the rest of the Internet most often uses for the same feature: Two-Factor Authentication). The “Two-Step” part means that getting access to your Amazon account requires two separate actions:- Sign in using your Amazon account credentials.
- Verify that you’re authorized to access the account by entering a code that Amazon sends via text or voice to a phone number you control.
- Surf to your country’s Amazon domain and sign in to your account.
- Click Accounts & Lists → Your Account. On other Amazon domains, you usually click Your Account → Manage Your Content and Devices.
- Click Login & Security.
- Click the Edit button beside Advanced Security Settings. Amazon displays the Advanced Security Settings page.
- Click the Get Started button that appears to the right of the Two-Step Verification label. Amazon asks how you want to receive your Two-Step Verification codes, as shown.
- Select the radio button for the method you want to use. Most people select Text Message, but you can also select Voice Delivery to get the code through an automated call, instead.
- Enter the phone number, and then click Send Code. Amazon sends you a test code.
- Use the Enter the Code That Is Sent to Your Device text box to do just that, and then click the Verify Code and Continue button. Amazon displays some information about using Two-Step Verification on devices that can’t display a second screen to enter the verification code.
- Click Got It. Turn on Two-Step Verification. Two-Step Verification is now active on your Amazon account.
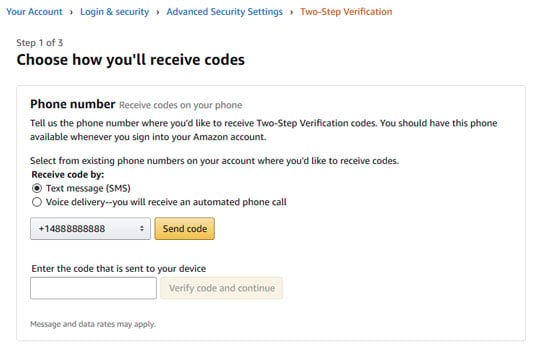 Use this page to specify how you want to receive your Two-Step Verification codes.
Delete your saved Wi-Fi passwords
Amazon’s Wi-Fi Simple Setup technology makes it easier to set up supported devices by automatically connecting them to your Wi-Fi network. That automatic connection works because Amazon stores your Wi-Fi network password on its servers. Amazon has gone to great lengths to ensure your saved network password is safe:- Amazon’s Privacy Policy states that it will not share your Wi-Fi password with a third party without your permission.
- The password is stored in encrypted form on the server.
- Devices that ask for network access are first authenticated by Amazon.
- When needed, the password is sent using an encrypted connection.
To allay these justifiable fears, you can delete your saved Wi-Fi passwords from Amazon and, optionally, turn off Wi-Fi Simple Setup. Here are the steps to follow:
- Surf to your country’s Amazon domain and sign in to your account.
- Click Accounts & Lists→Your Content and Devices. On other Amazon domains, you usually click Your Account →> Manage Your Content and Devices.
- Click the Preferences tab.
- Click Saved Wi-Fi Passwords. The Saved Wi-Fi Passwords settings appear, as shown.
- To remove your saved network password from Amazon, click Delete. Amazon asks you to confirm the deletion.
- Click Yes, Delete Permanently. Amazon deletes your saved Wi-Fi password.
- To prevent devices from using Wi-Fi Simple Setup, click Disable. Amazon asks you to confirm.
If you proceed with disabling Wi-Fi Simple Setup, you’ll have manually add all new smart-home devices to your network.
- Click Yes, Disable. Amazon disables Wi-Fi Simple Setup.
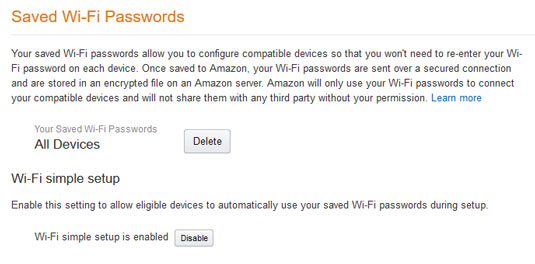 Use the Saved Wi-Fi Passwords page to remove your saved passwords from Amazon.
Revoke an Amazon Alexa skill’s permissions
When you enable an Alexa skill, you often have to give the skill permission to access some feature, such as your location, or to perform some action, such as display notifications. Some permissions can get a little annoying (for example, when a skill notifies you too often), but others are more of a problem on the privacy side (for example, when a skill asks for your location). If you no longer want a skill to have whatever permissions you gave it, follow these steps to revoke those permissions:- In the Alexa app, choose Menu→Skills & Games.
- Tap Your Skills.
- Tap the skill you want to work with.
- Tap Settings.
- Tap Manage Permissions.
- For each permission you want to revoke, tap the permission’s switch to Off.
- Tap Save Permissions.
Deregister your Alexa device
If you’re selling or giving away an Alexa device, you want to make sure the device is wiped clean of all your custom settings and personal info. You can do this by resetting your device.You also want to ensure that the device is no longer connected to your Amazon account, and that means deregistering the device with Amazon. If you have an Echo Show or Echo Spot, you’re all set, because resetting the device also deregisters it with Amazon. For other Alexa devices, you have two choices:
- In the Alexa app, choose Devices → Echo & Alexa, tap the device you’re getting rid of, and then tap the Deregister link that appears near the bottom of the Device Settings screen. When the Alexa app asks you to confirm, as shown, tap Deregister.
- Surf to your country’s Amazon domain, sign in to your account, click Accounts & Lists→Your Content and Devices (or Your Account→ Manage Your Content and Devices), click the Devices tab, click the Action button beside the device you’re getting rid of, and then click Deregister. When Amazon asks you to confirm, click Deregister.
 You see this dialog when Amazon asks you to confirm a device deregistration.