Before getting started, make sure you’ve installed Fitbit on the computer that contains the music and podcast playlists you want to transfer to your watch:
- Windows 10: You can use the Windows 10 version of the Fitbit app.
- Mac (or an older version of Windows 10 that can’t run the Fitbit app): You need to install Fitbit Connect.
Connect your Fitbit watch to Wi-Fi
The only way to upload audio playlists from your computer to your watch is through Wi-Fi, so your first chore is to connect your watch to the same Wi-Fi network that your PC or Mac is connected to. Follow these steps in the Fitbit app:- Click Dashboard→Account.
- Click your Fitbit watch.
- Click the Media tile.
- Click Manage Wi-Fi Networks.
- (iOS only) Click Next. The Wi-Fi Setup screen appears with a list of nearby networks.
- Click the Wi-Fi network you want to use.
- Type the network password, and then click Connect. Fitbit connects your watch to the Wi-Fi network.
Upload playlists to your watch
With your computer and your Fitbit watch eyeballing each other across your Wi-Fi network, you’re ready to transfer a playlist or three to your watch. How you proceed depends on whether you’re using Windows 10 or a Mac.You can transfer only playlists, not individual music tracks or podcast episodes. You can create on-the-fly playlists by using the Fitbit app or Fitbit Connect. However, you get more control if you create the playlists you want on your watch in advance by using Groove Music (Windows 10) or iTunes (Mac).
Uploading playlists from your Windows 10 PC
To transfer audio from your Windows 10 computer to your Fitbit watch, you use the Fitbit app. Follow these steps:- In the main navigation bar at the top of the Fitbit app, click the Media icon (musical note).
- Click Personal Music. Fitbit sets up a connection with your watch, and then displays a list of your Groove Music playlists.
- Wake your Fitbit watch.
- Swipe left until you see the Music app, and tap Music to open the screen shown.
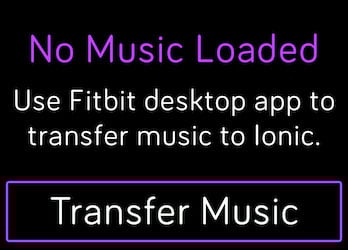 To put your watch into Transfer Mode, tap Transfer Music.
 - Tap Transfer Music.
Later, after you’ve added one or more playlists, you’ll need to scroll to the bottom of the Music app to see the Transfer Music button.
To create a new playlist by using the Fitbit app, click Create New Playlist, click the added playlist to open it, then drag music from Groove Music and drop it inside the playlist.
- Select the check box for each playlist you want to transfer to your watch.
When you select a playlist, Fitbit immediately begins the process of uploading the audio! Therefore, don’t select a playlist unless you’re sure you want to upload it.
Depending on the number of music tracks and podcast episodes that you’re uploading to your watch, it can take an hour or more to complete the transfer. Keep your eye on the watch storage meter at the top of the Fitbit app window. When that meter is full, you can’t add any more audio to your watch. The storage meter also doubles as a progress bar, displaying the progress of the transfer.
- When Fitbit completes the audio transfer, return to your Fitbit watch, open the Music app, and then tap End Now. You can now control audio playback on the Fitbit watch using the Music app.
Uploading playlists from your Mac
To get one or more iTunes playlists from your Mac to your Fitbit watch, you use the Fitbit Connect app. Here are the steps to follow:- Launch Fitbit Connect on your Mac.
- Click Manage My Music. Fitbit Connect prompts you to log in to your Fitbit account. Note that you don’t see this prompt if you’ve previously logged in, so in that case you can skip to Step 4.
- Enter your Fitbit credentials, and then click Log In. Fitbit Connect tells you to initiate Transfer Mode on your watch.
- Wake your Fitbit watch.
- Swipe left until you see the Music app, and then tap Music.
- Tap Transfer Music (refer to the preceding figure).
After you’ve added one or more playlists, you’ll need to scroll to the bottom of the Music app to access the Transfer Music button.
Fitbit Connect sets up a connection with your watch, and then displays a list of your iTunes playlists.
To create a new playlist from Fitbit Connect, click Create New Playlist, click the added playlist to open it, then drag music from iTunes and drop it inside the playlist.
- Select the check box for each playlist you want to transfer to your watch.
When you select a playlist, Fitbit Connect immediately starts uploading the audio! Therefore, don’t select a playlist unless you’re sure you want to upload it.
Depending on the number of music tracks and podcast episodes you’re uploading to your watch, the transfer can take an hour or more to complete. Keep your eye on the watch storage meter at the top of the Fitbit Connect window. When that meter is full, you can’t add any more audio to your watch. The storage meter also doubles as a progress bar, displaying the progress of the transfer.
- When Fitbit Connect completes the music transfer, return to your Fitbit watch, open the Music app, and then tap End Now. You can now control audio playback on your watch using the Music app.
Control audio on your watch
After you have your Fitbit watch loaded with your favorite audio and you’ve paired Bluetooth headphones or speakers with the watch, you’re ready to feel the noise.To get started, wake your Fitbit watch, swipe left from the clock until you see the Music icon, and then tap Music.
To start some audio, use either of these techniques:
- Tap Shuffle All to play all your audio in random order.
- Tap a playlist to display its audio, then tap a track or episode.
- Open the Music app, tap the current playlist, and then tap the current track.
- Press and hold down the watch’s Back button. If you don’t see the audio playback controls, swipe right.
Pair Bluetooth headphones or speakers
Your Fitbit watch can play, pause, and stop audio, but if you want to hear what’s being played (and I think you do), you need to connect your watch to headphones or speakers via Bluetooth. Here’s how to do it:- Put your Bluetooth headphones or speakers into pairing mode. See the manual that came with your headphones or speakers to learn how to put the device into pairing mode.
- Wake your Fitbit watch.
- Swipe left from the clock until you see the Settings app, and then tap Settings.
- Tap Bluetooth.
- Tap + Audio Device. Your watch begins looking for nearby devices that are in pairing mode. When your watch locates your headphones or speakers, it displays the name of the device.
- Tap the device name. Your Fitbit watch pairs with the headphones and speakers.