
The track is the basic building block of a song; each song is made up of one or more tracks. In GarageBand, you can record only one track at a time so that you can adjust and mix separate elements. For example, when you begin laying tracks, you can record everyone in your band playing a song together or record yourself playing the piano and singing at the same time. If you do, however, you can't adjust only the drums or only the vocals later in the mixing stage. If you want to adjust, say, the guitar or the vocals separately from the rest of the song, you have to record each part individually — on a separate track.
To record a track in GarageBand, follow these steps:
1. Open GarageBand and create a new song.
You can create a new song in one of two ways:
• If this is the first time you've launched GarageBand or no song was open when you quit GarageBand, a "Welcome to GarageBand" dialog box appears. Click the Create New Song button, and that's what will happen — a new song window appears.
• If a song opened when you launched GarageBand, you can create a new song by choosing File --> New.
2. When you see the standard OS X Save As dialog box appear, as shown in Figure 1, give your song a name and tell GarageBand where to save the file.
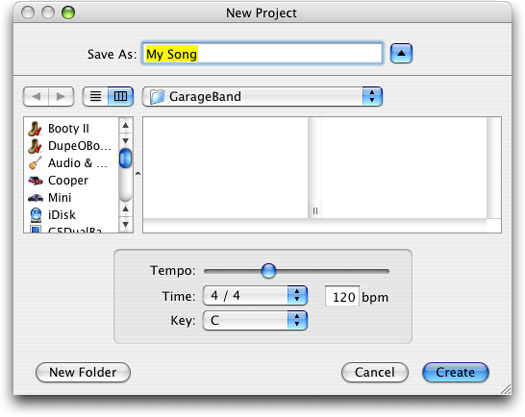
Figure 1: GarageBand's Save As dialog box offers adjustable settings.
You can also set some basic settings for the song. The settings that are shown in Figure 1 are the default and the most common settings for a song. Of course, you can change these settings for any song using the menus and slider, as follows:
• Tempo: Use this slider to adjust the tempo.
• Time: The pop-up menu lets you adjust the time signature. The adjacent bpm box indicates the beats per minute as selected with the Tempo slider. (If you type a new number in the box, the Tempo slider will move by the appropriate amount.)
• Key: Use this pop-up menu to adjust the key.
It's probably a good idea to leave the Tempo, Time, and Key settings alone if you don't know what they mean, at least for now. You can always change them later if you like.
After you save the file, you see the timeline, where your new song is just waiting for you to put something on its tracks.
3. Create a track by choosing Track --> New Track, by pressing Command-W, or by clicking the New Track button on-screen.
Whichever you choose, the New Track dialog box appears.
4. Click the name of the type of track that you want to create (at the top of the window): Real Instrument or Software Instrument.
GarageBand offers three different kinds of tracks: Real instrument tracks, software instrument tracks, and one master track per song. You can have as many real and software instrument tracks as your hardware can handle, but each song has but a single master track.
When you're laying down tracks, real and software instrument tracks are the ones that you need to focus on. The master track comes into play in the mastering stage.
Here's how to choose the right type of track for the instrument that you want to record:
• Real instrument tracks: If you connect an instrument — an electric guitar, electronic piano, synthesizer, or any other electronic instrument or a microphone — directly to your Mac when you record, this device requires a real instrument track in GarageBand. Vocals are also considered real instruments in GarageBand, so you record them on real instrument tracks. There is one exception — a MIDI keyboard.
• Software instrument tracks: If you connect a MIDI keyboard to your Mac, you use a software instrument track. This is also the type of track to use if you want to record a track using GarageBand's built-in software instruments.
After you select the type of track that you want to record, a set of related options appears in the left. At this point, recording a real instrument track becomes a little different from recording a software instrument track.
After you record a track, the "region" you just recorded appears on that track in the timeline in its proper color — real instruments are blue, and software instruments are green. The tracks even glow their proper color when you select them. Loops and real audio regions in the timeline are also colored this way. You'll have it memorized in no time; blue tracks are real instrument tracks, while green tracks are software instrument tracks.