When you use a digital camera, eventually you’ll want to transfer the images from the camera onto your PC. To transfer images from a digital camera to your computer, you have two choices:
Use a USB cable: The most awkward option for transferring images from a digital camera is to connect the camera to your PC by using a USB cable. The images must then be “beamed” into the PC from the camera, or the camera may appear as a “disk drive” in the Computer window.
Insert your memory card into the PC: The best way of transferring images from your digital camera is to remove its memory card and plug the card into the PC. Upon plugging in the memory card, you’re greeted by an AutoPlay dialog box, as shown in the following figure.
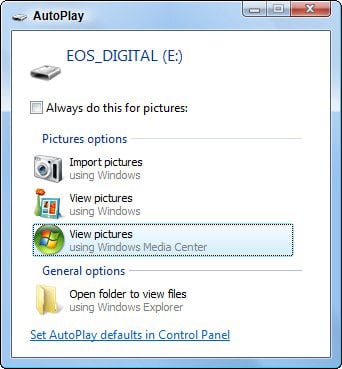 Transfer your images from a memory card.
When you see the AutoPlay dialog box, you need to choose a program to use for transferring the images. You most likely see the options shown in the figure, including perhaps any custom software you’ve installed. Use one of the following import options:
Import Pictures Using Windows: All images are read from the memory card and transferred to the PC’s hard drive. The images are organized and can be viewed by using the Windows Photo Gallery program.
Import Pictures and Videos to My Computer: By running a special import wizard, this option gives you the most control over which images are transferred to the PC. It’s available only in versions of Windows Vista that come with the Microsoft Digital Image Starter Edition.
Open Folder to View Files: A Windows Explorer window opens, allowing you to view files stored on the memory card. You can then manually transfer the image files from the memory card to your PC’s hard drive.