
You really should have a wireless Internet service available when you set up your Chromebook. (If you don’t know about the Internet service, it’s time to bring in the person who does.) If you’re using a stationary (home or public) wireless Internet network or a portable device with an Internet hotspot, you probably need to know
-
The network name (like Smith Family WiFi or ATT034)
-
The network password (usually a bunch of random letters and numbers)
If you don’t already have a Google Account, you’ll also need a phone handy to verify your new account while you set up your Chromebook.
Turn on your Chromebook
Regardless of the brand you choose, the Chromebook is built for speed — and you’ll notice this speed the first time you turn on your device! To turn on your device, you may simply need to plug in the power cord and open the laptop.
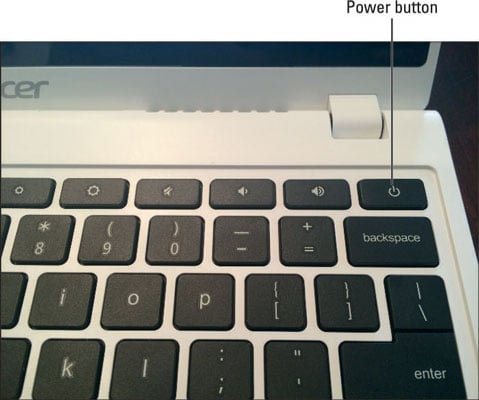
If your Chromebook doesn’t turn on automatically, locate the Power button, which may be located on the top-right corner of the keyboard itself. (This figure shows the Power button on the Acer C720P.)
When you turn on the device for the first time, a Chrome logo pops up on the screen, and within seconds, the computer powers on and displays the Welcome window.
Select a language
When the Welcome window appears, start by selecting your language. Once you’ve selected your language, make sure you select the keyboard layout. If you’re living in the U.S., you likely want to select the defaults here, which are English (United States) and US Keyboard.
Connect to the Internet
Next, you need to select a network to connect to the Internet. If no network is available, try holding off on attempting to set up your Chromebook until you can connect to an Internet source.
If you’re using a mobile device that can generate an Internet hotspot, it’s time to turn on the hotspot.
Follow these steps to connect for the first time:
-
Click the Open the Network drop-down list and select your network name.
Your Chromebook may detect several other nearby home or business networks. You can ignore them.
-
If your Chromebook requests it, enter your network password.
Once you select the network and enter a password, if applicable, the Wi-Fi bars onscreen fluctuate as your computer tries to connect. After the connection is established, the Continue button at the bottom of the dialog window becomes active.
-
Click the Continue button.
Agree to the Terms of Service
If you’ve installed software or activated a device within the last 10 years, you’ve likely seen a terms-of-service agreement. You can accept it by following these steps:
-
Review the Terms of Service.
-
(Optional) When you’re satisfied that you understand and agree to the terms, select or deselect the check box that sends usage stats back to Google.
Try leaving this box checked. The data is useful for identifying and fixing bugs, creating new features, and otherwise making the Chromebook better for everyone! (The NSA has all your information anyway, so why not?)
-
Click Accept and Continue to move to the next step.