It’s not easy to move files over from your old laptop to the new one. In earlier versions of Windows, the process was seamless, thanks to a program called the Windows Migration Wizard. It worked so well that Microsoft decided not to include that program with Windows 10.
Your only alternative is to connect both new and old laptops to the same network and then transfer files manually. This can be avoided for all cloud storage, because those files are automatically synchronized, but the rest of them must be copied.
Here are the general steps to take to migrate files from your old laptop to the new one:
Ensure that both laptops are on and connected to the same network.
The network can be wired or wireless. If both laptops see each other in that window, you’re good to go.
On the old laptop, find your User Profile folder.
The user profile is your main account folder. Press Win+E to open a File Explorer window. Open Drive C. Open the Users folder. Your account folder has your name, or it might be titled User.
Share your User Profile folder.
Right-click the folder and choose Properties. In the folder’s Properties dialog box, click the Sharing tab. Click the Advanced Sharing button. Ensure that the item Share This Folder is checked. Click the OK button.
After the folder on the old laptop is shared, you can access your files and copy them to the new computer.
On the new laptop, open the Network window and browse to the shared User Profile folder on the old laptop.
Choose Network from a File Explorer window. Open the old laptop’s icon, and then open the shared User Profile folder. You see all your old folders in the window, which is how you access the old laptop’s files.
Visit your User Profile folder on the new laptop.
Follow the directions for Step 2, although you’re hunting down your User Profile folder on the new laptop, not the old.
In the end, you have two open folder windows: one representing files on the old laptop and the second showing files on the new laptop.
Copy those files you want to keep from one window to the other.
For example, open the Pictures folder from your old laptop, select and copy all the files. Open the Pictures folder on your new laptop and paste the files.
Repeat this step for each folder on the old laptop. Yes, it’s tedious, but that’s how it’s done. And it doesn’t take that much time, especially considering the alternative methods, crude and ugly.
User Profile folder." width="535"/>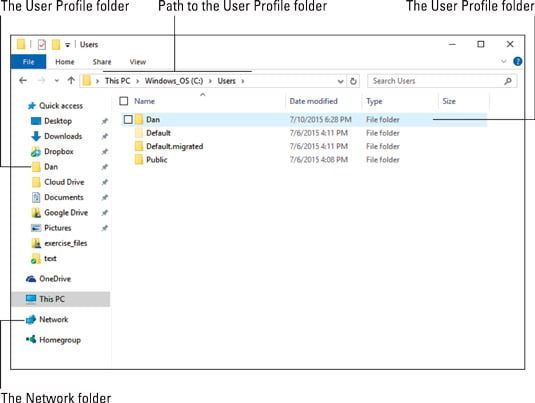 Finding your User Profile folder.
Alas, these steps don’t copy over your programs. Even the old Migration Wizard didn’t perform that task.
The crude-and-ugly alternative is to copy files from the old laptop to a thumb drive or another type of external storage. Then you add the storage to the new laptop and copy over the files, which is an extra, bothersome, painful step.
Any files you have on cloud storage are copied over as soon as you install the cloud storage software on your new laptop. This storage includes Microsoft’s own OneDrive, but also Dropbox, Google Drive, Amazon Cloud, and other storage. Install those cloud storage programs and you’ll instantly see the files.