
Windows 10 includes the magical Problem Steps Recorder (PSR), recently renamed the Steps Recorder, which lets you take a movie of your screen. To a first approximation, anyway, it’s actually a series of snapshots, more like an annotated slideshow. You end up with a file that you can email to a friend, a beleaguered spouse, or an innocent bystander, who can then see which steps you’ve taken and try to sort things out. To read the file, your guru must run Internet Explorer (unless Microsoft has finally updated Edge to read MHTML files).
Steps Recorder creates a slideshow of your screen with automatically generated detailed annotations from Windows 10, good, bad, ugly, problem-infested, or rosy-cheeked. If you have a rosy-cheeked background, anyway.
Steps Recorder is fast and easy, and it works like a champ.
Here’s how to make a screen record of Windows 10 problems:
- Make sure you remember which steps you have to take to make the problem (or rosy cheeks) appear.
Practice, if need be, until you figure out just how to move the whatsis to the flooberjoober and click the thingy to get to the sorry state that you want to show to your guru friend.
Realize that anything appearing on the screen, even fleetingly, may be recorded, and your friend may be able to see it. So don’t send your salary information, okay?
- In the Cortana box to the right of the Start icon, type steps, and tap or click Steps Recorder.
You can start the Steps Recorder from the Control Panel, but this method is a whole lot easier.
The Steps Recorder, which resembles a full-screen camcorder, springs to life. It isn’t recording yet.
 The unassuming Steps Recorder.
 - Tap or click Start Record.
The recorder starts. You know it’s going because the title flashes Steps Recorder — Recording Now.
Note that the recorded slideshow will include the Steps Recorder window, so you may have to move it out of the way in order to show what you want to show.
- (Optional) If you want to type a description of what you’re doing or why or anything else you want your guru friend to see while she’s looking at your home movie:
- Tap or click the Add Comment button. The recording pauses, and the screen grays out a bit. A Highlight Problem and Comment box appears at the bottom of the screen.
- Tap or click the screen wherever your problem may be occurring and drag the mouse to highlight the problematic location.
- Type your edifying text in the box, and tap or click OK. Recording continues.
- When you’re finished with the demo, tap or click Stop Record.
Steps Recorder responds with the Recorded Steps dialog box. Take a good look at the file because what you see in the Save As box is precisely what gets saved — each of the screen shots, in a slideshow, precisely as presented. Remember, this isn’t a video. It’s an annotated slideshow.
 Save the recording as soon as you finish it.
 - Type a name for the file (it’s a regular zip file), and tap or click Save.
The zip file contains an MHT file, which can be reliably read only by Internet Explorer — although you may have some luck reading the file in Firefox, if it’s running the MAFF or UnMHT add-ons. (It’s possible, by the time you read this, that Microsoft has built MHTML file reading capabilities into Edge, but don’t hold your breath.)
- When you’re finished, click the red X button to close the Steps Recorder.
Magical. Okay, Snagit does the screen recording shtick better, but still.
- Send the file to your guru friend.
Sneakernet — the old-fashioned way of sticking the file on a USB drive and hand-delivering it — works.
- Tell your friend to double-click the zip file when she receives it and then double-click the MHT file inside.
Edge appears and shows the MHT file. You have several options.
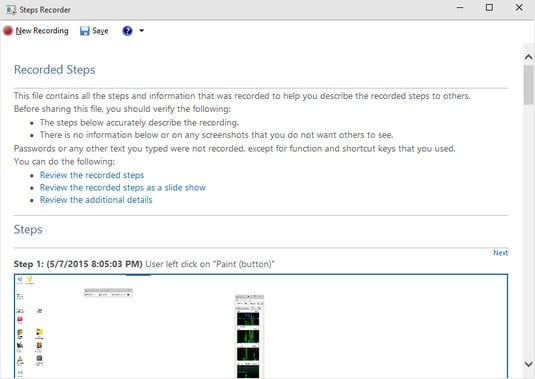
 The recording appears as a series of snapshots, with detailed accounts of what has been clicked and where.