Speech Recognition lets you issue verbal commands such as “Get my mail!” to your Mac and have it actually get your email. You can also create AppleScripts and Automator workflows, and Finder Quick Actions (a new Mojave feature) and trigger them by voice.
In earlier versions of macOS (pre-Yosemite), you had to explicitly turn on Speech Recognition; in later versions including Mojave, if you’ve enabled Dictation, you can use speech commands to instruct your Mac.
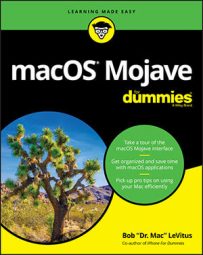
To see a list of commands your Mac will understand if you speak them, open the Keyboard System Preferences pane, click the Dictation tab, and enable Enhanced Dictation. Now, open the Accessibility System Preferences pane, click Dictation in the list on the left, and then click the Dictation Commands button. A sheet appears, in which you can enable or disable the available dictation commands, as shown.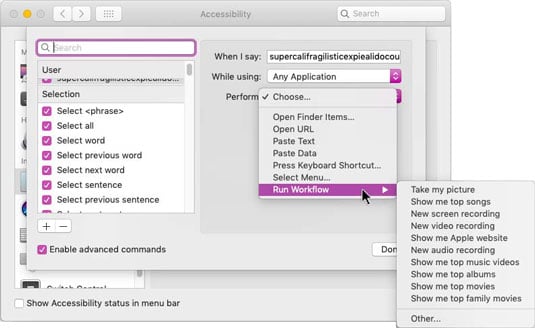 The Dictation Commands sheet displaying some things your Mac will understand if you say them (properly). Usually.
If you have a laptop or an iMac, you may get better results from just about any third-party microphone or (better still) a headset with a microphone. The mic built into your Mac is okay, but it’s not great. To select a third-party microphone, first connect the mic to your Mac. Then open the Sound System Preferences pane and select it from the list of sound input devices in the Input tab. Below the list is an input volume control (not available with some third-party mics) and a level meter, as shown. Adjust the Input Volume so that most of the dots in the Input Level meter darken (11 of 15 in the figure).
 This is a good level for Speech Recognition.
You can also choose an external mic in the drop-down menu below the microphone in the Dictation tab of the Keyboard System Preferences pane. However, you’ll need to use the Sound System Preferences pane if you want to adjust your input levels.
Speech Recognition is enabled along with Dictation. To give it a try, press Fn twice (or whatever shortcut you set earlier) and speak one of the items from the list of Dictation Commands, such as “Open TextEdit.” If the command is recognized, it will appear in text above the microphone icon, as shown. Open TextEdit above the mic icon means your command was recognized.
This technology is clever and kind of fun, but it can also be frustrating when it doesn’t recognize what you say, which occurs too often, if you ask me. And it requires a decent microphone even though the mic built into most Macs works okay. The bottom line is that I’ve never been able to get Speech Recognition to work well enough to continue using it beyond a few minutes at best. Still, it’s kind of cool (and it’s a freebie).