Getting started with complex hardware or software can be difficult. Luckily, a lot of people have taken the time to document their progress and have released libraries, often with examples, that you can easily integrate into your own Arduino sketches. From this, it’s possible to get something working and gain a better understanding of it. This learn-by-doing approach of Arduino allows you to make a lot of progress quickly and easily with hardware or software that would otherwise be a huge challenge.
Standard Arduino libraries
Standard Arduino libraries refers to a selection of the libraries included in the current release of Arduino at the time of writing (1.8.5). The standard libraries cover a wide range of subject areas and are usually popular topics that have been heavily documented. You can find these libraries by choosing Sketch → Include Library → Manage Libraries.Choosing a library includes one line at the top of your current sketch, such as #include <EEPROM.h>. Before you attempt to understand a library, you should try an example of it. You'll find examples at the bottom of the menu that appears at when you choose File → Examples.
Here is a brief description of what each Arduino library does:
- EEPROM: Your Arduino has electronically erasable programmable read-only memory (EEPROM), which is permanent storage similar to the hard drive in a computer. Data stored in this location stays there even if your Arduino is powered down. Using the EEPROM library, you can read from and write to this memory.
- Ethernet: After you have your Ethernet shield, the Ethernet library allows you to quickly and easily start talking to the Internet. When you use this library, your Arduino can act either as a server that is accessible to other devices or as a client that requests data.
- Firmata: Firmata is one way to control your Arduino from software on a computer. It is a standard communication protocol, so you can use the library to allow easy communication between hardware and software rather than write your own communication software.
- LiquidCrystal: The LiquidCrystal library helps your Arduino talk to most liquid crystal displays (LCDs). The library is based on the Hitachi HD44780 driver, and you can usually identify these displays by their 16-pin interface.
- SD: The SD library allows you to read from and write to SD and microSD cards connected to your Arduino. SD cards need to use SPI to transfer data quickly, which happens on pins 11, 12, and 13. You also need to have another pin to select the SD card when it’s needed.
- Servo: The Servo library allows you to control up to 12 servo motors on the Uno R3 (and up to 48 on the Mega). Most hobby servos turn 180 degrees, and using this library, you can specify the degree that you want your servo(s) to turn to.
- SPI: The Serial Peripheral Interface (SPI) is a method of communication that allows your Arduino to communicate very quickly with one or more devices over a short distance. Example of this communication include receiving data from sensors, talking to peripherals such as an SD card reader, and communicating with another microcontroller.
- SoftwareSerial: The SoftwareSerial library allows you to use any digital pins to send and receive serial messages instead of, or in addition to, the usual hardware pins (0 and 1). This capability is great if you want to keep the hardware pins free for communication to a computer, allowing you to have a permanent debug connection to your project while still being able to upload new sketches or to send duplicate data to multiple serial devices.
- Stepper: The Stepper library allows you to control stepper motors from your Arduino. This code also requires the appropriate hardware to work, so make sure to read Tom Igoe’s notes on the subject.
- Wi-Fi: The WiFi library is based on the Ethernet library listed previously, but with alterations specific to the Wi-Fi shield to allow you to wirelessly connect to the Internet. The WiFi library also works well with the SD library, allowing you to store data on the shield.
- Wire: The Wire library allows your Arduino to communicate with I2C devices (also known as TWI, or two-wire interface). Such devices could be addressable LEDs or a Wii Nunchuk, for example.
Additional Arduino libraries
Many libraries aren’t included in the Arduino software by default. Some libraries are for unique applications such as specific hardware or functions; others are refinements or adaptations of existing libraries. Luckily, Arduino makes including these easy, so you can quickly try them all to see which are right for your needs.Most libraries are easily installed by choosing Sketch → Include Library → Manage Libraries from the Arduino IDE menu. The Library Manager dialog box displays an easily searchable list of libraries submitted to the Arduino servers and approved for release.
Libraries may also be distributed as ZIP files that have the same name as the library; for example, the capacitive sensing library CapSense should be distributed as CapSense.zip and should contain a folder of the same name when unzipped.
Inside the folder there are files ending in .h and .cpp, such as CapPin.h and CapPin.cpp, and maybe even an Examples folder. If your .zip file contains only loose .h and .cpp files, you should place them in a folder with a library name. Sometimes you may find many .h and .cpp files that all perform different functions in the library, so make sure they're all inside the folder.
In the latest release of Arduino (1.8.5 at the time of this writing), it’s easy to include libraries distributed as ZIP files. Simply choose Sketch → Include Library → Add .ZIP Library and select the ZIP file containing the library.
After the library is installed, restart Arduino and choose Sketch → Include Library to check that your library is in the list.
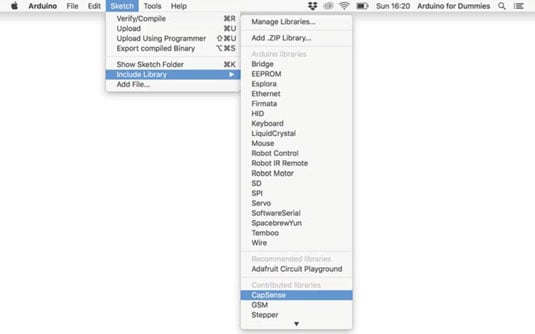 The Arduino menu shows the library in the Import Library drop-down list.
If the library has an Examples folder, you should also be able to see the examples by choosing File → Examples and then choosing the name of the library.
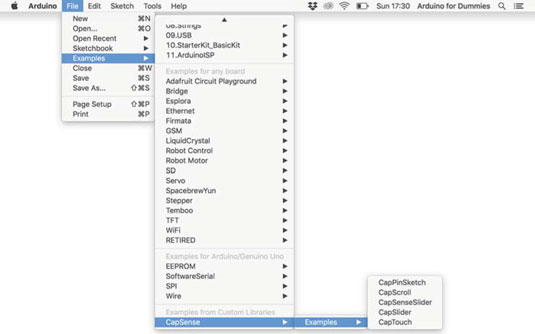 If there are examples with the library, you'll see them in the menu.
That’s all there is to installing a library. Removing a library is as simple: just take the library folder out of the Arduino Sketch folder.
Contributed Arduino libraries
A long list of community-contributed libraries appears on the Arduino libraries page and an exhaustive list appears on the Arduino Playground.To become familiar with contributed libraries, start with CapSense and TimerOne, two commonly used and helpful libraries:
- CapSense: The CapSense library allows you to make one or many pins on your Arduino into capacitive sensors. This feature allows you to make simple touch, pressure, or presence detection sensors quickly and easily with little hardware.
The Arduino Playground page has a lot of useful information, but a more recent version of the code can be found on GitHub.
- TimerOne: TimerOne (also called Timer1) uses a hardware timer on your Arduino to perform timed events at regular intervals. It’s a great library for reading sensor data regularly without interrupting what’s going on in the main loop. You can find a TimerOne page on the Arduino Playground and an up-to-date version of the library on Google Code.