The look of the torso from the side really counts in fashion illustration: A woman can show off her bod, and a guy can look pretty ripped in a simple T-shirt. Use the S curve to show side attitude; women get a more extreme curve than dudes, who get just a slight curve.
To create a side look for a female, try these steps:
-
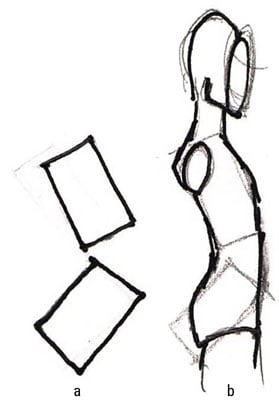
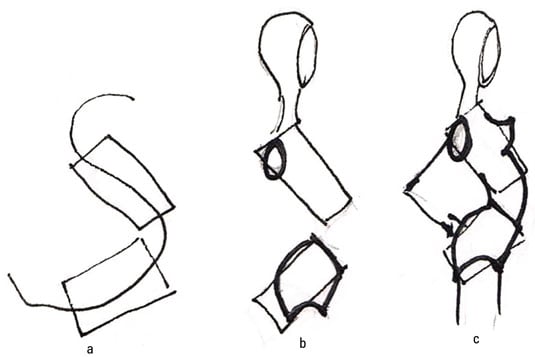
Draw two rectangles at nearly a 90-degree angle to each other. Draw an S curve that passes through the center of both rectangles.
From the side view, a fashion figure doesn’t taper much at the waist, so you can replace the trapezoids with rectangles when drawing the torso.
-
Sketch in a neck and head facing sideways.
-
Add an oval for the armhole in the top left corner of the upper rectangle. On the lower rectangle, curve the back of the butt for a round derrière and then add the downward arc for the right leg.
-
Connect the upper and lower rectangles at the tummy, using a gradual curve to keep the belly flat. Also connect the rectangles at the back to form the figure’s lower back.
-
Add a perky breast at approximately the same level as the armhole.
The shape of a guy’s torso is getting a lot of media play these days. Shirts are left unbuttoned, are worn tight to the torso with no room to spare, and are often sleeveless. All this exposure requires a lot of torso upkeep! When drawing a guy’s torso, use a slightly less extreme S curve for his back and a slight and gradual curving line for the front of his torso.
Follow these simple steps to draw the side view of a guy:
-
Draw two rectangles that are at a slight angle to one another.
-
Sketch in a neck and head facing sideways.
-
Add an oval for the armhole in the top left corner of the upper rectangle. Slightly curve the left side of the lower rectangle to create a rounded buttock — but don’t make it too round! Add the downward arc for the right leg.
-
Finish with a flat chest, a line that connects the rectangles at the stomach, and a small curve to connect the two rectangles at the lower back.