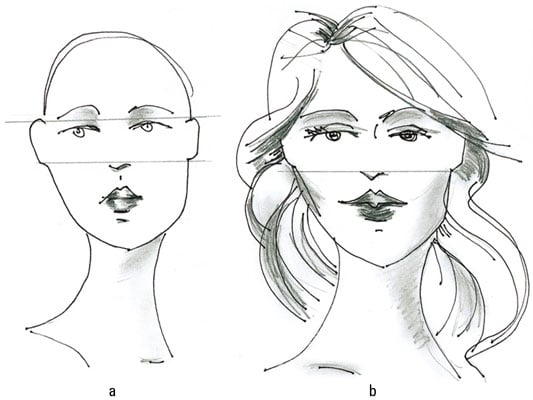
To create simple eyes from the front view, start by drawing an oval with a face grid.
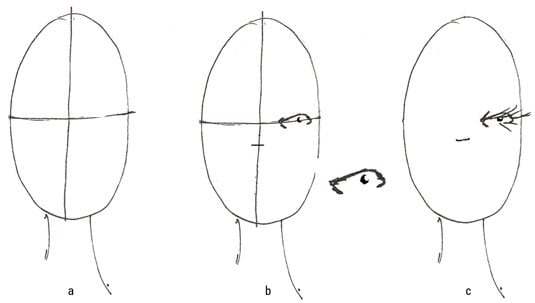
Add a neck for a nice effect. Draw the eye(s) on the horizontal guide line and about halfway between the center vertical line and the edge of the face.
The eye shape dips down in the front and then curves up and over the little pupil. It ends in another little pointed shape. To create a bit of shine, the pupil is a crescent shape rather than a full circle.
Add some long, dramatic eyelashes, always pulling and curving to the outside corner of the eye.
The eyes can look messy or fake; the point of simple eyes is to quickly throw an eye on the face.
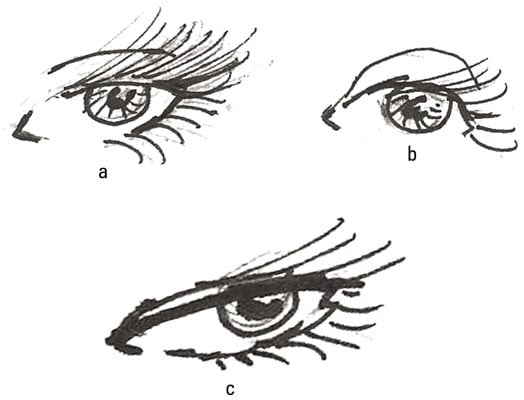
To draw a more detailed eye, start with a circle to represent the iris (the colored part of the eye).

For the pupil, draw a small circle in the center of the iris. Fill in the pupil with black, leaving a small white area for shine.
For the outside of the eye, draw an almond shape that cuts off the top third of the iris circle and extends past the circle. Add detail inside the iris circle, such as lines radiating out from the black pupil. Keep the inside corner of the eye (the side by the nose) small and pointed, and keep the other side of the eye wider. Draw a tiny circle at the inside corner of the eye.
Erase the top of the iris circle that extends above the almond shape and then shade the inside of the iris slightly. For the lower lashes, add small curved lines around the bottom lid to the corner of the eye.
For the upper eyelid, add a line that follows the same curve as the almond shape; lightly shade in the upper eyelid. Add lots of curved eyelashes on the top part of the eye, extending farther as the lines near the outside corner.
Finish the look with an eyebrow.
Try a few more types of eyes.
Eyes can be angled, sloping up or down with as much eyelid as you want to show. Get the angled look by tilting the almond shape of the eye.
Eyes can be rounded and wide, with the bottom line missing for a very youthful look. Accomplish this by rounding out the top of the almond shape and erasing the bottom line.
Eyes can be long and thin with hardly any eyelid and small amounts of the iris showing. Achieve this look by straightening out the top of the almond shape.
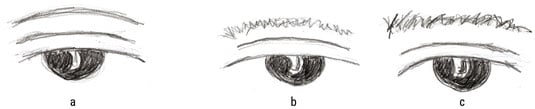
Give your fashion women eyebrows.
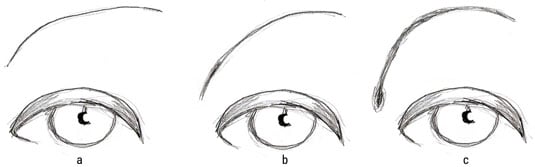
Draw an arched brow with only one pencil line above the eyelid. You can draw the arch as high as you like. This look is reminiscent of the historical and current styles in which women plucked their eyebrows and drew them in. Think movie stars from the 1930s.
Draw a high arch above and following the curve of the eyelid. This line is more angled and gives the face a sultry, confident look. The arch is about as high as the eye is wide. You can make this line thin or thick.
For drama, draw the same high arch but extend it a bit lower to form a tear shape near the inner corner of the eye. This look creates a dramatic face.
Experiment with high and low arches; varying the height of the arch creates a completely different personality. You can also experiment with smooth, rounded arches versus angled, pointy arches. A rounded arch tends to make the face look young, and a pointy arch gives the face a more mature look.
Give your fashion men eyebrows.
Draw a very slight curve above a guy’s eyelid. Follow the shape and length of the eyelids to get the perfect man brow. Most guys don’t pluck or wax, so you don’t need much of an arch.
Fill in the curve with a series of short crisscrossed lines that create the eyebrow.
A masculine brow can be more trimmed, too, so you can also make the brow more solid — it’s all about the look you want to create!
Add eyelashes for a finishing touch.
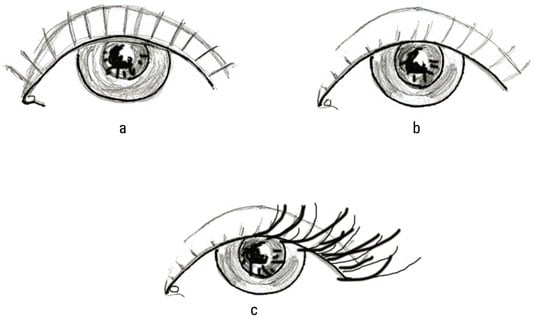
Eyelashes are a fashion frill, especially for women, but men and children can use them, too; otherwise, their eyes may have that not-quite-finished look.
Vary the length of the lashes to avoid the centipede look.
Eyelashes are longer at the outer corner of each eye.
For an extra “wow” look, make the upper lashes much longer at the outer corner of the eyelid.
How to Draw the Ears
You don’t want to draw anything other than a graceful ear in your fashion illustrations. Fashion ears shouldn’t be big and floppy, and they shouldn’t stick out on your fashion head. Fashion ears are often no more than a place to hang a pair of elegant earrings.
You don’t want to play up ears on women or men, but you do have a bit of a leeway with the kids. Until a child is about 12, the ears tend to naturally stick out a bit more.
Ears are one of the easiest features to master, because they pretty much look the same no matter whether you’re drawing women’s, men’s, or children’s. You don’t even have to change what you draw for the different views — front view, profile, and three-quarter view.
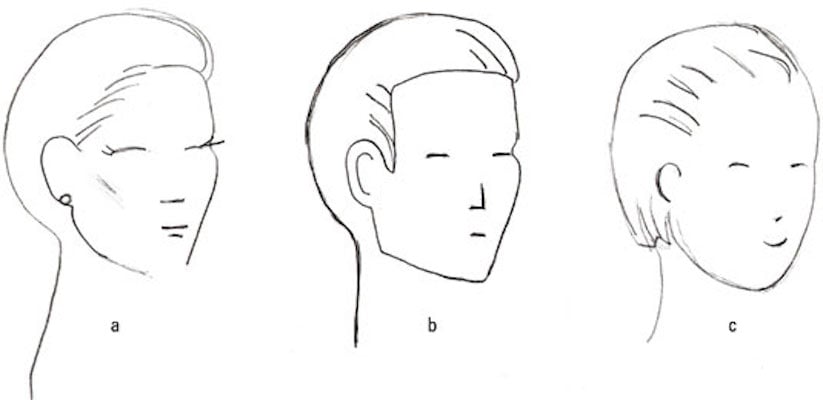
Allow ears to peek through long hair
Do you ever see ears when your fashion figure has long, thick hair? Not really. However, if your lady has long hair and is in motion, you may need to draw ears. Hair moves when the model does (but not as a solid mass), which allows the ears to peek through.
Drawing strands of hair running across the ears, leaving the earlobe visible, creates the right sense of movement. Draw the ears in the same way if the hair is pinned up with a few tendrils tumbling down the neck.
To draw long hair that partially covers the ear, follow these steps:
-
Draw a fashion face with C-shaped ears.
-
Sketch in hair with lines covering part of each ear.
Let the earlobe show through the hair.
Draw a simple fashion nose from the front view.

Female fashion noses breathe class and refinement. The sweet girl-next-door button nose is nothing to sneeze at, but it doesn’t fit a woman of high fashion.
Draw an oval for a face and a face grid. Divide the bottom half of the face into thirds and mark them with dashed lines. For the nose, draw two little slash lines in the center of the upper dashed line.
Fashion noses are much shorter than real noses. Figure c shows what this type of nose looks like after you erase your guide lines.
Give fashion guys strong noses.
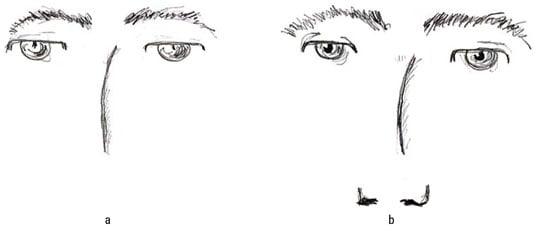
A masculine nose is drawn in thick, strong lines. Boldness works well for the masculine nose, but you’re not going for the big schnozz look here; even though it’s bold, a masculine nose is still elegant.
Sketch a man’s eyes and brows. Draw a slightly curved line starting right between the eyes and running down to where the tip of the nose begins. For the bottom of the nose, draw a couple of L-shaped marks slightly above the top of the upper lip.
Add nostrils by making the bottoms of the Ls a little darker.
Create cute kid noses.
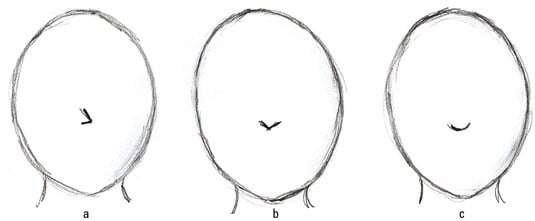
Kids’ noses are simple and cute. Don’t get realistic or detailed; otherwise, their little faces will be overwhelmed.
Use a small sideways V.
Draw a small V shape to show the tip of the nose. Use this shape for the bottom of the nose, not for the line of the nose, which you can leave out on youthful faces.
Go for a simple upward arc.
Draw the nose in three-quarter view.
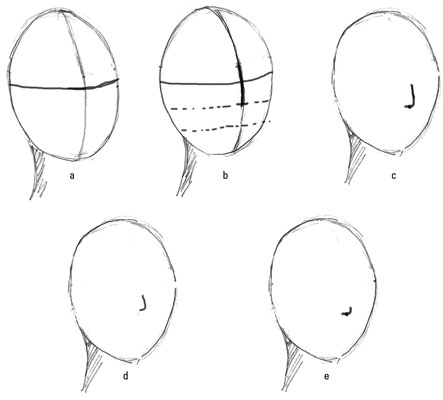
A three-quarter view nose is angled to the side. The nose from this view can be tricky to draw.
Draw a head with a face grid but shift the vertical line to the right side of the oval. Draw two dashed lines that divide the lower half of the face into thirds. The nose point goes on the upper dashed line. End with a short horizontal line heading to the left side to depict the bottom of the nose.
For women and children, the nose is a little more curved rather than pointy. Sometimes the slight differences in appearance come from the length of the top line of the nose: The longer the line, the more masculine it tends to look.
Draw the nose in profile view.
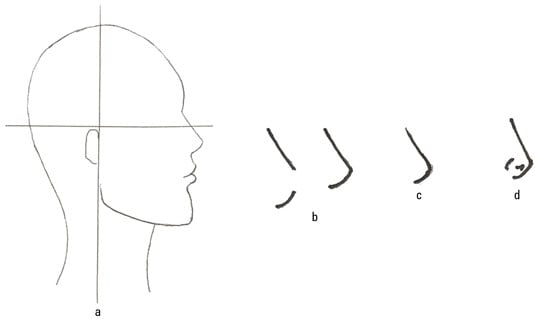
Noses in profile can be pointy and simple, rounded and simple, or either pointy or rounded with some nostril detail and shading. No matter which style you like, all these noses begin with two simple lines that meet up somewhere away from the face.
Draw a line that angles away from the face, and draw another line that’s a slight downward curve back toward the face. When you put these lines together, they create a nose in profile.
The top of the nose starts around the eye level line, and the nose finishes about a third of the way down the bottom half of the head.
The distance you bring the nose away from the face on the angle is the distance you bring back the curve underneath. Notice that the top of the nose line lines up with the end of the lower curve.
Practice the traditional feminine mouth shape.

Draw a short horizontal line to establish the opening of the mouth.
Sketch in the lower lip as an upward arc.
Draw the top lip with two peaks on each side of the center to add form.
Keep in mind that the lower lip is almost always fuller and deeper than the top lip.
Make some modifications for a simple yet fashionable mouth.
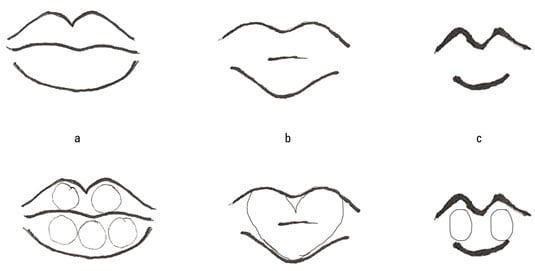
Use only a few lines for the lips. Figure a shows a slightly pointed top lip, a curved line for the opening between the lips, and a deep curve for the lower lip. Below the drawing is a sketch of circles you can use to help you create the shapes of the lips.
For more of a pout, the top line can have a gentler curve, and the center line can be a short dash; the bottom lip is only a slight, pointy curve.
You can draw just a simple little dot or line to show that lips are supposed to be there. This mouth is great for a very simple style of face.
To draw a male mouth for a fashion illustration, start with a simple horizontal line with a slight dip in the center.
Draw the lower lip as an upward arc. Shade slightly under the lower lip. Add the upper lip, but keep the curves to a minimum. Make sure the lower lip is fuller than the upper lip. Add two little lines at the corners of the mouth, one at each side. Keep the lines short; longer lines create an older-looking mouth. Add light shading on the lips.
Try experimenting with fewer lines and less detail to play with other male lip looks. Keep in mind that male lips curve less than female lips.
Draw a simple mouth for children's faces.
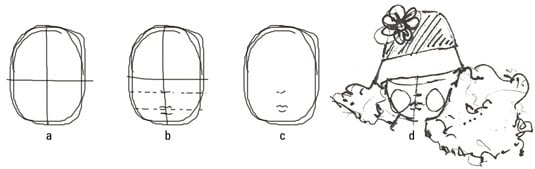
Draw a circle for a kid’s face and add in the face grid. Sketch in some dashed horizontal lines that divide the lower half of the face into thirds. The opening of the mouth goes at the lower dashed line.
Draw the opening of the mouth as a pair of downward curves that meet at a dip in the middle. Draw the bottom of the lips as a slight upward curve.
Erase the face grid and your other guide lines.
Draw three-quarter view lips.
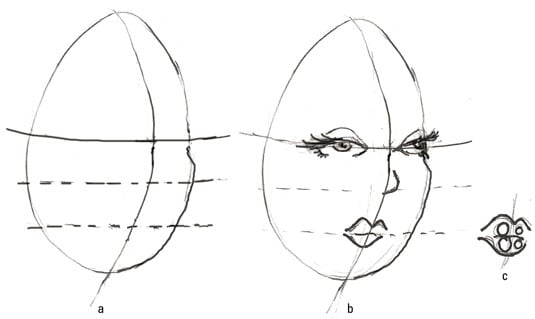
Sketch an oval for the head and draw a face grid with the vertical line off-center. Use a couple of dashed horizontal lines to divide the lower half of the face into thirds. Draw the woman’s eyes, nose, and lips along the horizontal lines.
The opening of the mouth sits on the lower dashed line. To draw the lips in a three-quarter view, divide the lips in left and right halves. Draw the half closest to the viewer as usual, with the upper lip as a downward arc and the lower lip as half an upward arc.
Draw the other half of the lips the same as the first half, but keep the curved top shorter and narrower. Make sure the bottom half is a small curve.
Draw lips in profile view.

Draw a sideways triangle that points to the right. Draw a dashed horizontal line that cuts the triangle in half.
Add two curves at the left side of the triangle, making the top curve narrower than the bottom.
Erase the left side of the triangle and trace over the dashed line with a solid line to separate the lips.
You can also draw another look in which the upper lip is slightly more forward than the lower lip, reflecting a realistic view of how the front teeth go just in front of the lower teeth.