At the top of your Page, next to the Edit Page button, is another button called Building Your Audience. The third link below Building Your Audience is Sharing Your Page. This particular process looks the same whether or not you’re an Admin of the Page, but non-Admins will access the Share link through the gear icon located below the Cover photo to the right.
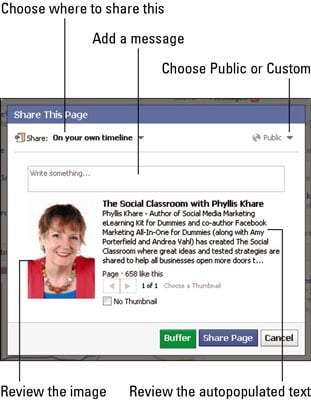
No matter where the link is found, when you click the link, the Share This Page dialog box appears. In this dialog box, you can create a nice invitation that you can post to your personal account Timeline, to someone else’s Timeline, to a group Page, to another Page for which you’re an Admin, or to a private Facebook Message.
Check out a few things before you send invitations:
Review the autopopulated text: This text is pulled right off your Info tab — generally, the text in the Company Overview field. If you don’t like what’s written here, you have to go back to the Info tab and change the text there. Or you can click the text; an editor interface comes up, and you can type whatever text you want.
Other people will be using this Share function, so you want to enter the text that you want to show up here automatically so they don’t have to edit it. Go back to your Info tab to fix the text if needed.
Review the image: This image is the Profile image, not the Cover image. If you want something else to show up there, you need to change the Profile image for the Page. It is not editable from this Share interface.
Add a message: Make sure that you list the benefits for liking the Page. You can create a nice, little message that’s compelling. You can mention that you have contests and free events — whatever is appropriate for your business.
Decide where to Share: You can share on your own personal Timeline, on a Friend’s Timeline, in a group, on another Page for which you’re an Admin, or in a private Facebook Message. Click the drop-down menu to choose which one you want.
Decide whether your shared update will be Public or Custom: You can change the viewing filter by clicking the Public icon to reveal a drop-down menu and changing it to a Facebook Friends list or a custom list.
After you’ve reviewed the invitation, click Share Page.