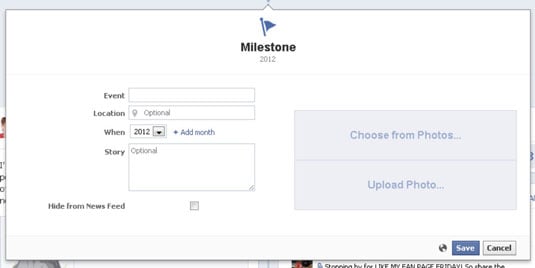
One of the best posts for a new Business Page is a milestone. In fact, when you created your Page, Facebook created your first milestone! When you look at your Timeline, you see that the very first post is a milestone. It may say Founded on (and then the date you created the Page).
The first thing you want to do is edit this milestone. If it stays at this point in time, you won’t be able to add any milestones in the past. Therefore, edit the date for this first milestone back before the milestones you want to add later.
Milestones are similar to Life Events on your personal account. They are similar in how they look and are placed on the Timeline structure. Whereas Life Events tell the story of your personal life, milestones help to tell the story of your business.
Follow these steps to edit the first milestone:
Find the first milestone.
Hover over the top-right corner, and click the pencil icon and the Edit link that appear.
Adjust the date to be as far back as you want.
You can also adjust the Milestone type (Opening, Started, Founded, Launched, Born, or Created).
(Optional) Add the story, and upload a photo.
We love stories and photos, and Facebook does, too. Add them and make them as personal as possible, and you’ll get a better response for the milestone. Ideal image size for a milestone is 843 pixels wide by 403 pixels long.
You are on a mission to get Likes and comments so that Facebook values your posts and gives them a better EdgeRank.
Click Save.
Now you’re free to add milestones to any date from this one to the present. You can’t add a milestone to a future date.
If you don’t see this starting milestone, when you try to create a milestone, Facebook asks you to create the first one first. Got that? Just go through the prompts, and remember to date it as far back as you can so that you can add other milestones that happened in the past.
Here’s how to create the next milestone:
On your Page, click inside the publishing area.
Click Event, Milestone +.
This step opens a menu with these choices: Event, Milestone, and Question.
Click Milestone.

In the Event field, add a title.
This becomes the title of the milestone. The large-font title at the top of this interface changes as you fill in this field. The flag icon doesn’t change.
(Optional) Fill in the location if it’s important to the milestone.
Add the date.
When you add a specific date, the milestone will attach to the Timeline at that particular date.
Type the story.
Adding a story makes the milestone much more interesting.
Upload an image that goes with the milestone.
The ideal image size is 843 pixels wide by 403 pixels long.
If you want to hide this milestone from the News Feed, select the Hide from News Feed check box.
Click Save.
Milestones are formatted as highlights on the Timeline, which means that they span the whole Page from left to right.

