To begin, take a look at a few open-position chords and explore some alternate fingerings for the guitar that you may not have thought of, or perhaps thought were incorrect.
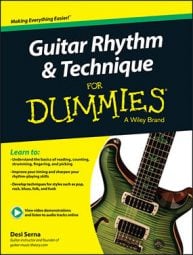
Below, you see four E chord diagrams. The first diagram includes the most common fingering for this chord, the one that is always taught to be “correct.” However, you can fret the same notes and produce an identical sound by using the fingering in the second diagram. The only difference is that your second and third fingers have swapped strings.
There is nothing wrong with using this fingering if you find it more comfortable to play. The third diagram uses your second finger to hold the second frets of both the fourth and fifth strings. Again, the chord sounds no different than the first two, and if this fingering works better for you, then it’s “correct” in your case. Sometimes you want to think outside the box and go for a different chord voicing, too. The same shape can be fretted with your first and fourth fingers, too.
The E5 fingering below is probably best played by moving your fretting-hand thumb to the back of the guitar neck.
You don’t need to master and use all the fingerings you find here. Instead, the goal here is simply to explore your options so that you get to know your own hands better and find what works well for you. You’ll progress as a guitarist and refine your skills by playing to your strengths and avoiding your weaknesses.
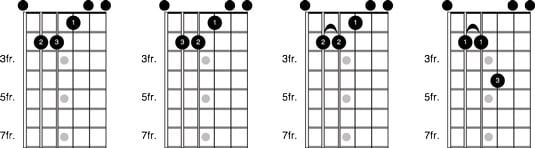
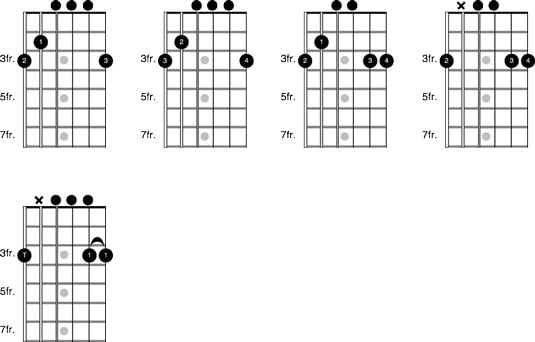
Next, you try a handful of A-chord options. Basically, your options include some combination of three fingers, or barring with one finger, usually the first. Again, there’s no right or wrong way to do things here, as long as you cleanly sound the chord.
It’s possible that you may favor one fingering in one situation and another fingering in another situation, depending on what chord you come from and where you go. With these fingerings, most guitarists prefer to wrap the fretting-hand thumb around the guitar neck so that it comes up over the top of it on the sixth string side.
When you play a chord like A, wrap your thumb around the back of the guitar neck and graze the sixth string to dampen it so that you clearly hear the open fifth string, A, in the bass position of the chord when strumming.
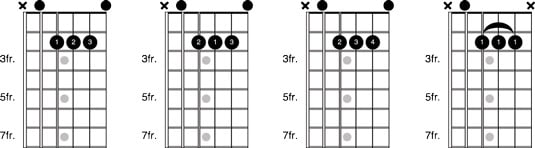
Next, you see some of your options when playing a D chord in the open position. The first diagram is how a D is usually taught and most often played, but perhaps one of the other versions works better for you. James Taylor favors the example in the second diagram, which you see him use in the “Fire and Rain” guitar lesson on his official YouTube page.
The fourth diagram features a fingering that works well if you want to free up your first finger to play an alternate bass note. Place your first finger on B at the second fret of the fifth string and the same shape makes a Bm7.
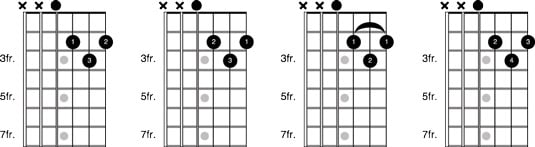
The last chord you look at in the open position is G. Below, you see five examples, with the first two being fingerings typically used to initially teach the G chord in beginner guitar lessons. The third diagram is very common and simply swaps the third, B, on the open second string with the fifth, D, at the third fret. If you also remove the B at the second fret of the fifth string, then the chord is all roots and fifths a la a “power chord,” a popular voicing favored by rock guitarists.
See the fourth diagram and be sure to mute the unwanted fifth string. Finally, the fifth diagram shows you an alternate fingering for the same G5, this time with your thumb coming from behind the neck to fret the root G and your first finger barring both the first and second strings at the third fret. This fingering may seem unusual, but remember to think outside the box. You never know — it may come in handy at some point, or you may need to think creatively in a similar manner with some other chord.
Although only a few types of open-position chords are covered here, you can apply the same ideas to other types of chords that you play near the end of the neck, always thinking outside the box and using fingerings that best help you accomplish what you’re trying to play.
Your favored fingerings may become uncomfortable when fatigue sets in during a lengthy song. In situations like this, it’s good to throw in a change-up by temporarily using an alternate fingering, one that isn’t normally your first choice. You give your muscles some relief when you change your hand and finger positions.