Tuning your Drumset
Regardless of the size of a drum or what its drum head is made of, the fundamentals of getting a good sound out of a drum are the same. You need to tune your drum to its sweet spot in order for it to sound its best. The sweet spot is simply the pitch where the drum resonates best. This spot varies from drum to drum based upon size, the construction of the shell, and the type of head that you use.
Finding the sweet spot is fairly easy: Just adjust the pitch a little bit at a time until the sound is clear and without a lot of overtones (higher pitched sounds that the drum creates, which are usually hidden behind the fundamental tone of the drum). After it’s tuned well, you shouldn’t need to dampen (stop from vibrating) the head with tape or an internal system in order to lessen the overtones because there won’t be any.
If you use the techniques in this article to tune your drums and still can’t get the sound you want, more than likely your heads are the problem. A few people do seem to have a drum-tuning deficiency. If you’re one of the few who can’t seem to tune your drum, don’t hang your head in shame; just find someone who can do it for you and then ask that person to teach you.
Tuning a drum with lugs
Got a wrench and a few minutes? Well, that’s all you need to tune up your lug-tuned drum. Lug-tuned drums are by far the most common style these days; drummers use lugs on all drumsets and many hand and stick drums. For the most part, drums with this type of tuning system are pretty straightforward to tune.
Start by removing the drumhead and the rim from your drum, and putting the drum on the floor. Wipe the edge of the shell with a dry cloth to get off any dirt or dust. Next, put the head on the drum and then the rim over that. Then follow these steps:
1. Tighten the lugs by hand until they’re as tight as you can get them.
Work the lugs by going across the drum as you go around. Start with the lug at the top (12 o’clock position), go to the lug at the six o’clock position, back up to the one o’clock position, to the seven o’clock position, and so forth until you go all the way around. This method ensures that you get the head evenly set on all sides.
2. Press down on the rim over each lug as you tighten it further by hand, following the same pattern around the drum.
3. After all the lugs are fully tightened by hand, gently press on the center of the head with your palm until you hear some cracking from glue on the head (be careful not to push too hard).
This pushing seats the head and forces it to make full contact with the shell.
4. Using the drum key (tuning wrench), work around the drum in the same manner described in previous steps and tighten each lug one-quarter to one-half a turn until all the wrinkles are out of the head.
This process should take only one or two times around the drum.
5. Check the drum’s pitch (how high or low the sound is) by hitting the drum in the center of the head.
6. Continue going around the head using one-quarter turns until you get to a pitch that rings freely.
If you notice overtones or if the pitch isn’t really clear, lightly tap the head with your stick about one inch in from each lug. The lugs should all be the same pitch. Adjust any that are out of pitch with the others until all are the same.
Repeat this procedure on the bottom head if you have double-headed drums. Some like to get both heads tuned to the same pitch, but other people tune the bottom head slightly higher or lower than the top head. Experiment and see what you prefer.
Tuning a drum with a rope system
Rope-tuned drums look hard to tune but they’re really not. In some ways, they’re actually easier to tune than drums with lugs, because you don’t have to worry about getting the drum in tune with itself.
The process for tuning a drum with a rope system is pretty simple. All you have to do is untie the loose end (usually the long section) from the rope so that it’s free. You can find this section by noticing where the end of the rope is that’s strung around the drum. To raise the pitch, feed the loose end of the rope under the next two vertical strands (keep the rope taut where it was initially tied off). Next, loop the rope back across the second strand to the first and go under that one again. Hold the drum securely (maybe by resting your knee on it) and pull the rope tight until the first strand crosses the second and the rope is straightened out. Continue this procedure until you have the drum at the desired pitch. Tie off the loose end of the rope, and you’re set to play!
Tuning the untunable
Many frame drums are untunable — they don’t have a hardware system that allows you to adjust the tension on the head. That doesn’t necessarily mean that you can’t adjust the pitch of the drum — you can as long as the drum has a natural skin head.
Because natural hide heads are affected by temperature and humidity, you can use these factors to adjust the tension on the head of your drum. Higher temperatures and lower humidity result in the head becoming more tense, thus producing a higher pitched sound. Likewise, lower temperatures and higher humidity result in a lower pitched sound. In most cases, you find that your drum drops in pitch, sometimes to the point where all you get is a “thud” when you hit it. This drop in pitch is especially evident in thinner-headed drums.
To raise the pitch of your untunable drum, place it in sunlight for a little while until the head warms up a bit. You can also hold it over a heat source for a couple of minutes (some people use a hair dryer). Be careful though: If you put the drum too close to extreme heat or leave it in the hot sun too long, the head will break. If you want to lower the pitch of an untunable drum, put it in the bathroom, close the door, and turn on the shower (don’t put the drum in the shower though!). The humidity in the room will drop the pitch of the drum.
These are both temporary solutions to tuning an untunable drum. The drumhead will eventually readjust to its natural pitch, as determined by the humidity and temperature in your room.
Choosing the perfect rhythm for your drum part
Playing a percussion instrument is all about rhythm. So if you play the drums, when you get together with other musicians, you need to be able to choose the correct rhythm for each song. If you end up reading music, this task is easy because the style of the music and basic groove pattern are notated on the chart (sheet music), but if you play without music, you have to figure out what to play. To do so, you need to listen to what the other musicians are playing and immediately choose a rhythm that fits.
Getting hints from other musicians
Often, somebody tells you the basic style of the tune by saying “straight-ahead rock” or “blues feel.” This hint gives you some idea of the genre of the music, but, depending on the person’s knowledge and skill level, it may or may not really help you figure out what to play. Just nod your head knowingly and listen very carefully (asking for clarification if you don’t understand is often okay).
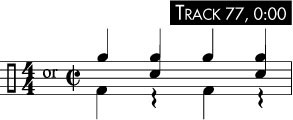
If the person counts the song in (for example, “one, two, three, four — play”) without playing an intro, you may have to fake it until you can actually hear what the other musicians are playing. The best thing to do is play the rhythm in Figure 1 until you can figure out what’s going on.
The rhythm in Figure 1 works well in these situations because it contains the core instruments (hi-hat, snare drum, bass drum), and it won’t conflict with the rhythms of the other instruments, no matter what they’re playing.
Using the music as a guide
The most important factor that will guide you in determining which rhythm to use is the overall feel of the music (the section or song). To figure out the overall feel, start asking yourself the following questions:
- Does the song have a straight or triplet feel? You need to listen carefully to the music to answer this question. Depending on the song and the abilities of the other musicians, the feel is pretty easy to determine. In some cases, though, hearing it will prove more difficult. Fast songs in a shuffle feel, for example, can sound surprisingly like a straight feel.
- If you’re unsure if the song has a straight or triplet feel, asking is generally okay. However, if you’re in a situation where asking isn’t possible or desirable, the best thing to do is keep it really simple until you can figure it out (try starting with the rhythm in Figure 1).
- What subdivisions are being used? Whether eighth or sixteenth notes are the basis of the main rhythm determines what type of rhythm you choose. If the guitar or keyboard player uses sixteenth notes, for example, you will probably find that playing sixteenth notes on the hi-hat will fit well.
- Is the feel regular or half-time? To answer this, listen for the basic pulse and watch other musicians as they play their parts (they often give this information away by the way they tap or sway as they play). It’s often pretty easy to tell the feel: One style fits much better than the other.
- What is the length of the rhythmic phrase? After you know the overall feel of the music, start listening for the rhythmic phrasing of the other instruments. The length of the rhythmic phrase can help you decide how long you want your rhythm. The most common lengths for rhythms are either one or two bars, although it’s not unheard of to have a groove that’s four bars long. Listen to the bass player. His or her rhythms are your cue for what to play on the bass drum.
- Unless you’re playing in a free-form jazz-fusion band using bizarre odd meters or you’re into experimental music where there isn’t a distinguishable pulse, the style of the song gives you an immediate sense of what to play. In most cases, you draw from a handful of established grooves.
Figure 2 shows you an example of how a drum part relates to the rhythms of the guitar and bass player’s parts. Notice how the hi-hat pattern and the bass player’s notes on the one and “&” of two (played on the bass drum) matches the guitar player’s eighth-note rhythm. Because this is a rock tune, the snare drum plays on the two and four.
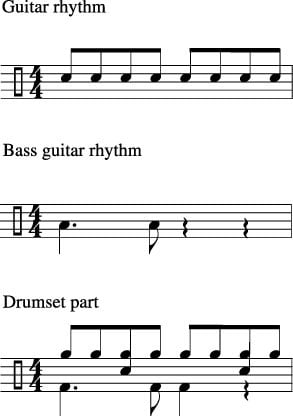
Figure 2: This is how a drum rhythm fits with the other instruments in a band.</di
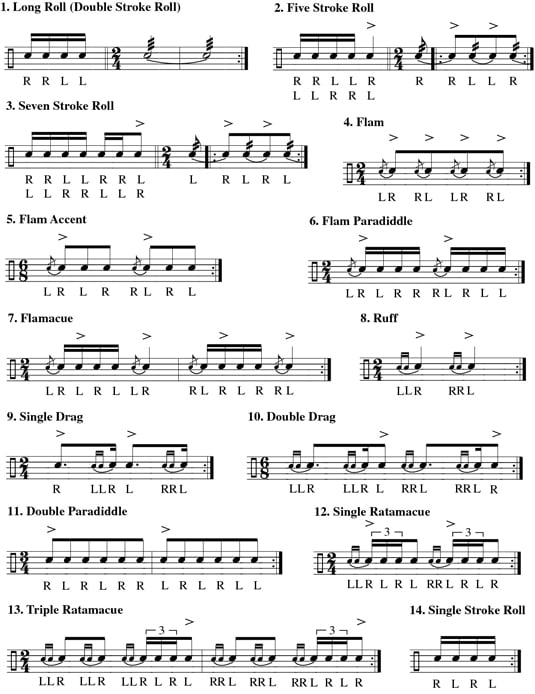
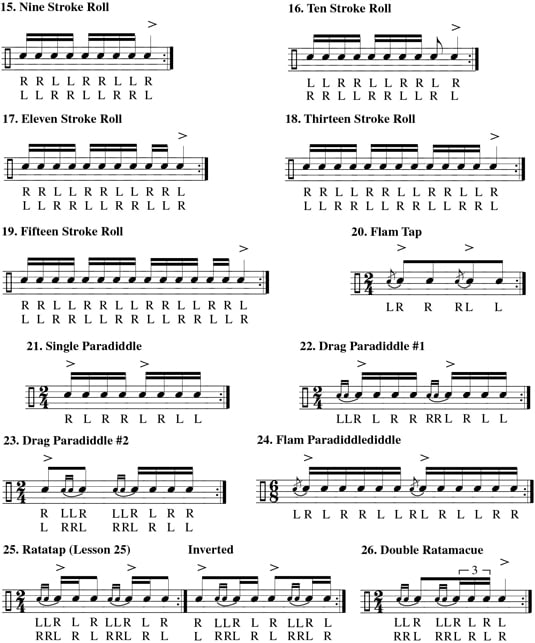
Drumming the 26 standard American rudiments
Rudiments are drumming exercises to help you develop fluency in a number of sticking patterns. Practicing these exercises builds hand-to-hand coordination and develops a relaxed sound. The following rudiments can be practiced in two ways:
-
Set your metronome (or play along to some music) at a comfortable tempo and play steadily for a few minutes or longer.
-
Start out slowly, gradually building up speed until you hit the maximum speed that you can play them and still be in control. Hold that tempo for a few minutes and then slowly reduce your speed until you’re back where you started.