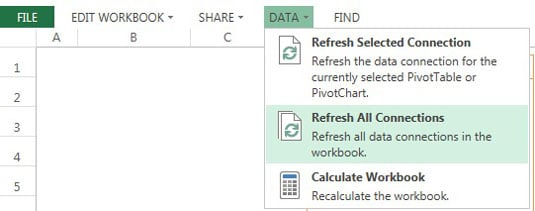
Alternatively, you can use the Power Pivot Gallery to schedule an automatic refresh based on a schedule you define. Simply click the Manage Data icon in the upper-right corner of the target report's shadow box.
SharePoint opens the Manage Data Refresh screen, shown here. The idea is to configure each setting to set up the schedule you want.
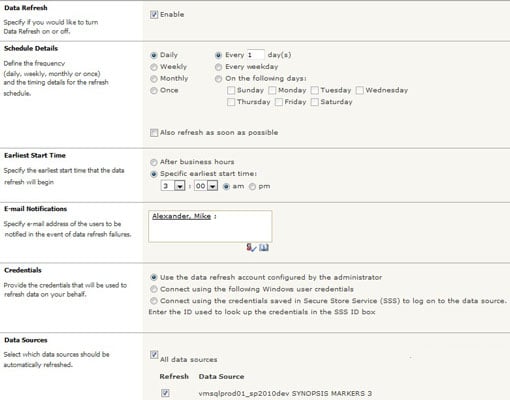
This list describes each settings section:
- Data Refresh: The Data Refresh section holds the On-Off switch for your schedule. Place a check in the Enable Schedule check box to make the schedule active. Remove the check to stop automatic refreshes.
- Schedule Details: In the Schedule Details section, you can specify the frequency and intervals of the schedule. In addition to selecting the time intervals, you can refresh as soon as possible. Placing a check mark next to the Also Refresh as Soon as Possible option starts a refresh within a minute. This option is helpful when you want to test the refresh process.
- Earliest Start Time: The Earliest Start Time section lets you specify the time of day to run the refresh process.
- E-mail Notifications: The E-mail Notifications section lets you specify who should receive an email from SharePoint every time the scheduled refresh is run. Individuals who are specified receive an email regardless of whether the process ran successfully.
- Credentials: Most data sources require authentication in order to connect to them (username, password, and so on). The Credentials section lets you specify how authentication is passed to external data sources. This section has these three options:
- Use the Data Refresh Account Configured by the Administrator: Authenticates the SharePoint system account to the data source. You typically have to work with your SharePoint administrator to set up this authentication method and ensure that the data source can use SharePoint's system account.
- Connect Using the Following Windows User Credentials: Lets you explicitly enter a username and password for authentication. Avoid using your personal username and password here. Instead, use this option with an application account, which is a "dummy" user created by your database administrators.
- Connect Using the Credentials Saved in Secure Store Service (SSS) to Log On to the Data Source: This authentication option allows data connections to be refreshed without requiring a password. In order to use this option, you need a Secure Store ID from your SharePoint administrator.
- Data Sources: This setting lets you define whether all data connections are refreshed, or only specific connections. Deselecting the All Data Sources check box enables the selection of individual connections in your workbook.