
Sometimes you’ll be working directly out of a campaign. Other times you may be running a specific report that isn’t campaign related (for example, an existing “Northern California Active Customers” report), but you may want to update the status of people who turn up in that data set.
Mass updating all member statuses in a campaign
To mass update campaign statuses for all contacts or all leads in a campaign, log in to Salesforce and follow these steps:- Click the Campaigns tab and select the specific campaign whose members’ statuses you’d like to update.
- Click the Manage Members button. A picklist appears.
- Select the Edit Members – Search option. The Manage Member page appears, with the Existing Members subtab selected.
- Use the filter criteria, as needed, to narrow the members that you want to update. You can also manually select which members to update by selecting the check box next to their names in the results.
- Select members to be updated for this campaign. You may select up to 200 members to update.Updating existing campaign member statuses in bulk.
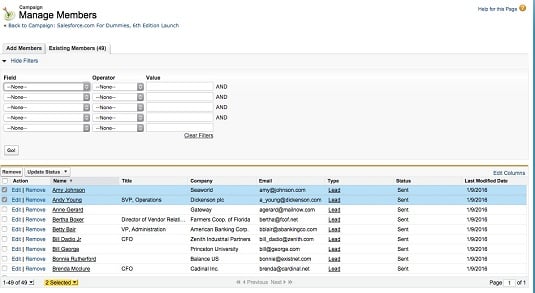
- Click Update Status to apply the new status to your selected members. A status bar displays the results of the operation. You may continue updating by selecting new views, or click the Back to Campaign: Campaign Name link when done.
Mass updating all member statuses in a report
To update the status of several members at once, follow these steps:- Click the Reports tab and scroll down to the Campaigns Reports folder from the left sidebar.
- Click the Campaign Call Down Report link. A page appears, allowing you to select a specific campaign.
- Use the Lookup icon to choose a campaign and click the Run Report button. A Campaign Call Down Report for your campaign appears.
- Click the Add to Campaign button. The Add Members Wizard opens.
- Confirm the campaign in the Campaign field. Use the Lookup icon to search for your match.
- After a campaign is selected, choose the appropriate status from the Member Status drop-down list.
- Use the radio buttons to toggle whether you want the existing member statuses to be overridden by this member status. The default is to not override existing member statuses. However, if your goal is to update all statuses of members in this report, choose to override the status.
- Click Add to Campaign to continue. Step 2 of the wizard appears with a status message of your attempt.
- Verify the information and click Done. You return to your view page.
You may also mass-update campaign statuses for contacts or leads in a campaign by updating the information in a .csv file first and then importing it.