
Customize Report button
The Customize Report button displays the Modify Report dialog box.Comment on Report button
Clicking the Comment on Report button displays the Comment on Report window (shown). To use the Comment on Report dialog box, you click a report value you want to annotate with a comment. QuickBooks then opens a comment box at the bottom of the window, you type your comment, and then you click the Save button.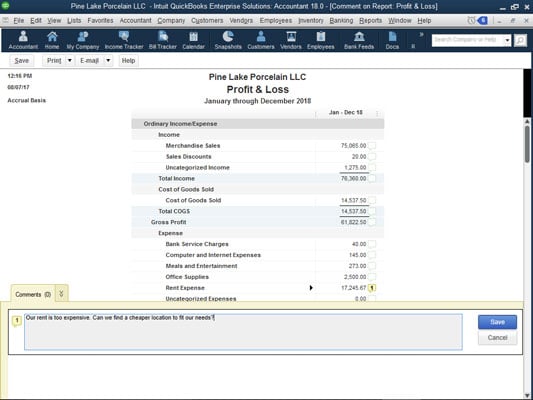 The Comment on Report window.
When you’re done commenting on the report, you need to save the annotated report. Do so by clicking an OK button when QuickBooks asks whether you want to save the commented report. Later on, when you print the report, you can include your comments. (This is a great tool for accountants and bookkeepers who want to explain what numbers mean to other readers of the financial statements.) You print a saved commented report by choosing the report from the Reports→Commented Reports menu.
Share Template button
The Share Template button, which QuickBooks enables after you’ve customized a report in some way, lets you share your customized report settings (not the data) with other QuickBooks users. When you click this button, QuickBooks displays the Share Template dialog box (not shown). Use the dialog box to give your report template a name (ideally a clever name, please), describe your customized report with a few choice words, provide your name and email address, and use the option buttons provided to indicate whether you want to remain anonymous. When you click Share, QuickBooks uploads your report template to an Intuit website where other people can grab the template and use it.Memorize button
The Memorize button displays the Memorize Report dialog box, shown here. The Memorize Report dialog box lets you memorize, or permanently save, a particular set of report creation settings. After you memorize these settings, you can produce the exact same report by choosing the memorized report from the Reports→ Memorized Reports submenu.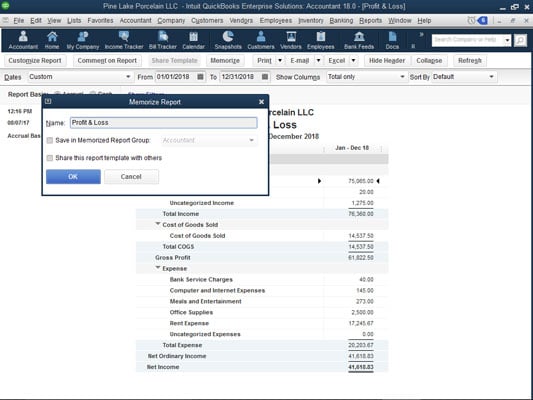 The Memorize Report dialog box.
You can save a memorized report in the Memorized Report Group. To do this, select the Save in Memorized Report Group check box. Then use the Save in Memorized Report Group drop-down list to select the report group in which the memorized report should be saved.
Print button
The Print command button in the top menu bar displays a drop-down list with two options: Report and Save As PDF. If you click Report, QuickBooks (sometimes after a bit of annoyance) displays the Print Reports dialog box, shown here, which lets you choose how the report should print and where it should print. The Settings tab, for example, lets you choose the printer, select a page orientation (either portrait or landscape), specify whether you want to print only a range of the report’s pages, control page breaking, and adjust the dimensions (width and height) of the report. If you click Save As PDF, QuickBooks displays the Save Document As PDF dialog box, which lets you create a PDF of report document.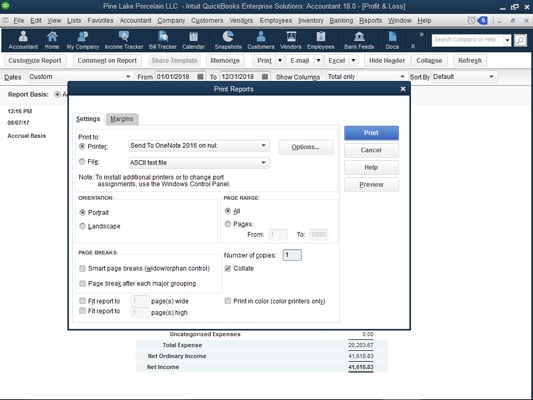 The Settings tab of the Print Reports dialog box.
The Margins tab of the Print Reports dialog box, shown here, lets you specify the margins that QuickBooks should use on the printed report pages. You specify the top, right, bottom, and left margins in inches.
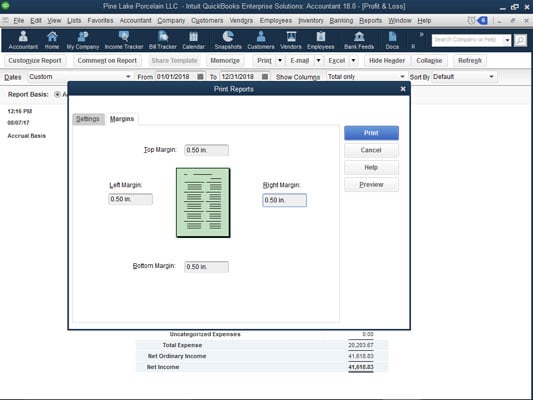 The Margins tab of the Print Reports dialog box.
Click the Preview button, provided on the Print Reports dialog box, to display the Preview window. The Preview window shows what your printed report pages look like. The window also includes buttons that let you page to the previous and next pages of the report, zoom in and out on the report, and print the report.
After you’ve used the Settings tab and the Margins tab to specify how QuickBooks should print a report, click Print. QuickBooks sends the report to your printer.Email button
The E-mail command button lets you email either an Excel workbook version of a report or a PDF version of a report to someone else as an email attachment.Excel button
If you click the Excel button, QuickBooks displays a submenu from which you can choose Create New Worksheet or Update Existing Worksheet. Choose Create New Worksheet to display the Send Report to Excel dialog box, shown here. The Send Report to Excel dialog box lets you take the information in a report and copy it to a file that a spreadsheet program, such as Microsoft Excel, can easily open. You can send the copy to a new Excel spreadsheet, to an existing Excel spreadsheet, or to a .csv (comma-separated values) file, which can be opened by just about any spreadsheet or database program. The Send Report to Excel dialog box.
To copy the report to a new workbook, select the Create New Worksheet radio button. From there, you have the option to create a whole new Excel spreadsheet (click the In New Workbook option) or create a new sheet in an existing file by using the In Existing Workbook radio button; then enter the path and name of the workbook in the text box that QuickBooks opens after you select the radio button. (If you don’t know the path and name of the workbook, click the Browse button and then use the dialog box that QuickBooks displays to locate the workbook file.)
If you want to copy the report to an existing Excel spreadsheet, select the Update an Existing Worksheet radio button. QuickBooks causes Excel to refresh the previously exported workbook.
If you want to replace an existing Excel spreadsheet with the new report you’re sending to Excel, select the Replace an Existing Worksheet radio button. Then, when QuickBooks opens a text box and adds the Browse button, either enter the path and name of the workbook in the text box or click the Browse button, navigate to the workbook, and select it.
Finally, if you want to copy the report information to a .csv file (a file format that can be opened by any spreadsheet or database program), select the Create a Comma Separated Values (.csv) File radio button.
If you click the Advanced command button on the Send Report to Excel dialog box, QuickBooks displays the Advanced Excel Options dialog box, shown here. This dialog box allows you to control what formatting QuickBooks copies to Excel (do this with the QuickBooks Options check boxes), turn certain Excel formatting features on or off (do this with the Excel Options check boxes), and set up some preliminary workbook printing information in Excel (do this with the Printing Options radio buttons). All this stuff relates to how Excel works. If you’re comfortable working with Excel, go ahead and make the changes that you want. If you aren’t comfortable working with Excel, go ahead and accept QuickBooks’s default suggestions. You can change all this stuff later, and rather easily, in Excel.
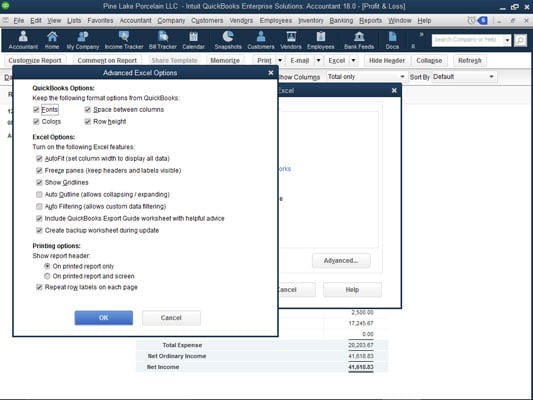 The Advanced Excel Options dialog box.
If you’re working with QuickBooks, know that Excel is a wonderful tool for digging deeper into your data. Also note that next time you buy a PC, you may have the option of getting Microsoft Office as part of the purchase price. Microsoft Excel comes with Microsoft Office.
Hide Header button
The Hide Header button and the Collapse button change the way that the report appears in the Report window and, if printed, on the page.You click the Hide Header button to remove the header information, such as the company name. If you hide the header, you can click the Hide Header button again to replace the header.
Collapse button
The Collapse button collapses detail in a report. QuickBooks doesn’t show subaccounts in a collapsed report — only accounts.To uncollapse a report that you previously collapsed, click the Expand button. QuickBooks replaces the Collapse button with the Expand button when the Report window shows a collapsed report.
Don’t spend any time trying to figure out what the Hide Header and Collapse/Expand buttons do. If you have a question, simply display a report in the Report window and click the command button about which you have a question. The changes in the Report window show you what the command button does.
Refresh button
The Refresh button tells QuickBooks to update a report’s information for changes in the QuickBooks data file. This sounds crazy at first, but you can actually leave report windows open. This means that a report window may show a profit and loss statement from a week ago, for example. If you’ve entered several transactions in the past week, the report data may no longer be correct. When you click the Refresh button, QuickBooks knows that it should update the report with the most recent changes.QuickBooks typically prompts you to update a report for changes to the QuickBooks data file. If you don’t follow QuickBooks’s suggestion to update, however, you can later click Refresh to update.