As you can see in this figure, the Brush Settings panel menu offers very few commands, whereas the Brush panel menu includes variations in how to display the panel content, some housekeeping commands for resetting/loading/saving brushes, and a list of brush sets in the bottom half of the menu.
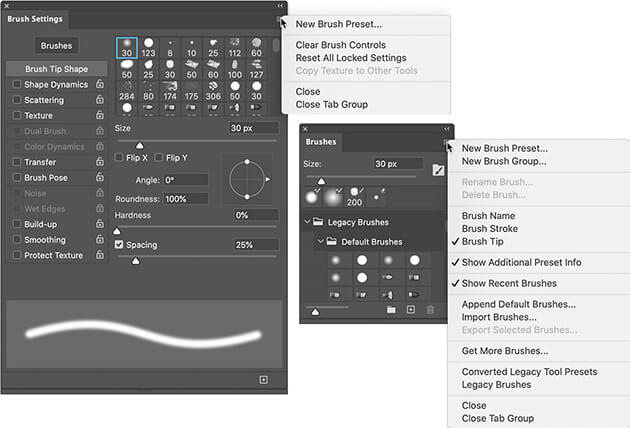
Don’t overlook those little lock icons to the right of the various pane names in the Brush panel. Click the lock to preserve the settings in that pane while you switch among brush tip presets. Any unlocked attributes revert to those with which the brush tip was created. Locking, for example, Shape Dynamics retains those settings even if you switch to a totally different brush tip.
Here, in order, are the Brush panel panes and the options in those panes to which you should pay attention:
-
Brushes: This button (just above the names of the panes) opens the Brush panel, where you pick the basic brush tip shape from the brushes loaded in the panel. You can also resize the brush tip, but that’s it. (Note that you can also select a brush tip in the Brush Tip Shape panel of the Brush Settings panel.)
-
Brush Tip Shape: Without a check box to the left or a lock icon to the right, Brush Tip Shape is the pane in which you can select and customize a brush tip. (Refer to the Brush Tip Shape pane in the figure)
This is perhaps the most important part of the Brush panel. In this pane, you can select a brush tip, change its size, alter the angle at which it’s applied, change the height-width relationship (Roundness) of the tip, and adjust the Spacing setting.
-
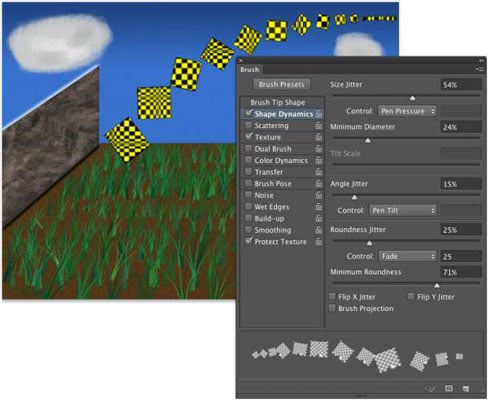
Shape Dynamics: Dynamics in the Brush panel add variation as you drag a tool. Say you’re working with a round brush tip and choose Size Jitter. As you drag the brush tip, the brush tip instances (the individual marks left by the brush as you drag) will vary in diameter. The Shape Dynamics pane offers Size Jitter, Angle Jitter, and Roundness Jitter.
Each of the “jitters” can be set to fade after a certain number of brush tip instances or can be controlled with the stylus that you use with a tablet and stylus. Angle can also be set to Direction, which forces the brush tip to adjust the direction that you drag or the direction of the selection or path you stroke.Use Shape Dynamics to add some variation and randomness to your painting, as shown in this image:
-
Scattering: Scattering varies the number of brush tip instances as you drag as well as their placement along the path you drag. Like Shape Dynamics, Scattering can be set to fade or can be controlled with a Wacom tablet.
-
Texture: Use the Texture pane to add a pattern to the brush tip, as shown. You can select from among the same patterns that you use to fill a selection. Texture is most evident when Spacing for the brush tip is set to at least 50%.
-
Dual Brush: Using a blending mode you select, the Dual Brush option overlays a second brush tip. You could, for example, add an irregular scatter brush to a round brush tip to break up the outline as you paint.
-
Color Dynamics: Using the Color Dynamics pane, you can vary the color of your stroke as you drag. This comes in most handy for painting images and scenes rather than, say, working on an alpha channel. Just as you might add jitter to the size, shape, and placement of a grass brush while creating a meadow, you might also want to add some differences in color as you drag.
You could pick different shades of green for the foreground and background colors and then also add jitter to the hue, saturation, and brightness values as the foreground and background colors are mixed while you drag, as shown in the previous figure. -
Transfer: Think of this pane as Opacity and Flow Jitter. You can add variation to the opacity and flow settings from the Options bar to change the way paint “builds up” in your artwork.
-
Brush Pose: When working with a tablet and stylus, this panel enables you to ensure precision by overriding certain stylus-controlled variations in a stroke. If, for example, you want to ensure that the brush tip size doesn’t change, regardless of how hard you press on the tablet, open Brush Pose, set Pressure to 100%, and select the Override Pressure check box. You can also override the stylus's rotation and tilt as you paint, setting any value from -100 to +100 for both tilt axis values and 0 to 360 degrees for rotation.
-
Other Options: At the bottom of the left column are five brush options that don’t have separate panes in the Brush panel. They’re take-it-or-leave-it options — either activated or not.
-
Noise: Adding Noise to the brush stroke helps produce some texture and breaks up solid areas of color in your stroke.
-
Wet Edges: Wet Edges simulates paint building up along the edges of your stroke.
-
Build-up: The Build-up check box simply activates the Airbrush button on the Options bar.
-
Smoothing: Smoothing helps reduce sharp angles as you drag your mouse or stylus. If the stroke you’re painting should indeed have jagged turns and angles, disable Smoothing.
-
Protect Texture: The Protect Texture option ensures that all the brushes with a defined texture use the same texture. Use this option when you want to simulate painting on canvas, for example.
-
When creating a dashed line or stroking a path with a nonround brush tip, go to the Shape Dynamics pane of the Brush panel and set the Angle Jitter’s Control pop-up menu to Direction. That enables the brush tip to rotate as necessary to follow the twists and turns of the selection or path that it's stroking. (You'll generally want to leave Angle Jitter set to 0 percent so the stroke follows the selection or path precisely.)