
Geni.com has space where you can initiate public discussions about research, ancestors, or just about anything genealogy-related you can think of. Much like other social networking sites, it has areas within your profile where you can upload photos and videos, and maintain a timeline. Unlike typical social networking sites though, it has a section where you can cite sources of your research findings and share DNA results.
Here's what to do to get started:
- Using your web browser, go to Geni.com.
- In the Start My Family Tree box, begin by selecting the option for your gender.
- In the First Name field, enter your first name.
- In the Last Name field, enter your last name.
- In the Email Address field, type your preferred email address.
- Click the Start My Family Tree button.
The registration opens to a page where you can activate your family tree by adding relatives.
- Click the parent whose information you are ready to add, as shown.
 You can navigate to other ancestors through the Geni.com family tree to add information about your family.
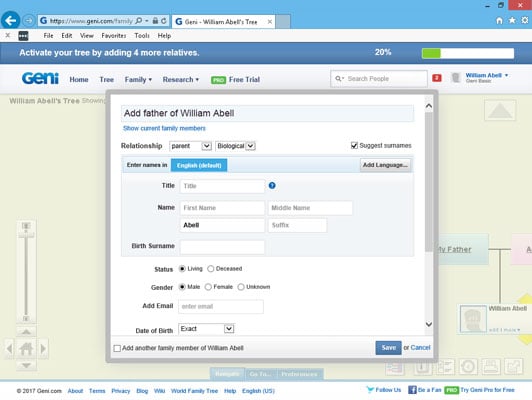
For this example, to enter information about your father, click the left parental box above your box on the family tree. A dialog box appears where you can enter information.
- Using the drop-down menus at the top of the box, pick the appropriate Relationship. The choices include parent, spouse, ex-spouse, partner, ex-partner, fiancé, sibling, or child in the first drop-down, and Biological, Adoptive, or Foster in the second drop-down.
- In the First Name field, enter your father's first name.
- If your father's last name is different from the one that automatically populates, fix it in the Last Name field.
- Select the appropriate option for Status to indicate whether your father is living or deceased.
- Select the appropriate Gender for your father.
- If you like (and you have your dad's permission), type your father's email address in the Email (Optional) field. Geni.com will use this email address to send this person an invitation to join Geni.com. Some relatives may consider these uninvited invitations to be spam, so be careful about entering other people's email addresses at networking websites.
- Select a parameter from the drop-down next to Date of Birth — your choices are Exact, Before, After, and Between. The type your dad's date of birth. If the date is approximate and not known for sure, you can click the Circa button next to Date. If you did not enter an email address, Geni.com presents you with a pop-up box offering to welcome your relative to the family tree by giving you another opportunity to add his or her email address. If you don't want to see these pop-up boxes every time you enter a relative, select the Do Not Show This Message Again checkbox in the lower left, then click the Skip button.
- Provide the place name where your father was born in the Place of Birth field.
- If you wish, you can enter a Current Location and Occupation in the last two fields in the box.
- If you have other relatives to add, you can check the box labeled Add another family member of [focus person's name]. On saving this person's data, this opens another box where you can enter information about another relative immediately.
- Click the Save button.
The Geni.com site is impressive in the ways it helps you share your family tree research with others. Here's a quick overview of the various parts of the site:
- Tree: On this tab, you can view information about the family members included in the tree as a family tree (pedigree chart) or a list. You can navigate in the standard Geni.com format by clicking the yellow arrows and name boxes, or you can search by name in the Go To section.
- Family: Several handy functions are accessible on the Family menu including Lists, Photos, Videos, Calendar, Map, Statistics, Timeline, and a Last Names Index. This is also where you can find links to share your tree and to generate the Family Tree Chart. The Lists, Photos, and Videos sections are places for you to add items to your file to enhance the content. If you enter birth dates and anniversaries for your family members, the Calendar gives you a consolidated list that helps you remember special events. The Family Map shows you where your family members currently live and were born, if you include locations in the individualized data you record on the site. The Statistics section is very interesting if you like to look for overall patterns within the family, such as average life expectancy or number of children. The Timeline gives you a quick glance of all your Geni.com activities since registering. And the Last Name Index is just that — a list of last names in your records. Share Your Tree enables you to extend invitations to other users to view and/or contribute information. It also has a GEDCOM Export functionality so you can convert your tree for sharing. Lastly, the Family Tree Chart option builds an attractive family tree that you can then download for printing and sharing.
- Research: The Research menu offers services to help you connect with others to share research. It includes a Merge Center where you can see matches between people in your tree and other members' trees and online records. There are also sections for discussions with other members, projects where you can create and administer joint research with others, and documents you can upload to support your research. Additionally, there's a list of surnames in Geni.com to explore and a list of popular profiles for famous people that you can view. And if you want to order a DNA testing kit, the Research menu has information about services offered by their partner, MyHeritage DNA.
- PRO Free Trial: The PRO Free Trial tab allows you to register to try the PRO Geni.com membership for free for 14 days. The PRO membership enables access to enhanced service features and allows you to store unlimited photos, videos, and documents. It also offers a premium level of support if you have questions or need help. Be aware that you are required to provide a credit card when you sign up for the free trial. At the end of the trial period, you will automatically be charged the one-year membership fee to continue the service if you do not notify Geni.com to end your free trial before the 14 days are over.
- Profile: The menu to the Profile section appears under your name, to the right of the Search field in Geni.com. This Profile section is where you can store data specifically about you — everything from your birth date and age, to educational information, to your work experience, to personal narratives about your life, aspirations, and research interests, or whatever you'd like to say about yourself in the free-form text boxes. This is also where you can track who you've invited to view and participate in your Geni tree. The data is sorted into seven tabs: Basics, Relationships, About, Personal, Contact, Work, and Schools. Depending on which setting you choose, various aspects of your profile may or may not be visible.