
- Sign into AWS using your administrator account.
- Navigate to the EC2 Management Console.
You see the EC2 Management Console.
- Verify that you have the correct region selected by choosing it in the region drop-down list at the top of the EC2 Management Console.
- Select Load Balancing → Load Balancers in the Navigation pane.
You see the Load Balancer page. Notice that the message specifies that you don’t have any load balancers configured for the selected region; it doesn’t say that you lack access to any load balancers.
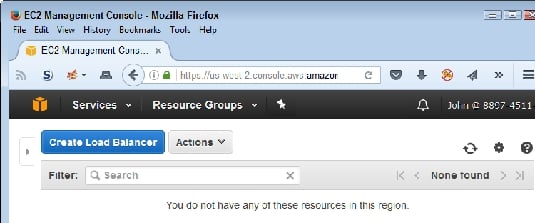 The Load Balancer page tells you about any load balancers you have configured.
 - Click Create Load Balancer.The wizard asks you to choose a load balancer type.
The kind of load balancer you choose affects all sorts of things. The best place to get a detailed comparison is at this AWS article. However, here is a quick overview of what to expect:
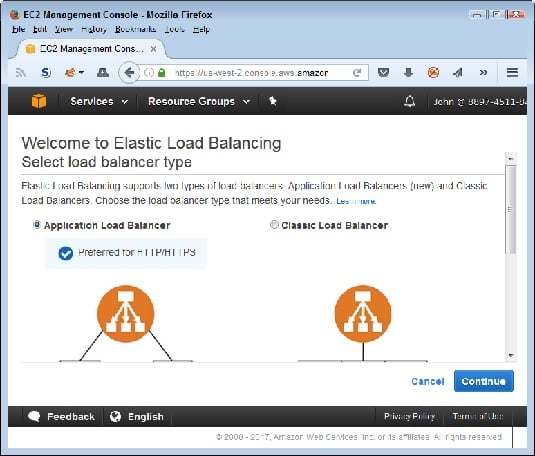 Choose a load balancer type based on the kind of load balancing you need.
- Classic: The classic load balancer works at layer 4 of the OSI model, which means that it focuses on a combination of IP address and port when routing calls. The advantages of this load balancer are that it’s easier to set up and configure, is generally less expensive, and differentiates between calls that use SSL and those that don’t.
- Application: The application load balancer works at layer 7 of the OSI model, which means that it focuses application content, in addition to IP address and port. You can use rules to map how the load balancer routes information requests. The advantages of this load balancer are significantly greater flexibility, a capability to prioritize tasks, and the capability to use dynamic port mapping.
- Choose a load balancer type and then click Continue.
The example uses the Classic Load Balancer option to keep the costs of working with this feature minimal.
The wizard prompts you for a load balancer name. In addition, notice that you can add protocols for accessing the load balancer. You use the same protocols that your EC2 instances normally require. Remember that users will send requests to the load balancer instead of the EC2 instance. The load balancer will then send the request to the EC2 instance best able to handle it.
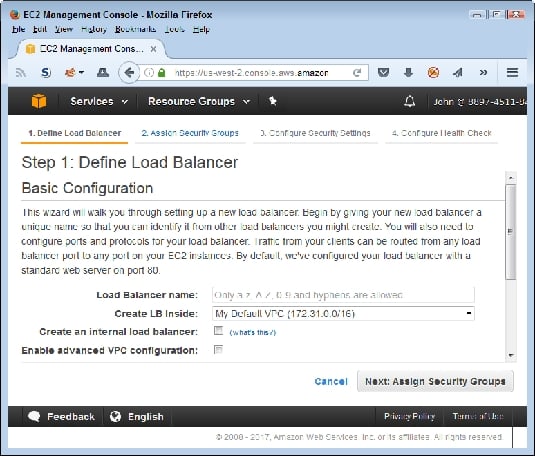 Define the basic load balancer settings.
If you don’t provide any secure ports for your load balancer, the wizard will ask you to reconsider during the security setup step. Whether you use a secure port depends on how you’re using your EC2 instances. If you don’t need a secure connection for your EC2 instances, you aren’t likely to need a secure connection for the load balancer.
- Type MyLoadBalancer in the Load Balancer Name field and then click Next: Assign Security Groups.
You see the Step 2: Assign Security Groups page. Using an existing security group makes configuration considerably easier and reduces the risk of users failing to access applications and resources. However, creating a new security group does enable you to define a more secure environment for applications that need it.
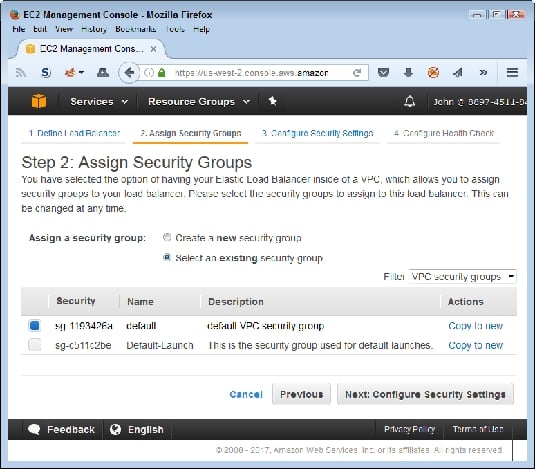 Choose a security group for your load balancer.
 - Select the Default-Launch security group and then click Next: Configure Security Settings.
You see a message regarding the load balancer’s security. If you did select one of the secure options, the same screen asks you to provide an SSL certificate or allow AWS to generate an SSL certificate for you.
- Click Next: Configure Health Check. You see the Step 4: Configure Health Check page.
This step is especially important because it ensures that the Elastic Load Balancer sends requests only to EC2 instances that are able to respond. Using this approach adds a level of reliability to your setup. The default options normally work quite well, but you can choose to change them if desired.
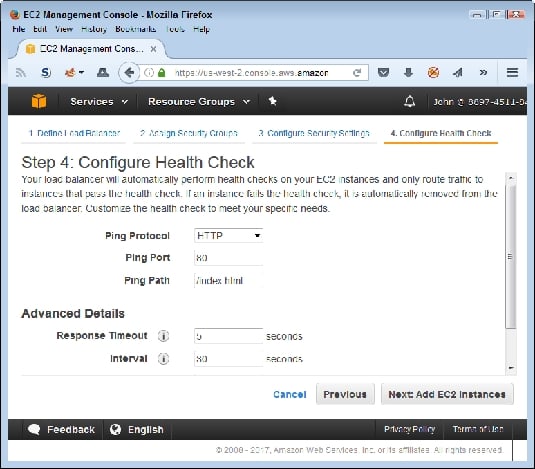 Define the method and timing used to verify EC2 instance health.
 - Click Next: Add EC2 Instances.
The wizard presents you with a list of running instances. Normally, you choose as many instances as you can to help support load balancing.
- Select each of the EC2 instances you want to use and then click Next: Add Tags.
The tags provide information that you can use for various organizational needs. You don’t need to define any unless you use them as part of an application-programming requirement or some other need.
- Click Review and Create.
The wizard presents you with a screen showing the selections you made. Make sure to check the information carefully.
- Click Create.
AWS starts the Elastic Load Balancer for you and shows you the Load Balancer page.