
For more reliable exposure guidance, find out whether your camera offers an exposure meter, histogram, or highlights display mode.
Reading the meter
An exposure meter offers before-the-shot assistance. This simple bar graph indicates whether the camera thinks your current settings will produce a good exposure. When you see a single bar at the 0 mark, as in the third illustration, you're good to go.Bars appearing on the side of the meter that sports a minus sign indicate underexposure; bars on the plus-sign side predict overexposure. The more bars that appear, the greater the potential exposure problem. (Note that some cameras place the positive end of the meter on the left while other models put it on the right, so inspect the meter closely to see which is which on your camera.)

A few pointers about the way exposure meters operate:
- You may need to press the shutter button halfway to display the meter. Your half-press wakes the exposure system and tells the meter to do its thing.
- Where and when the meter appears depends on your camera and shooting mode. The meter may appear in the viewfinder, monitor, or top LCD readout, depending on your camera. But on most cameras, the meter appears only when you shoot in manual exposure mode. In other modes, the meter typically appears only if the camera anticipates an exposure problem or if you enable Exposure Compensation, an autoexposure adjustment feature.
- The meter readout depends on the metering mode. This setting determines which part of the frame the camera analyzes when calculating exposure. Normally, the entire frame is measured.
- Keep the lens trained on your subject while checking the meter. If your camera displays the meter only in the monitor (or if you prefer to view the meter there), don't move the camera after pressing the shutter button to display the meter. All too often, people frame the shot, press the shutter button halfway to activate the meter, and then point the lens at the ground so that they can get a better look at the display. The problem is that most cameras continue adjusting exposure settings until you take the picture, so as soon as you move the camera, it takes a new reading. So when the lens is pointing down, you're viewing the proper settings for photographing the ground and not your subject. For this reason, you should rely on the viewfinder meter if your camera offers one.
Interpreting a histogram
A histogram is a chart that plots out the brightness values of all pixels in the photo, using a scale of 0 (black) to 255 (white). For example, the histogram shown below represents the accompanying butterfly photo. The horizontal axis of the chart displays brightness values, with shadows on the left and highlights on the right. The vertical axis shows you how many pixels fall at each brightness value. A spike at any point indicates that you have lots of pixels at that particular brightness value.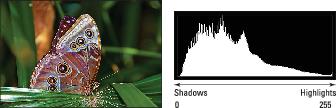
Some cameras can display a histogram on the monitor in shooting mode, helping you suss out exposure settings before you snap the shot. Most models, however, offer this tool only during playback; you may need to change your camera's default playback settings to display it.
Normally, a histogram that resembles a bell-shaped curve, or something close to it, is a good sign because well-exposed photos typically contain more midtones (areas of medium brightness) accented by highlights and shadows. This fact has led some photographers to believe that their exposure decisions should be based on generating this so-called perfect histogram. But unless you plan to frame and exhibit your histogram instead of your photograph, this idea is hogwash.
Here's the thing: You have to interpret a histogram with respect to the brightness values of your subject. You're just not going to see a ton of pixels at the dark end of the scale when you're photographing a polar bear against a snowy backdrop, for example.However, if you look at your camera’s histogram and it has a big spike to the left, it may be that your photo is too dark, in which case you need to adjust the exposure settings or add a flash. If it’s spiked to the right, your photo may be too bright. It’s normal to have a few odd spikes here and there, though.
Displaying playback “blinkies”
The problem with both the meter and the histogram is that although they can indicate an exposure issue, they don't tell you which parts of the image are under- or overexposed. To provide this information, many cameras offer a playback mode that causes any pixels that are pure white — that is, the ones that have a brightness value of 0 — to blink in the display. Most photographers refer to this as “blinkies” mode, but the official name on most cameras is Highlights Display mode.Again, consider the blinkies display with respect to your subject. When you shoot a portrait against a very bright background, you may see lots of blinkies in the background. If your subject is well exposed, ignore those blinkies — it's the subject that matters. But if the blinkies occur on the person's face or hair, that's a signal to adjust the exposure settings or find different light in which to shoot your subject and try again.