
Conserve battery power
Your camera won't even turn on, let alone take a picture, without adequate battery power. So check the user guide to find out where to locate battery-status information; usually, it's indicated by a symbol. A full battery symbol means the battery is charged; bars inside the icon disappear as the battery drains.
When the battery level approaches the danger zone, use these strategies to make the most of the remaining power:
- Disable or limit the use of energy-hogging features. Two big energy consumers are the monitor and the flash, assuming that the latter is of the built-in variety. (External flash heads usually run on separate batteries.) Electronic viewfinders, too, can be a major energy suck, although the extent to which an EVF drains the battery varies from model to model.
Another feature that requires lots of battery juice is the autofocusing system, especially when you use continuous autofocusing. But if your camera doesn't offer manual focusing or your subject is moving too quickly to make manual focusing practical, you don't really have the option to go without autofocusing.
Turning off image stabilization — a feature designed to compensate for small amounts of camera shake — can lighten the load on the battery in some cases. Check your camera or lens manual to find out whether this is the case for your equipment. If not, leave this feature turned on to ensure sharper shots when you're handholding the camera.
Finally, if your camera offers GPS and Wi-Fi, shut down those features as well unless they're absolutely necessary.
- Turn on the autosleep function. Most cameras offer a feature that saves power by automatically disabling the monitor and other power-hungry features (including the exposure meter and autofocus systems) after a period of inactivity. You may even be able to reduce the wait time that must pass before the shutdown occurs. Look for this option on your camera's basic-setup menu.
- Take off the chill. Batteries deplete faster when cold, so when you're not shooting, do what you can to keep your camera warm.
Safeguard camera memory cards
Take the following precautions to keep memory cards in good working order and ensure the safety of the pictures they hold:- Avoid touching the contact areas of the card.
- Turn off the camera before inserting or removing a card.
- Use special care when inserting CompactFlash cards.
- Beware of environmental hazards.
- Store extra cards properly.
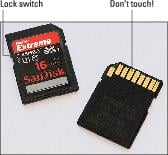
- Check the lock switch (SD cards and some CFast cards).
- Format the card.
Do not format a card that already contains pictures or any other data that you want to retain. Formatting erases all the data on a card.
Swap lenses in a protected environment
If you own an interchangeable lens camera, be careful when changing lenses, because that’s a prime occasion for dirt to sneak into the camera. Try to point the camera slightly downward when you attach the lens; doing so can help prevent dust from being sucked into the camera by gravity.When shooting outdoors, your camera is even more at risk during this operation, so try to find a way to shelter the camera while making the lens exchange. You can use a jacket or T-shirt as a sort of protective tent or, if your camera bag is large enough, perform the lens swap inside it.
Finally, be especially mindful of the end of the lens that sports the electronic contacts (the end that you attach to the camera). Avoid touching the contacts, and attach the cap made to cover that end of the lens as quickly as possible.
Clean with care
Dust, sea spray, flecks of dirt, and raindrops are just some of the substances that can spoil your images when they land on the front of the lens. Camera monitors also get gunked up pretty easily. And with cameras that offer touchscreen controls, fingerprints are inevitable.Cleaning both components is safe and easy if you use the right tools and techniques. Start by using a manually operated, bulb-style air blower or soft brush, commonly available in camera stores, to remove any large particles of dust or dirt. Then wipe the lens or monitor surface gently with a clean microfiber cloth or another material designed for camera use.
Do not use any of the following materials:
- The same microfiber cloth you use for your glasses.
- Facial tissue, newspaper, napkins, or toilet paper.
- Household cleaning products.
- Compressed air.
- Synthetic materials (like polyester).
- The hem of your t-shirt (or other piece of clothing).
Update camera firmware
Just when you thought software and hardware were confusing enough, along comes another techno-term to deal with: firmware. This special software lives permanently on your camera, telling it how to operate and function — in essence, it’s your camera’s gray matter.Every now and then, camera manufacturers update firmware to fix problems and bugs, enhance features, and generally do housekeeping that makes your camera operate better. Sometimes these changes are minor, but occasionally they fix pretty serious problems and errors.
To benefit from these updates, you have to download the new firmware files from your camera manufacturer’s website and install them on your camera. If you signed up for manufacturer email updates when you registered your camera (you did do that, right?), the company should inform you of updates when they occur. But it’s a good idea to also simply check the manufacturer’s camera support page every three months or so to make sure that you don’t miss an important firmware update. You will find instructions on how to install the firmware at the website.
Go from hot to cold (and vice versa) slowly
A digital camera is pretty much a computer with a lens, and like any electronic device, it isn't designed to cope with weather extremes. So take these safety steps:- Don't let your camera catch a cold. Extreme cold can cause various mechanical functions in your camera to freeze. If you must take your camera into the cold, keep it in a camera case under your jacket until you’re ready to use it.
- Don't let it get heat stroke, either. Extreme heat can damage your camera as well and can be especially hard on your LCD screen, which can “go dark” if it gets too hot. If this happens, simply get your camera to a cooler place.
- Avoid rapid changes in temperature. Changing temperature extremes, such as from an air-conditioned office into the heat of a summer day, is bad for your camera. To minimize this issue, invest in a well-insulated camera bag. When you arrive at your destination, leave the camera in the bag for a while so that it can acclimate to the change in temperature.
Keep it dry
Water — especially salt water — can short out important camera circuitry and corrode metal parts. A few raindrops probably won’t cause any big problems, but exposure to enough water can result in a death sentence for a camera. Even models designed expressly to be water resistant have their limits.If you accidentally leave your camera on the picnic table during a downpour or drop it in the swimming pool, all may not be lost, however. First, use a soft cloth to dry the outside of the camera. Then remove the batteries and memory card — try not to push any camera buttons in the process — and set the camera in a warm place where it can dry out as quickly as possible. With luck, the camera will come back to life after the water has had time to evaporate. If not, it's off to the repair shop to see whether anything more can be done.
Clean the image sensor
The image sensor is the part of your camera that absorbs light and converts it into a digital image. If dust, hair, or dirt gets on the sensor, it can show up as small spots on your photos. Image-sensor spots are often most visible in the sky or in bright, clear areas of an image, but can be seen just about anywhere. Typically, the spot appears in every frame, sometimes even in the same area in every frame.
Most cameras have an internal cleaning system designed to remove any stray flotsam and jetsam from the sensor. Usually, the camera is set up at the factory to complete a cleaning cycle every time you turn the camera on or off, or both. You may also be able to initiate a cleaning cycle at other times by choosing a menu option.
If the camera’s internal cleaning mechanisms don’t do the trick, take your camera to a repair shop to have the sensor cleaned manually. For cameras that have removable lenses, you can find products designed to help you do this job yourself, but it's a delicate operation, and you can easily damage the sensor if you're not careful.
Recording proof of ownership
When you get a new camera, lens, or other expensive equipment, fill out and submit the warranty information requested by the manufacturer. Although this step isn’t technically required to obtain warranty service in most cases, it enables the manufacturer to alert you to any recalls or firmware updates. These days, you usually can send your information over the Internet, but some manufacturers still provide mail-in registration cards.Also take a couple of pictures of each piece of equipment, including close-ups of the product serial and model numbers (usually found on the bottom of cameras). Print those photos and keep them with your purchase receipt. That way, if your equipment is stolen and later recovered by law enforcement, you can prove that it belongs to you and not to one of the other 20 people who reported that they had the same type of gear lifted. Of course, this information is also helpful in getting an insurance claim paid in the event of fire, flood, or other damage that ruins in your equipment.
Use image recovery software to rescue lost photos
It happens to everyone sooner or later: You accidentally erase an important picture — or worse, an entire folder full of images. Don’t panic yet — you may be able to get those pictures back.The first step: Stop shooting. If you take another picture, you may not be able to rescue the deleted files. If you must keep shooting and you have another memory card, replace the one that has the accidental erasure with the other card. You can work with the problem card later.
When you're ready to try recovering your images, install a file-recovery program. You can find several good programs available online, and some memory cards even come with an image-recovery program on the card. (Be sure to install that card before you format it for first use in your camera.)For recovery programs to work, your computer must be able to access the camera’s memory card as if the card were a regular drive on the system. If your camera doesn’t show up as a drive when you connect it to the computer, you need to buy a card reader.
If you erased pictures on the computer, you may not need special software. In Windows, deleted files go to the Recycle Bin and stay there until you empty the Bin. Assuming that you haven’t taken that step, just use Windows Explorer to open the Bin, click an erased file, and then choose File → Restore to “unerase” the picture.
On a Mac, deleted files linger in the Trash folder until you choose the Empty Trash command. Until you do, you can open the Trash folder and move the deleted file to another folder on your hard drive. Already emptied the Recycle Bin or Trash? You also can buy programs to recover files that were dumped in the process. Again, head online to search for a recovery program designed for your computer's operating system.