
The steps involved in taking a picture in Live View mode with a Nikon D7000 are essentially the same as for viewfinder photography once you’ve chosen a focusing method. Here's the drill:
Turn the Mode dial (on top of the camera) to select an exposure mode.
Remember, the exposure mode determines what picture settings you can control.
Enable Live View by rotating the Live View switch to the right and releasing it.
Review and adjust picture settings.
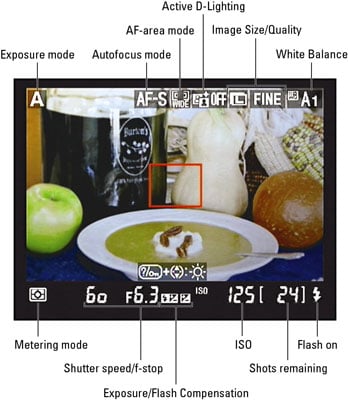
In Live View mode, the Information screen, which normally displays the critical picture settings, isn't available. But you can view most of the same settings on the Live View display. To view other displays, press the Info button. Note that some settings, such as Exposure Compensation and Flash Compensation, appear only when those features are enabled. If you enable automatic bracketing, you also see a BKT symbol near the f-stop setting.
Note that Exposure Compensation adjustments aren't always reflected by the monitor brightness. When you increase or decrease exposure using this feature, available only in the P, S, A, and M modes, the image on the monitor becomes brighter or darker only up to shifts of EV +/-3.0, even though you can select values as high as +5.0 and as low as -5.0.
If focusing manually, twist the focusing ring to set focus.
If using autofocusing, position the focus frame over the subject.
And if you're using Subject Tracking autofocus, press OK to initiate tracking.
In AF-S mode, press the shutter button halfway to initiate autofocusing.
Focus is locked when the focus frame turns green.
Regardless of the Autofocus mode, exposure metering begins when you adjust the shutter button halfway and is adjusted up to the time you take the picture.
Press the shutter button the rest of the way to take the picture.