
 Press the Zoom In button or pinch out on the touchscreen to magnify an image.
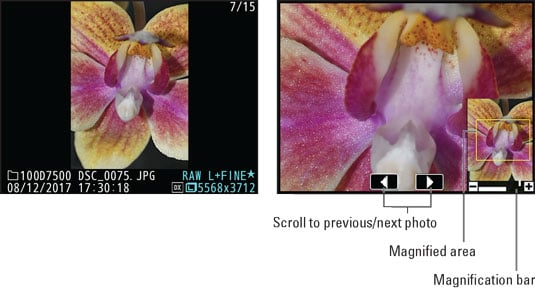
- Magnify the image. Pinch out on the touchscreen or press the Zoom In button. The bar at the bottom of the navigation window gives you an indication of the magnification level; the bar turns green when you reach 100 percent magnification.
- Reduce magnification. Pinch in or press the Zoom Out button.
- View another part of the magnified picture. When an image is magnified, a thumbnail showing the entire image appears briefly in the lower-right corner of the monitor (refer to the right side). The yellow outline in the thumbnail indicates the area that's consuming the rest of the monitor space. To scroll the display and view a different portion of the image, use the Multi Selector or just drag your finger across the screen.
After a few seconds, the navigation thumbnail disappears; tap the screen or press the Multi Selector in any direction to redisplay it.
• Inspect faces. When you magnify portraits, the picture-in-picture thumbnail displays a white border around each face. Rotate the Sub-command dial or tap a face in the thumbnail to scroll the display to show another face. Unfortunately, the camera sometimes fails to detect faces, especially if the subject isn't looking directly at the camera. When it works correctly, though, this is a pretty great tool for checking for closed eyes, red-eye, and, of course, spinach in the teeth.
- View more images at the same magnification. While the display is zoomed, tap the scroll arrows at the bottom of the screen (labeled on the right) or rotate the Main command dial to display the same area of the next photo at the same magnification.
- Crop the photo to the currently displayed area. This feature creates a new image that contains just the area visible in the magnified view. To try it out, press the i button and then choose Quick Crop from the i-button menu, as shown on the left. The camera creates your cropped copy, assigns it the next available filename, and displays it on the monitor, as shown on the right in the figure. The Retouch symbol, labeled in the figure, appears to remind you that you're not looking at an original image. The lower-right corner of the display also shows a scissors symbol, indicating that the photo was cropped. The resolution of the cropped copy appears as well.
Although handy, this feature limits you to cropping to the photo's original aspect ratio. For other options, check out the Trim function on the Retouch menu.
- Return to full-frame view. You don't need to keep pressing the Zoom Out button or pinching in until the entire photo is displayed. Instead, just press OK.
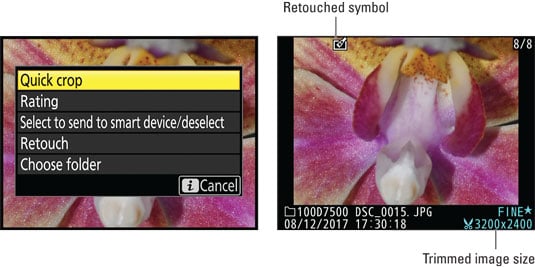 While a photo is magnified, choose Quick Crop from the i-button menu (left) to create a new image that contains only the area visible in the zoomed view (right).