
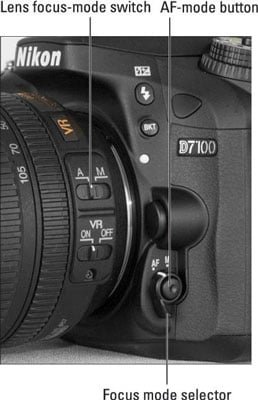
The AF-area mode setting tells the Nikon D7100 what part of the frame contains your subject so that it can set focusing distance correctly. To adjust the setting, press the AF-mode button to temporarily highlight the setting icon.
While holding the button, rotate the Sub-command dial to cycle through the available settings.
You can choose from the following settings, represented in the display by the icons shown:
Face Priority: Designed for portrait shooting, this mode attempts to hunt down and focus on faces. Face Detection typically works only when your subjects are facing the camera, however. If the camera can't detect a face, it behaves as if you selected the Wide Area mode.

Wide Area: In this mode, you use the Multi Selector to move a focusing frame around the screen to specify your desired focusing spot. It's the most intuitive of the options and the one you'll probably rely on most of the time unless you're shooting a portrait.

Normal Area: This mode works the same way as Wide Area autofocusing but uses a smaller focusing frame. The idea is to enable you to base focus on a very specific area. With such a small focusing frame, however, you can easily miss your focus target when handholding the camera.

If you move the camera slightly as you’re setting focus and the focusing frame shifts off your subject as a result, focus will be incorrect. For best results, use a tripod in this mode.
Subject Tracking: This mode, designed for focusing on a moving subject, tracks a subject as it moves through the frame. Subject Tracking isn't always as successful as you might hope, though. For a subject that occupies a small part of the frame — say, a butterfly flitting through a garden — autofocus may lose its way.

Ditto for subjects moving at a fast pace, subjects getting larger or smaller in the frame (when moving toward you and then away from you, for example), or scenes without much contrast between the subject and the background.
Oh, and scenes with a great deal of contrast can create problems, too. When the conditions are right, this feature works well, but otherwise, Wide Area gives you a better chance of focusing on a moving subject.
Follow these steps to set focus:
Choose the Autofocus mode (AF-S or AF-F).
Remember, this setting determines whether focus is locked at a specific distance or adjusted continuously as you or your subject move. Use AF-S if you want to lock focus and choose AF-F for continuous autofocusing.
Dial in the setting by pressing the AF-mode button while rotating the Main command dial.
In AF-F mode, the autofocus system perks up and starts hunting for a focus point immediately.
Choose the AF-area mode by pressing the AF mode button while rotating the Sub-command dial.
This setting determines what part of the frame the camera considers when establishing focus. Your choices are Face Priority, Wide Area, Normal Area, and Subject Tracking.
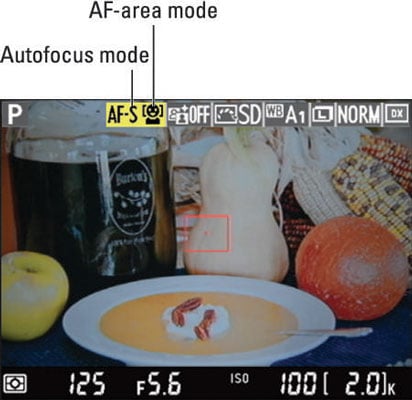
Locate the focus frame in the Live View display.
The appearance of the frame depends on the AF-area mode, as follows:
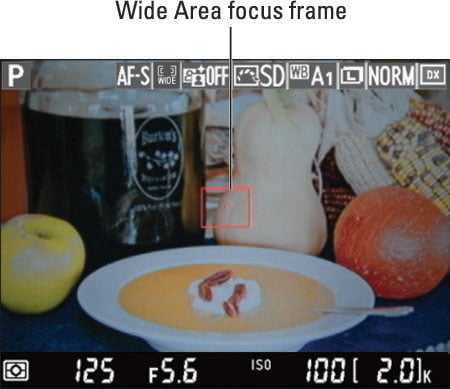
Wide Area and Normal Area: You see a red rectangular frame. (The figure shows the frame at the size it appears in Wide Area mode; it’s smaller in Normal Area mode.)
Face Priority: If the camera locates faces, you see a yellow focus frame around each one, as shown on the left. In a picture containing multiple faces, one frame has interior corner marks —see the girl on the right. Those marks indicate the face selected as the one to use to set focusing distance.
If you don’t see any yellow boxes but instead see the red frame, the camera can’t detect a face and will set focus as it would if you were using Wide Area mode.
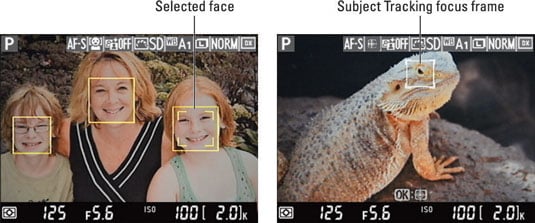
Subject Tracking: A white focusing frame appears.
In AF-F mode, the frame turns green when the object under the frame is in focus.
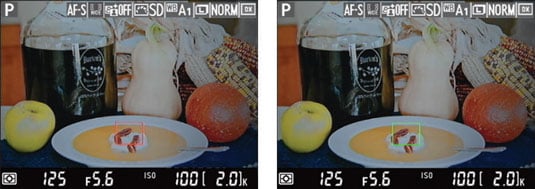
Use the Multi Selector to move the focusing frame over your subject.
For example, the focus frame is moved over the garnish on the soup bowl for, as shown on the left.
In Face Priority mode, you can use the Multi Selector to move the box with the corner marks —which indicates the final focusing point — from face to face in a group portrait. In Wide Area and Normal Area modes, press OK to move the focus point to the center of the frame.
In Subject Tracking AF-area mode, press OK to initiate focus tracking.
If your subject moves, the focus frame moves with it. To stop tracking, press OK again. (You may need to take this step if your subject leaves the frame — press OK to stop tracking, reframe, and then press OK to start tracking again.)
In AF-S autofocus mode, press and hold the shutter button halfway down to start autofocusing.
Wait for the focus frame to turn green.
What happens next depends on your Autofocus mode:
AF-S mode: Focus remains locked as long as you keep the shutter button pressed halfway.
AF-F mode: Focus is adjusted if the subject moves. The focus frame turns red (or yellow or white) if focus is lost; green signals that focus has been achieved again. You can lock focus by pressing the shutter button halfway. (In most cases, the camera will reset focus on your subject when you press the button even if the focus frame is already green.)
(Optional) Press the Qual button to magnify the display to double-check focus.

Each press gives you a closer look at the subject. A small thumbnail in the corner of the monitor appears, with the yellow highlight box indicating the area that’s currently being magnified. Press the Multi Selector to scroll the display if needed.
To zoom out, press the ISO button. If you’re not using Subject Tracking mode, you can also press OK to quickly return to normal magnification.
